Application Integration Case:
YOLOV8 Visual Recognition 1. Project Overview
As an indispensable execution unit in current social production, the robotic arm has been integrated into all kinds of our production and life. How to make the robotic arm perform tasks more intelligently is a continuous goal of improving production efficiency and production intelligence. This project adds "eyes" to the robotic arm to increase its perception information and endows it with the ability to recognize surrounding environmental information, so as to improve its execution intelligence and provide a basis for subsequent integration of robots to complete automated production tasks.
1.1 Project Background
Robots are mostly used as actuators in traditional applications. For example, a robotic arm operates workpieces in a fixed posture sequence on an assembly line, which requires its posture setting to be very precise and strict, and any deviation during the work process will disrupt the entire process and cause huge losses. In order to enable robots to operate target objects more intelligently, it is necessary to give robots vision. Traditional industrial cameras can provide information such as the outline color of objects to meet some factory production conditions, but because they cannot understand the semantic information of objects, they cannot leave the factory and provide smart services for daily life.
The emergence of deep learning has enabled robots to understand images. Based on various algorithms, advanced semantic information can be obtained from two-dimensional images to help robots understand the surrounding environment. YOLOV8 (You Only Look Once version 8) is a deep learning framework for real-time object detection. It is the latest iteration of the YOLO series, designed to provide greater accuracy and speed. Its characteristics are as follows:
- Real-time performance: YOLOV8 continues to maintain the real-time detection characteristics of the YOLO series, and can achieve high frame rates (FPS) even on lower hardware configurations.
- High accuracy: Through a deeper and more complex network structure and improved training techniques, YOLOV8 has greatly improved the accuracy of detection while maintaining high speed.
- Multi-scale prediction: YOLOV8 introduces improved multi-scale prediction technology that can better detect objects of different sizes.
- Adaptive anchor frame: The new version has been optimized in adaptively adjusting the anchor frame, which can more accurately predict the position and size of objects.
Empowering robots through YOLOV8 is a common practice in the current process of robot intelligence. As the most widely used robot operating system, Robot operating system (ROS) can disperse the real-time computing pressure brought by functions such as computer vision and speech recognition based on its peer-to-peer design and mechanisms such as service framework and node manager, and can adapt to the challenges encountered by multiple robots. The YOLOV8 visual function package made based on the above background is convenient for developers to obtain visual information in ROS.
1.2 Main Objectives
- Visual recognition function integration: Integrate the visual recognition algorithm with the execution function of the robotic arm to complete information exchange.
- Intelligent execution: Through visual recognition information, the robotic arm moves to a specified position and grabs a specified object.
1.3 Core Functions
- Visual recognition object information release: The object information obtained by the visual recognition algorithm is released through ROS topics, which is convenient for direct access by users.
- Multi-type trajectory execution: The robotic arm has a variety of trajectory planning algorithms, which can allow the robotic arm to reach the target point through different movement modes and protect the equipment from damage.
1.4 Technical Highlights
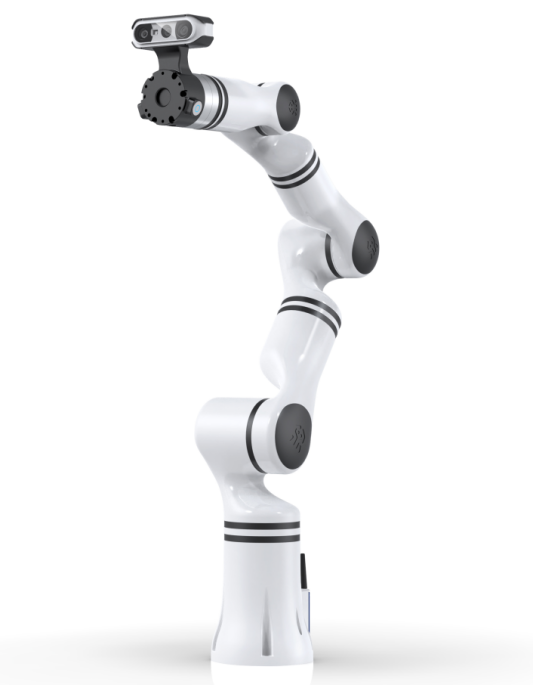
- High-performance robot arm: The RealMan RM65 robot arm provides a wide operating range and high-precision operation capabilities with its 6 degrees of freedom and 5kg payload capacity.
- ROS-based software architecture: Adopt the ROS noetic version to build a modular and extensive software system that supports secondary development and function expansion.
1.5 Application Prospects
The visual recognition grasping system can be quickly integrated into various robots to facilitate the functional requirements of designated scenarios such as unmanned supermarkets and smart agriculture.
1.6 Update Log
| Updated on | Updated content | Version No. |
|---|---|---|
| 2025/01/10 | YOLOV8 Visual Recognition Function Package Released | v1.0.0 |
2. Overview of Software and Hardware
2.1 Engineering Structure
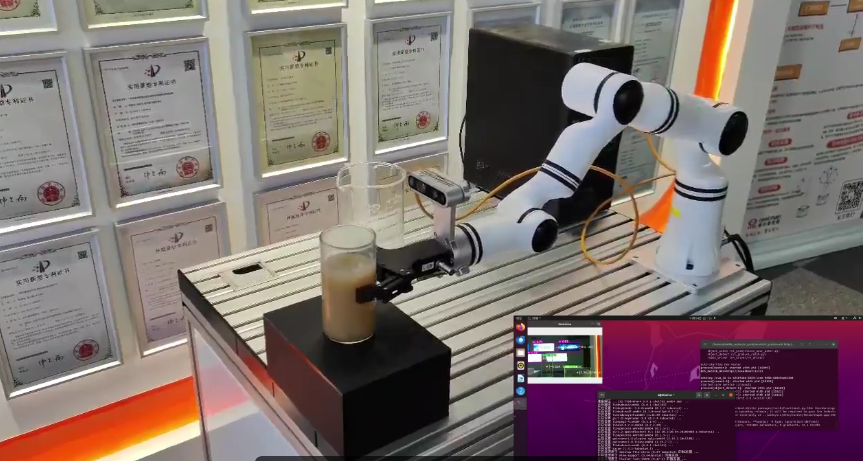
The YOLOV8 visual recognition function package is developed based on RM products. It uses YOLOV8 and D435 cameras to visually recognize objects, obtain the three-dimensional coordinates of the object, and finally let the RM robotic arm complete a grabbing action. To use this function package, you only need to add it to the function package of the original RM product. It can be used after compilation. A DEMO is provided for a single robotic arm to grab a water bottle and pour water.
Download path:YOLOV8 Visual Recognition
The directory structure of the relevant documents is as follows:
│  requirements.txt                             //Functional package dependency environment
│  YOLOV8 视觉识别功能包使用说明.md
│
├─pic
│      435测试画面.png
│      抓取.png
│      抓取流程.png
│      硬件连接.jpg
│      视觉臂.png
│
├─rm_robot                                      //Robotic arm ROS package
│
├─vi_grab                                       //Visual grabbing package
│  │  CMakeLists.txt
│  │  package.xml
│  │
│  ├─include
│  │  └─vi_grab
│  ├─launch
│  │      vi_grab_demo.launch                    //Visual grabbing demo launch file
│  │
│  ├─model
│  ├─scripts
│  │  │  LICENSE
│  │  │  pub.py
│  │  │  vision_grab.py                          //Visual grabbing execution file
│  │  │  vision_pour_water_modbus.py
│  │  │  vi_catch_yolov8.py                      //YOLOV8 visual detection ROS publishing node
│  │  │
│  │  └─.idea
│  │      │  .gitignore
│  │      │  .name
│  │      │  misc.xml
│  │      │  modules.xml
│  │      │  scripts.iml
│  │      │  vcs.xml
│  │      │  workspace.xml
│  │      │
│  │      └─inspectionProfiles
│  │              profiles_settings.xml
│  │              Project_Default.xml
│  │
│  └─src
└─vi_msgs
    │  CMakeLists.txt
    │  package.xml
    │
    ├─include
    │  └─vi_msgs
    ├─msg
    │      ObjectInfo.msg                           //YOLOV8 detected object topic message type
    │
    └─src
2.2 Hardware Configuration
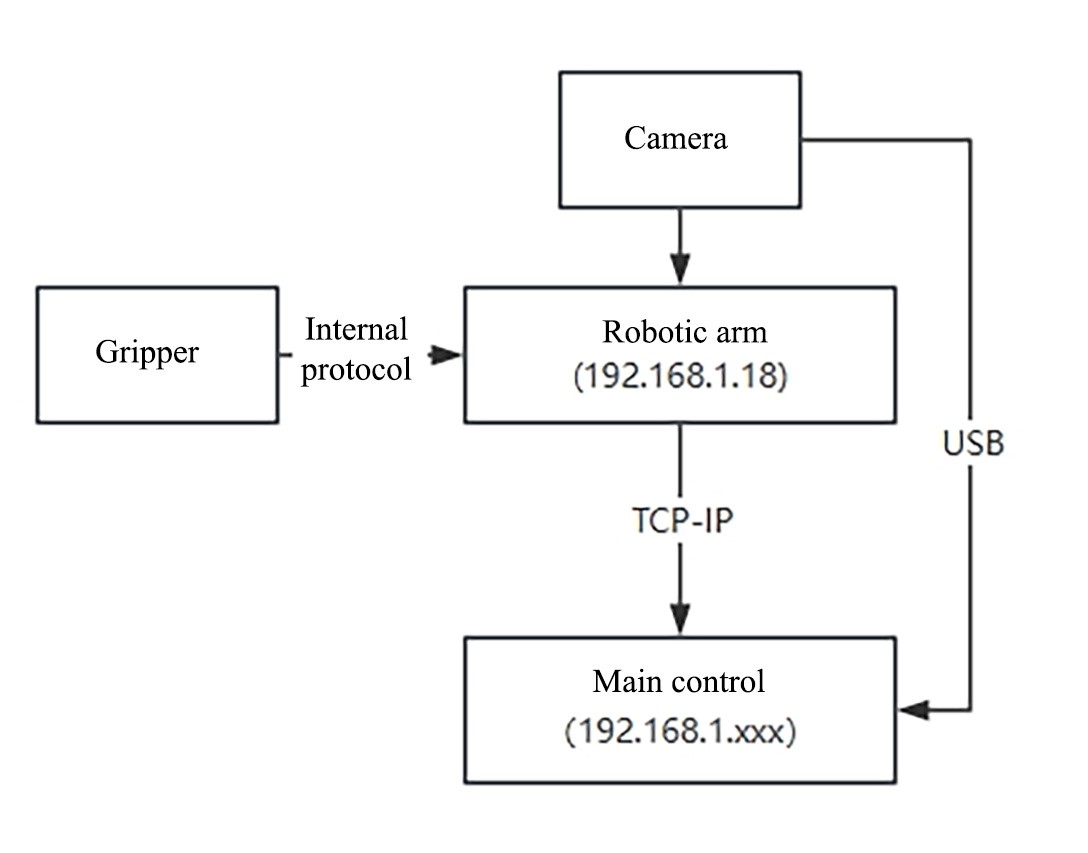
The hardware includes the RM65 series robotic arm, Intel Realsense D435 camera, and Yins Robotics EG2-4C2 two-finger electric gripper. The robotic arm can be either the RM65-B version with a visual adapter board or the RM65-B-V visual version (as shown in the figure below, with an internally routed and integrated D435 camera). The main controller can be a PC with an ARM or X86 architecture.
The robotic arm is connected to the main controller through a network cable, the camera is connected to the USB interface of the main control through a data cable, and the clamping jaws are connected to the end of the robotic arm by a special terminal interface line made by RM. The communication interface at the end of the RM robotic arm is a 6-pin connector, which provides power and control signals for different grippers and sensors connected to the robot. Therefore, different end effectors can be replaced, and you should refer to the RM robotic arm secondary development manual during integration.
3. Function Package Test Environment
3.1.ROS noetic Environment
Execute the following command to complete the ROS environment installation:
wget http://fishros.com/install -O fishros && . fishros3.2. Ubuntu20.04 System
The example of this package uses a Jetson Xavier NX with JatPack installed, along with Cuda.
3.3. YOLOV8 Dependency Requirements
YOLOV8 officially requires a Python version of 3.8 or higher. Therefore, after installing the basic environment, you need to set up a Python 3.8 environment (which can be a Conda virtual environment or the system's built-in Python 3.8 environment).
After setting up the Python3.8 environment, perform the following steps in this environment, open the terminal under Src, and install the Python third-party library according to requirements.txt.
pip3 install -r requirements.txtpip3 install ultralytics3.4. RealSense D435 Driver and pyrealsense2
Register the public key of the server.
bashsudo apt-get update && sudo apt-get upgrade && sudo apt-get dist-upgrade sudo apt-key adv --keyserver keyserver.ubuntu.com --recv-key F6E65AC044F831AC80A06380C8B3A55A6F3EFCDE || sudo apt-key adv --keyserver hkp://keyserver.ubuntu.com:80 --recv-key F6E65AC044F831AC80A06380C8B3A55A6F3EFCDEAdd the server to the repository list.
bashsudo add-apt-repository "deb https://librealsense.intel.com/Debian/apt-repo $(lsb_release -cs) main" -uInstall SDK2.
bashsudo apt-get install librealsense2-dkms sudo apt-get install librealsense2-utilsThis step may report an error on ARM architecture. If there is no error, you can directly proceed to the step of testing Realsense-viewer; if an error occurs, you can use the source code installation method—first download the source code and install the necessary libraries.
bashgit clone https://github.com/IntelRealSense/librealsense.git sudo apt-get install libusb-1.0-0-dev libglfw3-dev libgtk-3-devThen go to the directory and run the following commands to install and compile dependencies:
bashsudo apt-get install libudev-dev pkg-config libgtk-3-dev sudo apt-get install libusb-1.0-0-dev pkg-config sudo apt-get install libglfw3-dev sudo apt-get install libssl-dev sudo cp config/99-realsense-libusb.rules /etc/udev/rules.d/ sudo udevadm control --reload-rules && udevadm trigger mkdir build cd build cmake ../ -DBUILD_EXAMPLES=true make sudo make installTest installation results.
bashrealsense-viewer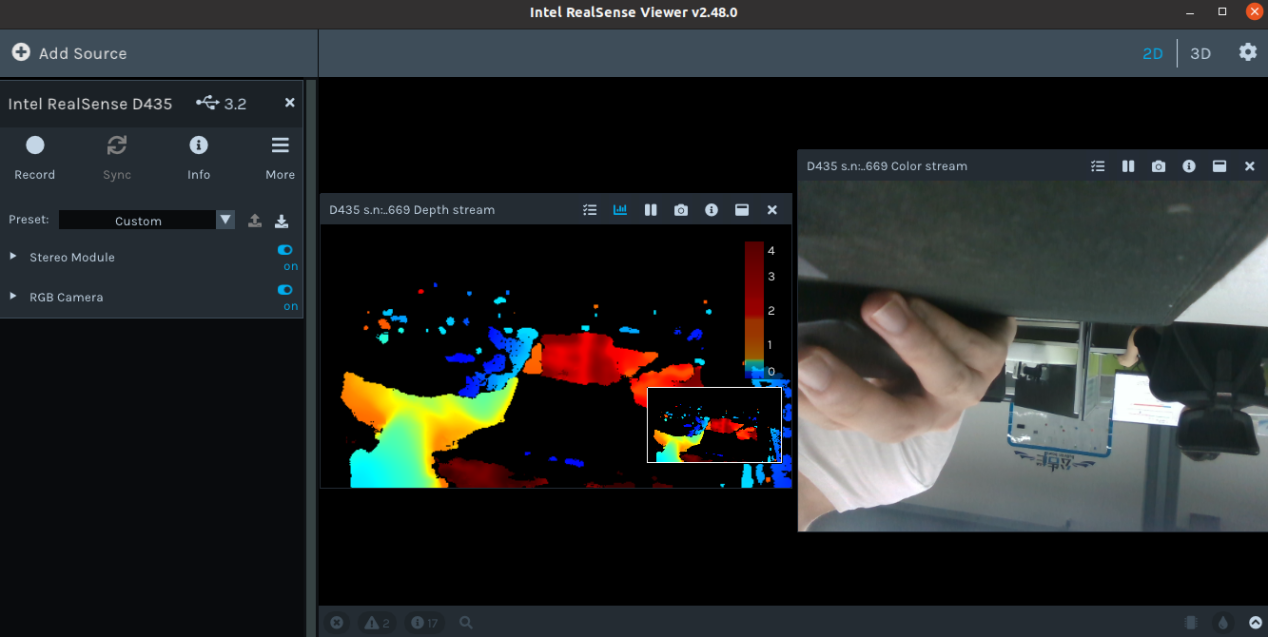
Install pyrealsense2.
bashpython -m pip install --upgrade pip pip install pyrealsense2 -i https://pypi.tuna.tsinghua.edu.cn/simple/
4. Test Steps
First, confirm whether the robotic arm's ROS package can be used normally. Since there is a corresponding relationship between the ROS package and the robotic arm's version, you can check the specific version correspondence in the Version Description . If there is a problem with the ROS package, please download the latest ROS package from the official website to replace rm_robot in the src directory.
bashsudo apt-get update # Update the online package list sudo apt-get install python-catkin-tools # Install catkinbashmkdir -p rm_work # Create a package cd rm_work # Enter the workspace directoryUnzip the downloaded src and put it in the rm_work directory.
Compile vi_msgs, rm_msgs.
bashcatkin build vi_msgs rm_msgsThe object information defined by ObjectInfo under vi_msgs is as follows:
bashstring object_class //Object category float64 x //X-axis value of the object's distance from the camera coordinate system float64 y //Y-axis value of the object's distance from the camera coordinate system float64 z //Z-axis value of the object's distance from the camera coordinate systemThe function package is compiled as a whole.
bashcatkin buildRun vi_grab_demo.launch.
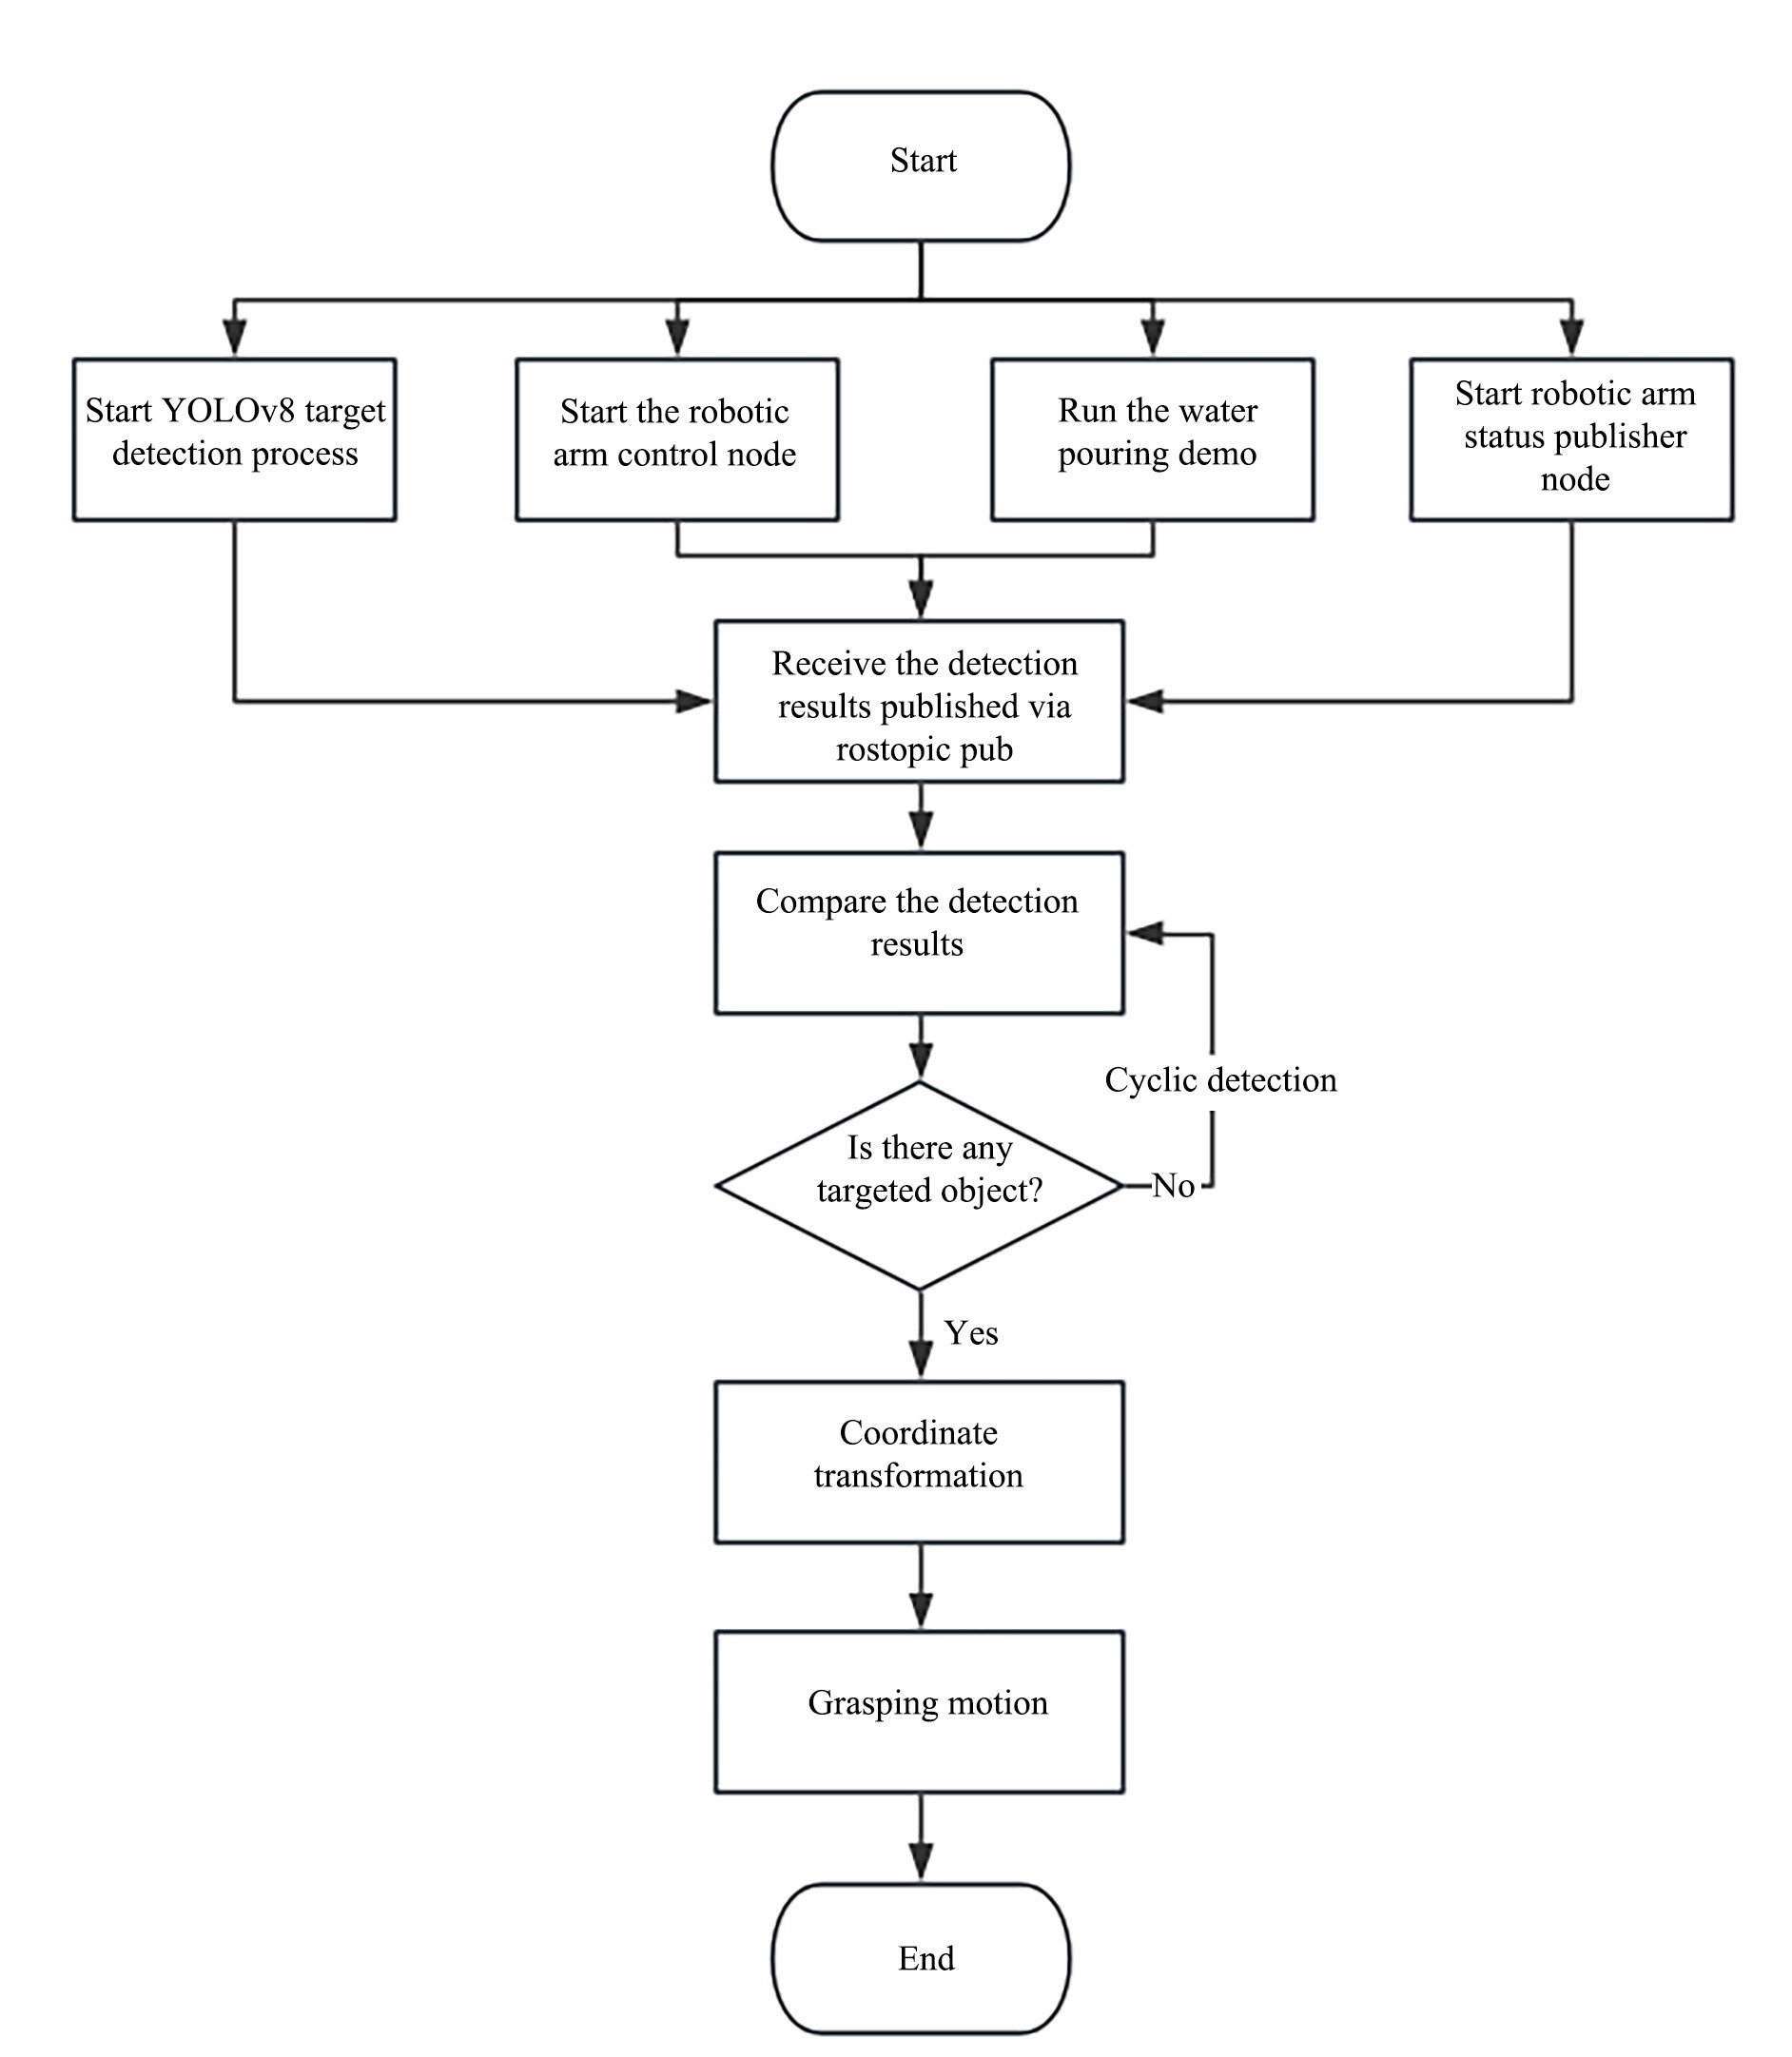
A total of four nodes are started in vi_grab_demo.launch, namely msg_pub (actively obtain the robot arm status), robot_driver (robot arm function start), object_detect (visual recognition information release), and object_catch (capture task script).
bash# Declare environment variables source devel/setup.bash # Run the launch file roslaunch vi_grab vi_grab_demo.launchPublish the objects to be grabbed.
Before publishing the object information, you need to manually teach the robotic arm to the initial position. This is because the grasping logic involves recognizing the object based on the current state of the robotic arm and grasping the object according to the current end posture — that is, it is necessary to keep the end posture as horizontal as possible.
Open the terminal and publish the name of the object you want to grab through rostopic pub in the terminal (using coco model), for example, grabbing a water bottle is
bashrostopic pub /choice_object std_msgs/String "bottle"the robotic arm receives the information that it needs to grab an object and starts executing the motion logic in the vision_grab.py file. The following is a logic flow chart.
5. Key Code Analysis
The visual function package is a ROS node established to publish the visual recognition results of YOLOV8. Users can perform various secondary developments based on this node by simply placing the function package into the original workspace. In RM products, we convert object information into the coordinate system of the RM robotic arm by subscribing to object information topics to complete functions such as visual grabbing.
5.1 Visual Recognition and Information Release
model_path = os.path.join('model', 'yolov8n.pt')
model = YOLO('model_path')  #By loading different models, different modes of yolov8 can be used. For example, yolov8n-pose.pt is the human pose recognition mode, and yolov8n.pt is the ordinary detection box mode.
rospy.init_node("object_detect",anonymous=True)   #Establish a ROS node
object_pub = rospy.Publisher("object_pose",ObjectInfo,queue_size=10)   #Define a topic publisher
# Cyclically detect the image stream
try:
    while True:
        # Wait to obtain a pair of consecutive frames: depth and color
        intr, depth_intrin, color_image, depth_image, aligned_depth_frame = get_aligned_images()
        if not depth_image.any() or not color_image.any():
            continue
        # Perform target detection using YOLOv8
        results = model.predict(color_image, conf=0.5)
        detected_boxes = results[0].boxes.xyxy  # Get bounding box coordinates
        data = results[0].boxes.data.cpu().tolist()
        canvas = results[0].plot()

        for i, (row, box) in enumerate(zip(data, detected_boxes)):
            id = int(row[5])
            name = results[0].names[id]
            x1, y1, x2, y2 = map(int, box)  # Get bounding box coordinates
            # Display the center point coordinates
            ux = int((x1 + x2) / 2)
            uy = int((y1 + y2) / 2)
            dis, camera_coordinate = get_3d_camera_coordinate([ux, uy], aligned_depth_frame, depth_intrin) #Obtain the depth value of the center point as the distance

            formatted_camera_coordinate = f"({camera_coordinate[0]:.2f}, {camera_coordinate[1]:.2f},{camera_coordinate[2]:.2f})"
            # Display the detection interface
            cv2.circle(canvas, (ux, uy), 4, (255, 255, 255), 5)
            cv2.putText(canvas, str(formatted_camera_coordinate), (ux + 20, uy + 10), 0, 1,
                        [225, 255, 255], thickness=2, lineType=cv2.LINE_AA)
            # ROS topic sends object coordinates
            object_info_msg.object_class = str(name)
            object_info_msg.x = float(camera_coordinate[0])
            object_info_msg.y = float(camera_coordinate[1])
            object_info_msg.z = float(camera_coordinate[2])
            rospy.loginfo(object_info_msg)
            object_pub.publish(object_info_msg)

        cv2.namedWindow('detection', flags=cv2.WINDOW_NORMAL |
                                               cv2.WINDOW_KEEPRATIO | cv2.WINDOW_GUI_EXPANDED)
        cv2.imshow('detection', canvas)
        key = cv2.waitKey(1)
        # Press esc or 'q' to exit the program and image interface
        if key & 0xFF == ord('q') or key == 27:
            cv2.destroyAllWindows()
            break
finally:
    # Turn off the camera image stream
    pipeline.stop()
5.2 Coordinate Transformation
The coordinate function of the object's three-dimensional coordinates in the camera coordinate system is converted to the robot arm base coordinate system:
def convert(x,y,z,x1,y1,z1,rx,ry,rz):
    """
    Function: We need to convert the rotation vector and translation vector into a homogeneous transformation matrix, then use the object coordinates (x, y, z) recognized by the depth camera and the pose (x1, y1, z1, rx, ry, rz) of the robotic arm end effector to calculate the pose (x, y, z, rx, ry, rz) of the object relative to the robotic arm base.
    Input parameters: Object coordinates (x, y, z) recognized by the depth camera and pose (x1, y1, z1, rx, ry, rz) of the robotic arm end effector.
    Return value: Position (x, y, z) of the object in the robotic arm base coordinate system.
    """
    global rotation_matrix,translation_vector
    obj_camera_coordinates = np.array([x, y, z])

    # Pose of the robotic arm end effector, in radians.
    end_effector_pose = np.array([x1, y1, z1,
                                  rx, ry, rz])
    # Convert the rotation matrix and translation vector into a homogeneous transformation matrix.
    T_camera_to_end_effector = np.eye(4)
    T_camera_to_end_effector[:3, :3] = rotation_matrix
    T_camera_to_end_effector[:3, 3] = translation_vector
    # Convert the pose of the robotic arm end effector into a homogeneous transformation matrix.
    position = end_effector_pose[:3]
    orientation = R.from_euler('xyz', end_effector_pose[3:], degrees=False).as_matrix()
    T_base_to_end_effector = np.eye(4)
    T_base_to_end_effector[:3, :3] = orientation
    T_base_to_end_effector[:3, 3] = position
    # Calculate the pose of the object relative to the robotic arm base.
    obj_camera_coordinates_homo = np.append(obj_camera_coordinates, [1])  # Convert the object coordinates into homogeneous coordinates.
    #obj_end_effector_coordinates_homo = np.linalg.inv(T_camera_to_end_effector).dot(obj_camera_coordinates_homo)
    obj_end_effector_coordinates_homo = T_camera_to_end_effector.dot(obj_camera_coordinates_homo)
    obj_base_coordinates_homo = T_base_to_end_effector.dot(obj_end_effector_coordinates_homo)
    obj_base_coordinates = obj_base_coordinates_homo[:3]  # Extract the x, y, z coordinates of the object from the homogeneous coordinates.
    # Calculate the rotation of the object.
    obj_orientation_matrix = T_base_to_end_effector[:3, :3].dot(rotation_matrix)
    obj_orientation_euler = R.from_matrix(obj_orientation_matrix).as_euler('xyz', degrees=False)
    # Combine the results.
    obj_base_pose = np.hstack((obj_base_coordinates, obj_orientation_euler))
    obj_base_pose[3:] = rx,ry,rz
    return obj_base_pose
Wait for the choice_object topic information. If no information is published to the choice_object topic, it will wait continuously.
object_msg = rospy.wait_for_message('/choice_object', String, timeout=None)5.3 Callback Function
Upon receiving the specified object-grasping signal, it enters the callback function. If the specified object is matched, it proceeds to the catch grasping logic.
def object_pose_callback(data):
    """
    Function: Callback function after each frame of image is recognized. If there is a grabbing command, it will judge whether there is a target object in the current frame. If yes, it will convert the object coordinates and make the robotic arm perform the grabbing action.
    Input parameters: None
    Return value: None
    """

    # Judge whether there is a target object in the recognition result of the current frame.
    if data.object_class == object_msg.data and len(object_msg.data) > 0 :

        # Wait for the current pose of the robotic arm.
        arm_pose_msg = rospy.wait_for_message("/rm_driver/Arm_Current_State", Arm_Current_State, timeout=None)
        print(arm_pose_msg)
        rospy.sleep(1)
        # Wait to receive the quaternion form of the current robotic arm pose.
        arm_orientation_msg = rospy.wait_for_message("/rm_driver/ArmCurrentState", ArmState, timeout=None)
        print(arm_orientation_msg)
        # Calculate the object coordinates in the robotic arm base coordinate system.
        result = convert(data.x,data.y,data.z,arm_pose_msg.Pose[0],arm_pose_msg.Pose[1],arm_pose_msg.Pose[2],arm_pose_msg.Pose[3],arm_pose_msg.Pose[4],arm_pose_msg.Pose[5])
        print(data.object_class,':',result)
        # Grab the object.
        catch(result,arm_orientation_msg)
        # Clear the information of object_msg, so that the grabbing object information can be executed again when published for the second time.
        object_msg.data = ''
5.4 Grabbing Logic
In the grabbing logic, it is necessary to segment the robotic arm's execution trajectory according to the target position. For example, the first segment should involve the robotic arm reaching in front of the object first, and the second segment is to perform the grasping. This can avoid trajectory collision with the object. In the code, the first movejp_type reaches 7 cm in front of the object (assuming the object is in the negative X-axis direction of the robotic arm's base coordinate system).
def catch(result,arm_orientation_msg):
    '''
    Function: The robotic arm performs the grabbing action
    Input parameters: 'result' obtained through the conversion of the convert function and the current quaternion pose 'arm_orientation_msg' of the robotic arm
    Return value: None
    '''
    # In the previous step, we moved to a good recognition posture through pic_joint, and then started the grabbing process
    # Step 1 of the process: After conversion by convert, the object position coordinates (result) in the robotic arm coordinate system are obtained. Move to the vicinity of the result target through movej_p, as it cannot reach the target directly at once
    movejp_type([result[0]-0.07,result[1],result[2],arm_orientation_msg.Pose.orientation.x,arm_orientation_msg.Pose.orientation.y,
                 arm_orientation_msg.Pose.orientation.z,arm_orientation_msg.Pose.orientation.w],0.3)
    print('*************************catching  step1*************************')

    # Step 2 of grabbing: After reaching the front of the object in Step 1 of grabbing, use the movel movement mode to make the robotic arm move linearly to the object coordinates
    movel_type([result[0],result[1],result[2],arm_orientation_msg.Pose.orientation.x,arm_orientation_msg.Pose.orientation.y,
                 arm_orientation_msg.Pose.orientation.z,arm_orientation_msg.Pose.orientation.w],0.3)
    print('*************************catching  step2*************************')

    # Step 3 of grabbing: Reach the target and close the gripper
    gripper_close()
    print('*************************catching  step3*************************')

    # Step 1 of pouring water: Lift the object by 5 cm
    movel_type([result[0],result[1],result[2]+0.05,arm_orientation_msg.Pose.orientation.x,arm_orientation_msg.Pose.orientation.y,
                 arm_orientation_msg.Pose.orientation.z,arm_orientation_msg.Pose.orientation.w],0.3)
    print('*************************pour  step1*************************')

    # Step 2 of pouring water: Rotate the end joint of the robotic arm. Achieve the pouring action example by adding a rotation angle to the end joint of the robotic arm
    movej_type([arm_orientation_msg.joint[0],arm_orientation_msg.joint[1],arm_orientation_msg.joint[2],arm_orientation_msg.joint[3],
                arm_orientation_msg.joint[4],arm_orientation_msg.joint[5]+1],0.3)
    print('*************************pour  step2*************************')
6. Update Steps
The entire project is divided into two parts: one is the robotic arm ROS part, and the other is the visual detection part. The overall logic of the project is that the visual detection part references the robotic arm ROS part to control the robotic arm to complete a series of vision-based movements. Since there is a corresponding relationship between the software version of the robotic arm body and the ROS package version, when the hardware version of the robotic arm is updated, the ROS package may not be used normally. At this time, the ROS package in the project needs to be updated.
The update steps are:
- Download the latest ROS package for robotic arms from the official website
- Replace the rm_robot folder in the project
- Recompile rm_robot
- Change the robot control topic in the vision_grab script to be consistent with the latest robot ROS package
- Running test
Common Issues
1. Network Communication Issues
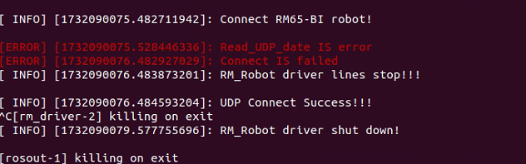
This error will result in the inability to read the current status information of the robot arm through the topic, so it cannot be ignored. The network settings should be modified.
For example, when using this demo on a virtual machine with the NAT connection mode, there may be an issue where UDP data fails to be reported. When the virtual machine uses nat mode, since the virtual machine and the host are connected through address translation, the host maintains an address translation table. Therefore, the virtual machine can access the external network through the host, but the external network needs to use the address translation table to locate the virtual machine. However, the address translation table is dynamic and updates periodically, as it needs to release some port occupations. Therefore, if the waiting time is too long, the address translation table will have been updated by then, making it impossible for udp packets to be sent to the correct address. This results in the client being unable to receive udp data normally.
Therefore, when using a virtual machine, you need to set the network mode to bridge mode to receive UDP data.
2. Grab the Issue
If inaccurate grasping is encountered during actual use, the cause can be determined from two aspects: one is whether the hand-eye calibration result is correct, and the other is whether the object coordinates are accurate. For example, due to issues with the model or lighting during recognition, the recognized coordinates may be 0, 0, 0. In such cases, the position reached by the robotic arm after calculation will definitely be incorrect. Therefore, it is necessary to ensure that object recognition achieves good results under the initial posture.