Application Integration Case Study:
Warehouse Handling Robot I. Project Overview
1.1 Project Introduction
The embodied dual-arm robot warehouse handling system is an automation solution designed specifically for exhibition demonstrations, showcasing the coordinated operation capabilities of dual-arm robots in warehousing and logistics scenarios. The system realizes the automatic grasping, transportation and placement functions of material boxes through visual recognition, precise positioning and dual-arm collaborative control, reflecting the application potential of modern industrial robots in the field of intelligent manufacturing.
TIP
After the current Demo configuration is completed, if you need to switch to a different scenario, you only need to reconfigure the chassis.

1.2 Core Functions
- Dual-arm collaborative operation: Both arms can complete material handling tasks independently or in collaboration.
- Visual identification system:
- Material Tray Positioning using Aruco Markers.
- Multi-camera (left arm, right arm, head camera) target recognition.
- Autonomous navigation:
- SLAM mapping and navigation based on Woosh chassis.
- Precise point-to-point arrival control.
- Intelligent charging: autonomous low-battery charging.
- Multi-mode control: supports automatic mode and manual debugging mode.
1.3 Application Scenarios
This demo is particularly suitable for the following scenarios:
- Technical demonstration at industrial exhibitions;
- Warehousing and logistics automation showcase;
- Intelligent manufacturing teaching demonstration;
- Research on robot collaborative operation.
1.4 Project Results
- Complete software and hardware integration solution;
- Detailed exhibition process and technical documents;
- Reusable ROS package;
- Stable demonstration system (supporting 24-hour continuous operation);
- Automatic Startup Configuration Solution on Boot.
The project demonstrates the coordinated control ability of dual-arm robots in complex tasks, providing a practical technical reference for industrial automation applications. The system boasts for its practicality and reliability, especially suitable for exhibitions that require long-term stable operation.
1.5 Update Log
| Update date | Update content | Version No. |
|---|---|---|
| 2025/4/25 | Demo initial version of warehouse handling robot released | v1.0.0 |
II. Exhibition Setup Environment Preparation
The exhibition setup environment covers an area of approximately4*4 m² , of which the shelves occupy about 0.5*1.5 m², the tables occupy about 0.6*1.2 m², and the robot body occupies about 0.4*0.7 m².
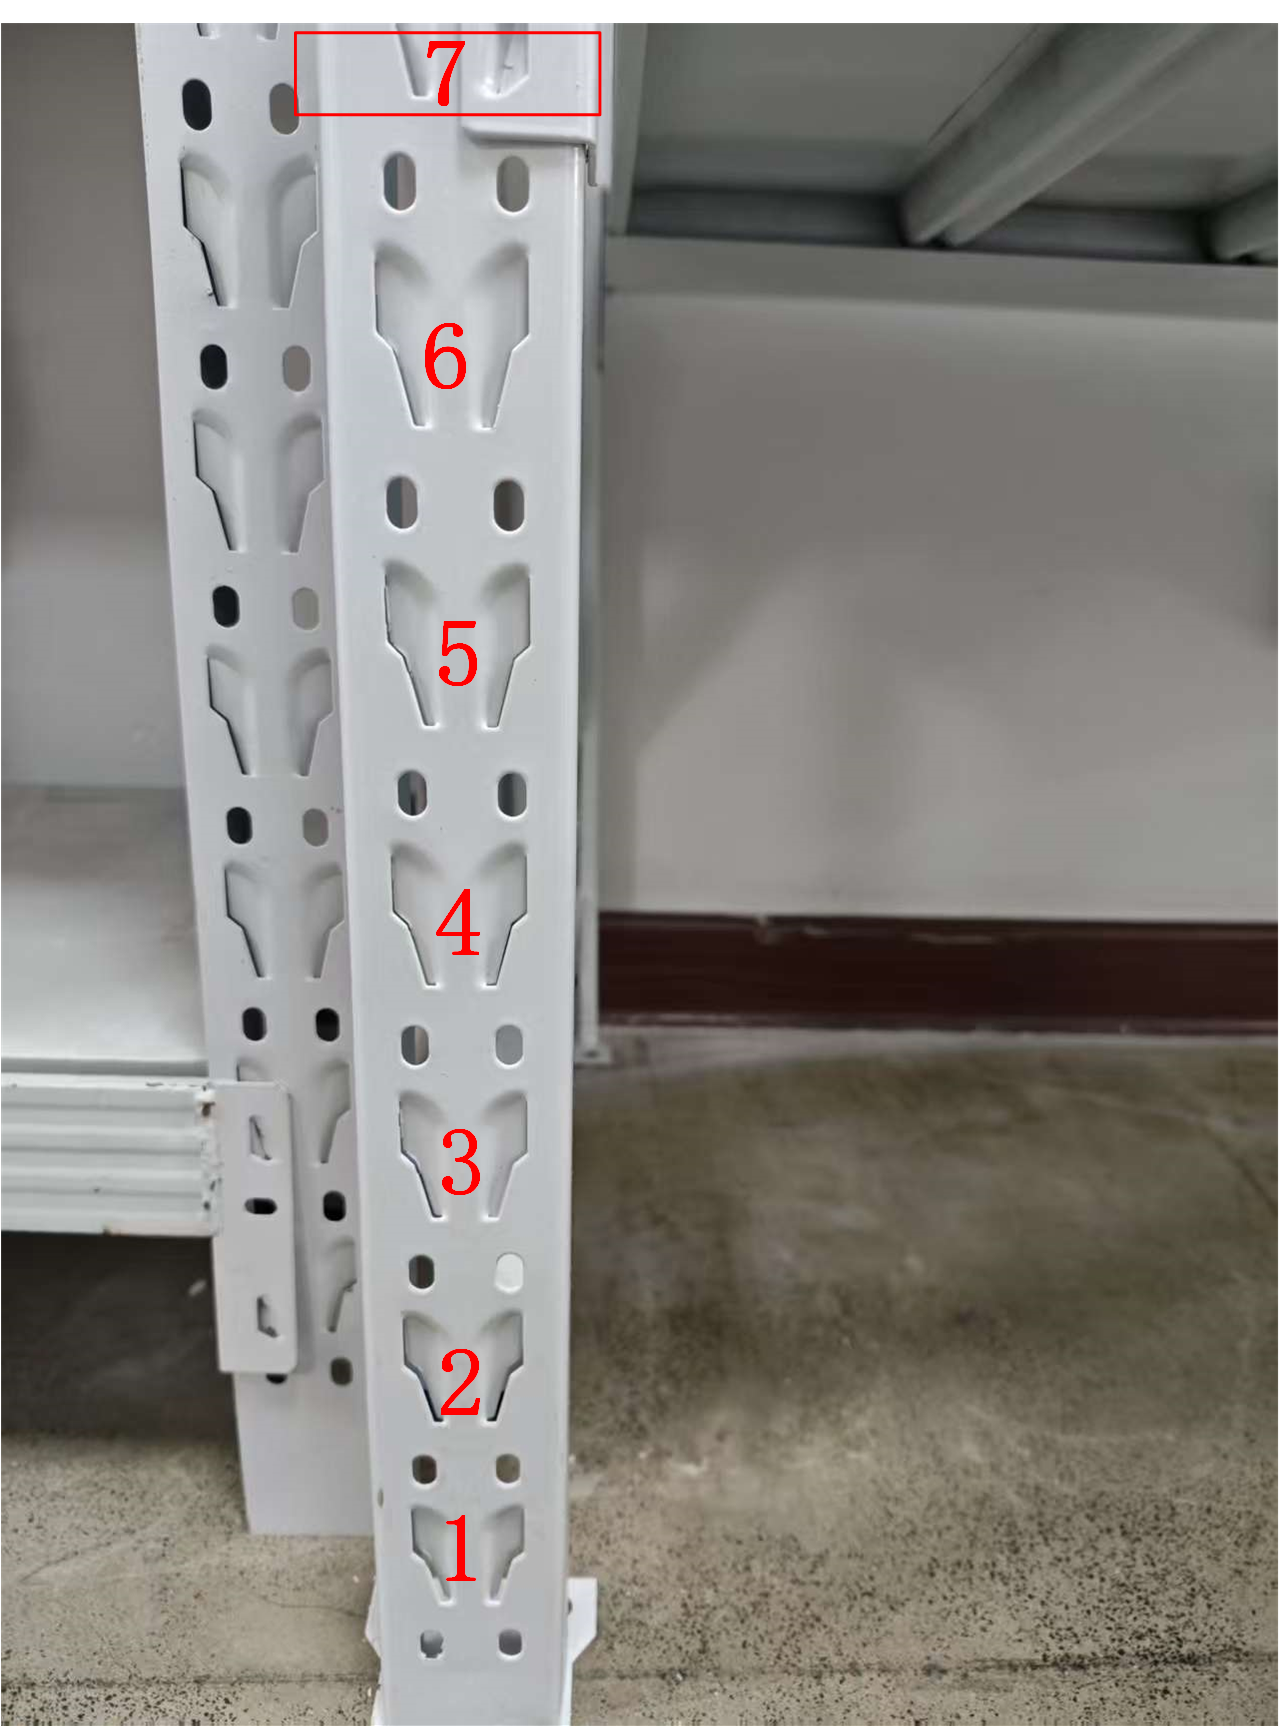
The shelves are divided into 4 layers, which are to be positioned according to slot locations from top to bottom as follows:
Number of floors Bayonet position Corresponding lift height (m) 1 7 0.095 2 15 0.575 3 23 1.05 4 31 ∞ Lift Height for Goods Pick-up:
Parameter Status Corresponding lift height lift_send When the robot transports materials 0.645 lift_send When the robot transports materials 0.305 TIP
It is necessary to locate according to the lower part of the buckle on the middle layer plate (the 3rd and 4th layers of shelves cannot be reached due to the height limit of the current lift).
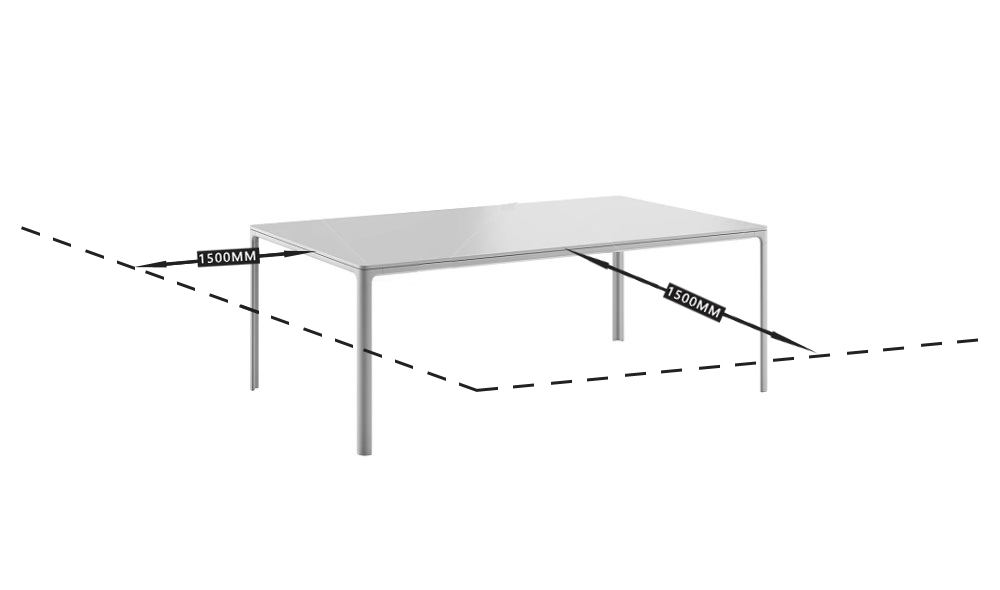
When placing the table, ensure that there is at least a 1.5m expansion range around it to ensure that the robot has enough space to plan the point of grabbing materials.
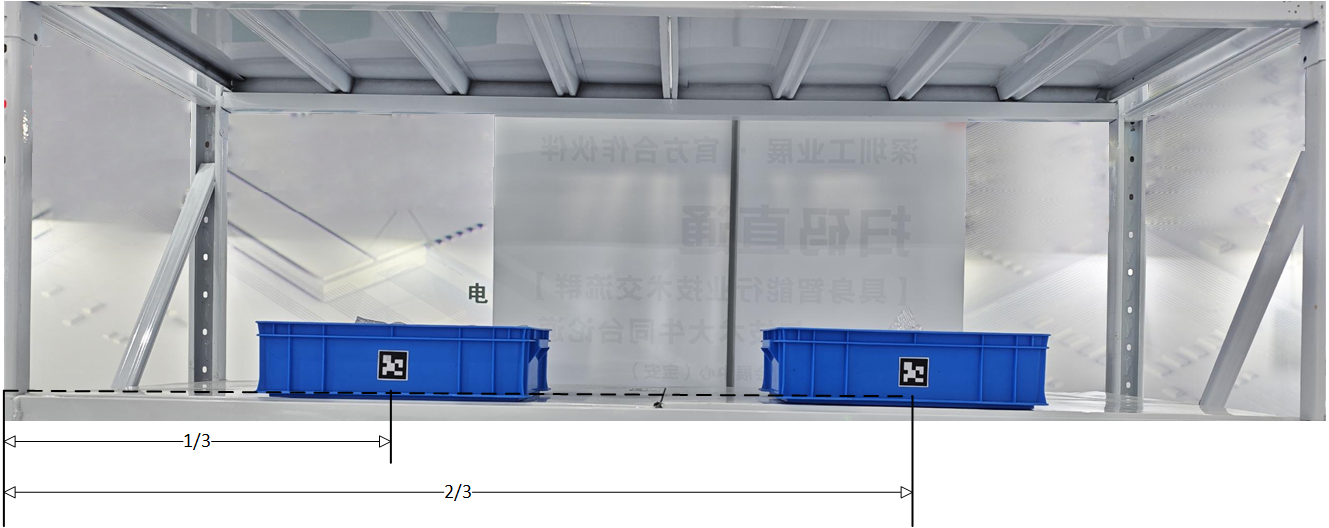
The material frame should be placed in the middle of each layer of boards on the shelf and the Aruco marker should face outward. Meanwhile the material box should be placed at the edge of the shelf as much as possible to ensure that the robotic arm has enough working space. In addition, the Aruco marker should be affixed to the middle of the material box. For the Aruco marker, please visit the resource download to download
物料框的Aruco码.docfile and print it.
The material box should be placed at 1/3 and 2/3 of each layer to avoid the robot arm from colliding with both sides of the shelf during planning.
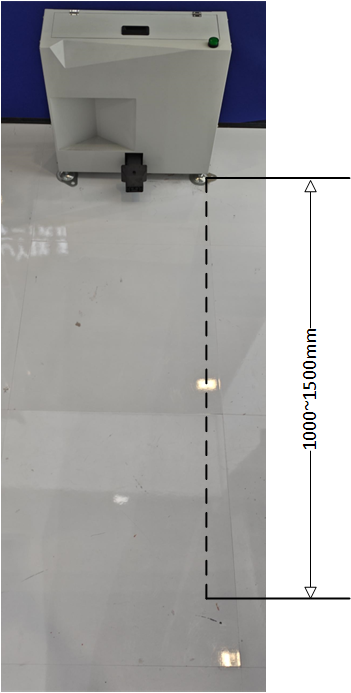
When placing the charging pile, ensure that there are no obstacles within at least 2 to 3 meters in front of it. The location of the charging point is 1 to 1.5 meters in front of the charging pile. A space of 2 to 3 meters will facilitate the stable execution of the robot's charging docking process.
III. Hardware Environment Description
3.1 Device Hardware Structure

3.2 Hardware Wiring Instructions
TIP
Since user host 2 and chassis main control are directly connected to the same WIFI through their WIFI network interface cards, user host 2 cannot access the robot's mechanical arm through 2.
3.3 Hardware Configuration Description
3.3.1 Robotic Arm Configuration
For operations related to the robotic arm, please refer to Teaching User Guide for operation configuration.
IP configuration of left and right arms
According to the factory settings of robotic arm, the default IP address of robotic arm is
192.168.1.18. Since the LAN IP requires169.254.128.xxxnetwork segment, the left arm and the right arm can be set asL_IP:169.254.128.18andR_IP:169.254.128.19respectively. The IP configuration process for entering the teach pendant is:System configuration=>Communication configuration=>IP Mode Setting=>IP:L_IP/R_IP, and finally set the gateway169.254.128.1and mask255.255.255.0and click Settings.
Zero-position configuration of both arms
When both arms are at their zero position, ensure that the end camera of the robotic arm is facing upward, the end gripper is parallel to the camera, and the tool mount forms a 90-degree angle with the camera. The specific effect is illustrated in the diagram below:
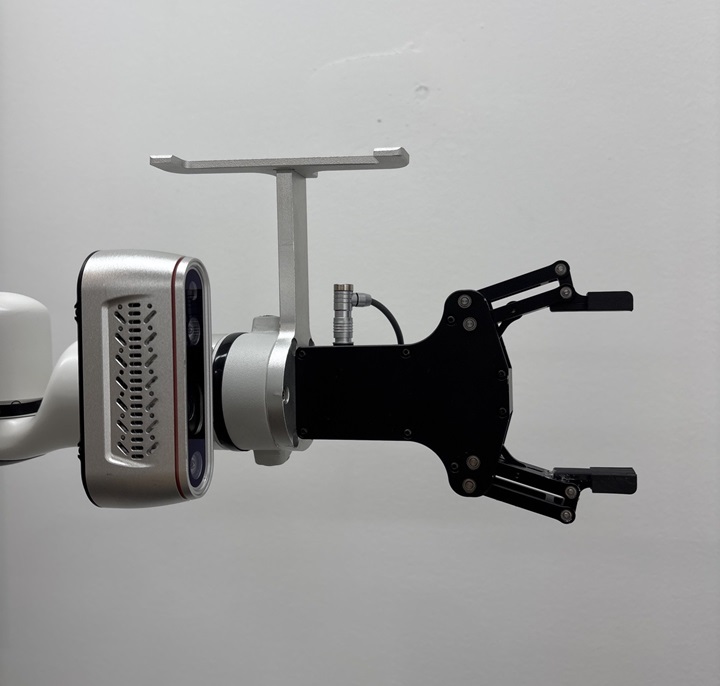
Physical Diagram of the End Effector of the Right Robotic Arm Physical Diagram of the End Effector of the Left Robotic Arm Left and right arm tool coordinate system settings
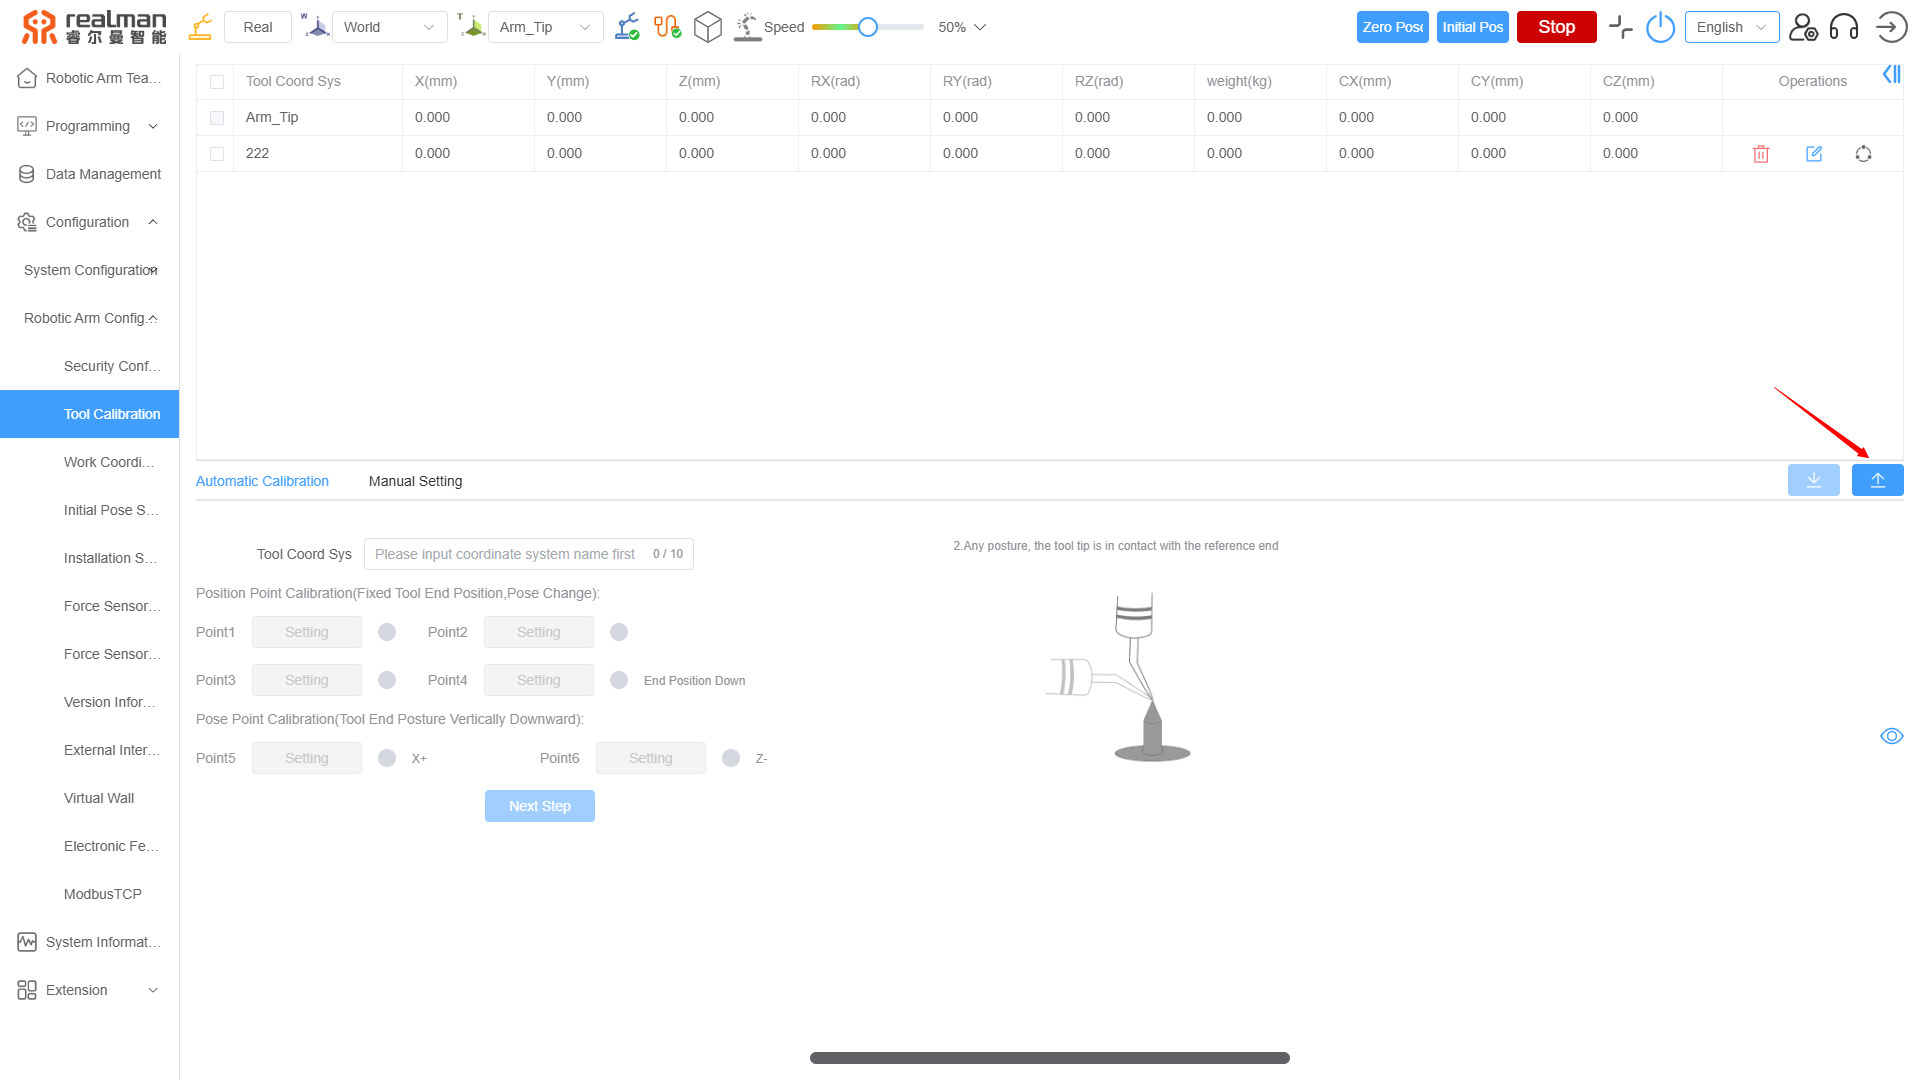
In order to suit the requirements of the demonstration, the following individual tool coordinate systems must be established: the Robotic Arm End Flange Tool Frame (
tip_*), the Robotic Arm Gripper Tool Frame (grip_*), and the Robotic Arm Holder Tool Frame (nip_*). The configuration process is to upload the "Left-Arm Tool Frame Parameter Script.txt" and "Right-Arm Tool Frame Parameter Script.txt" through the teach pendant:Robotic arm configuration=>Tool Calibration=>Import Coordinate System File (the highlighted blue button in the middle on the right side).Among them, please visit Resource download to download the "Left-Arm Tool Frame Parameter Script.txt" and "Right-Arm Tool Frame Parameter Script.txt".
Expanded joint configuration
Before the Demo is started, it must be ensured that the robot's expansion joints (end control and lift control) have been successfully connected and enabled. Among them, the lift control section must ensure that the reduction ratio coefficient is 0.0066, the minimum position is -10mm, and the maximum position is 820mm. The terminal control part needs to maintain a 24V operating voltage and establish a successful connection.
3.3.2 Chassis Configuration
Note: When the robot switches to different scenarios, it is necessary to reconfigure the chassis.
Open the software

Connect the robot (make sure that the WIFI of the robot is turned on and connected)
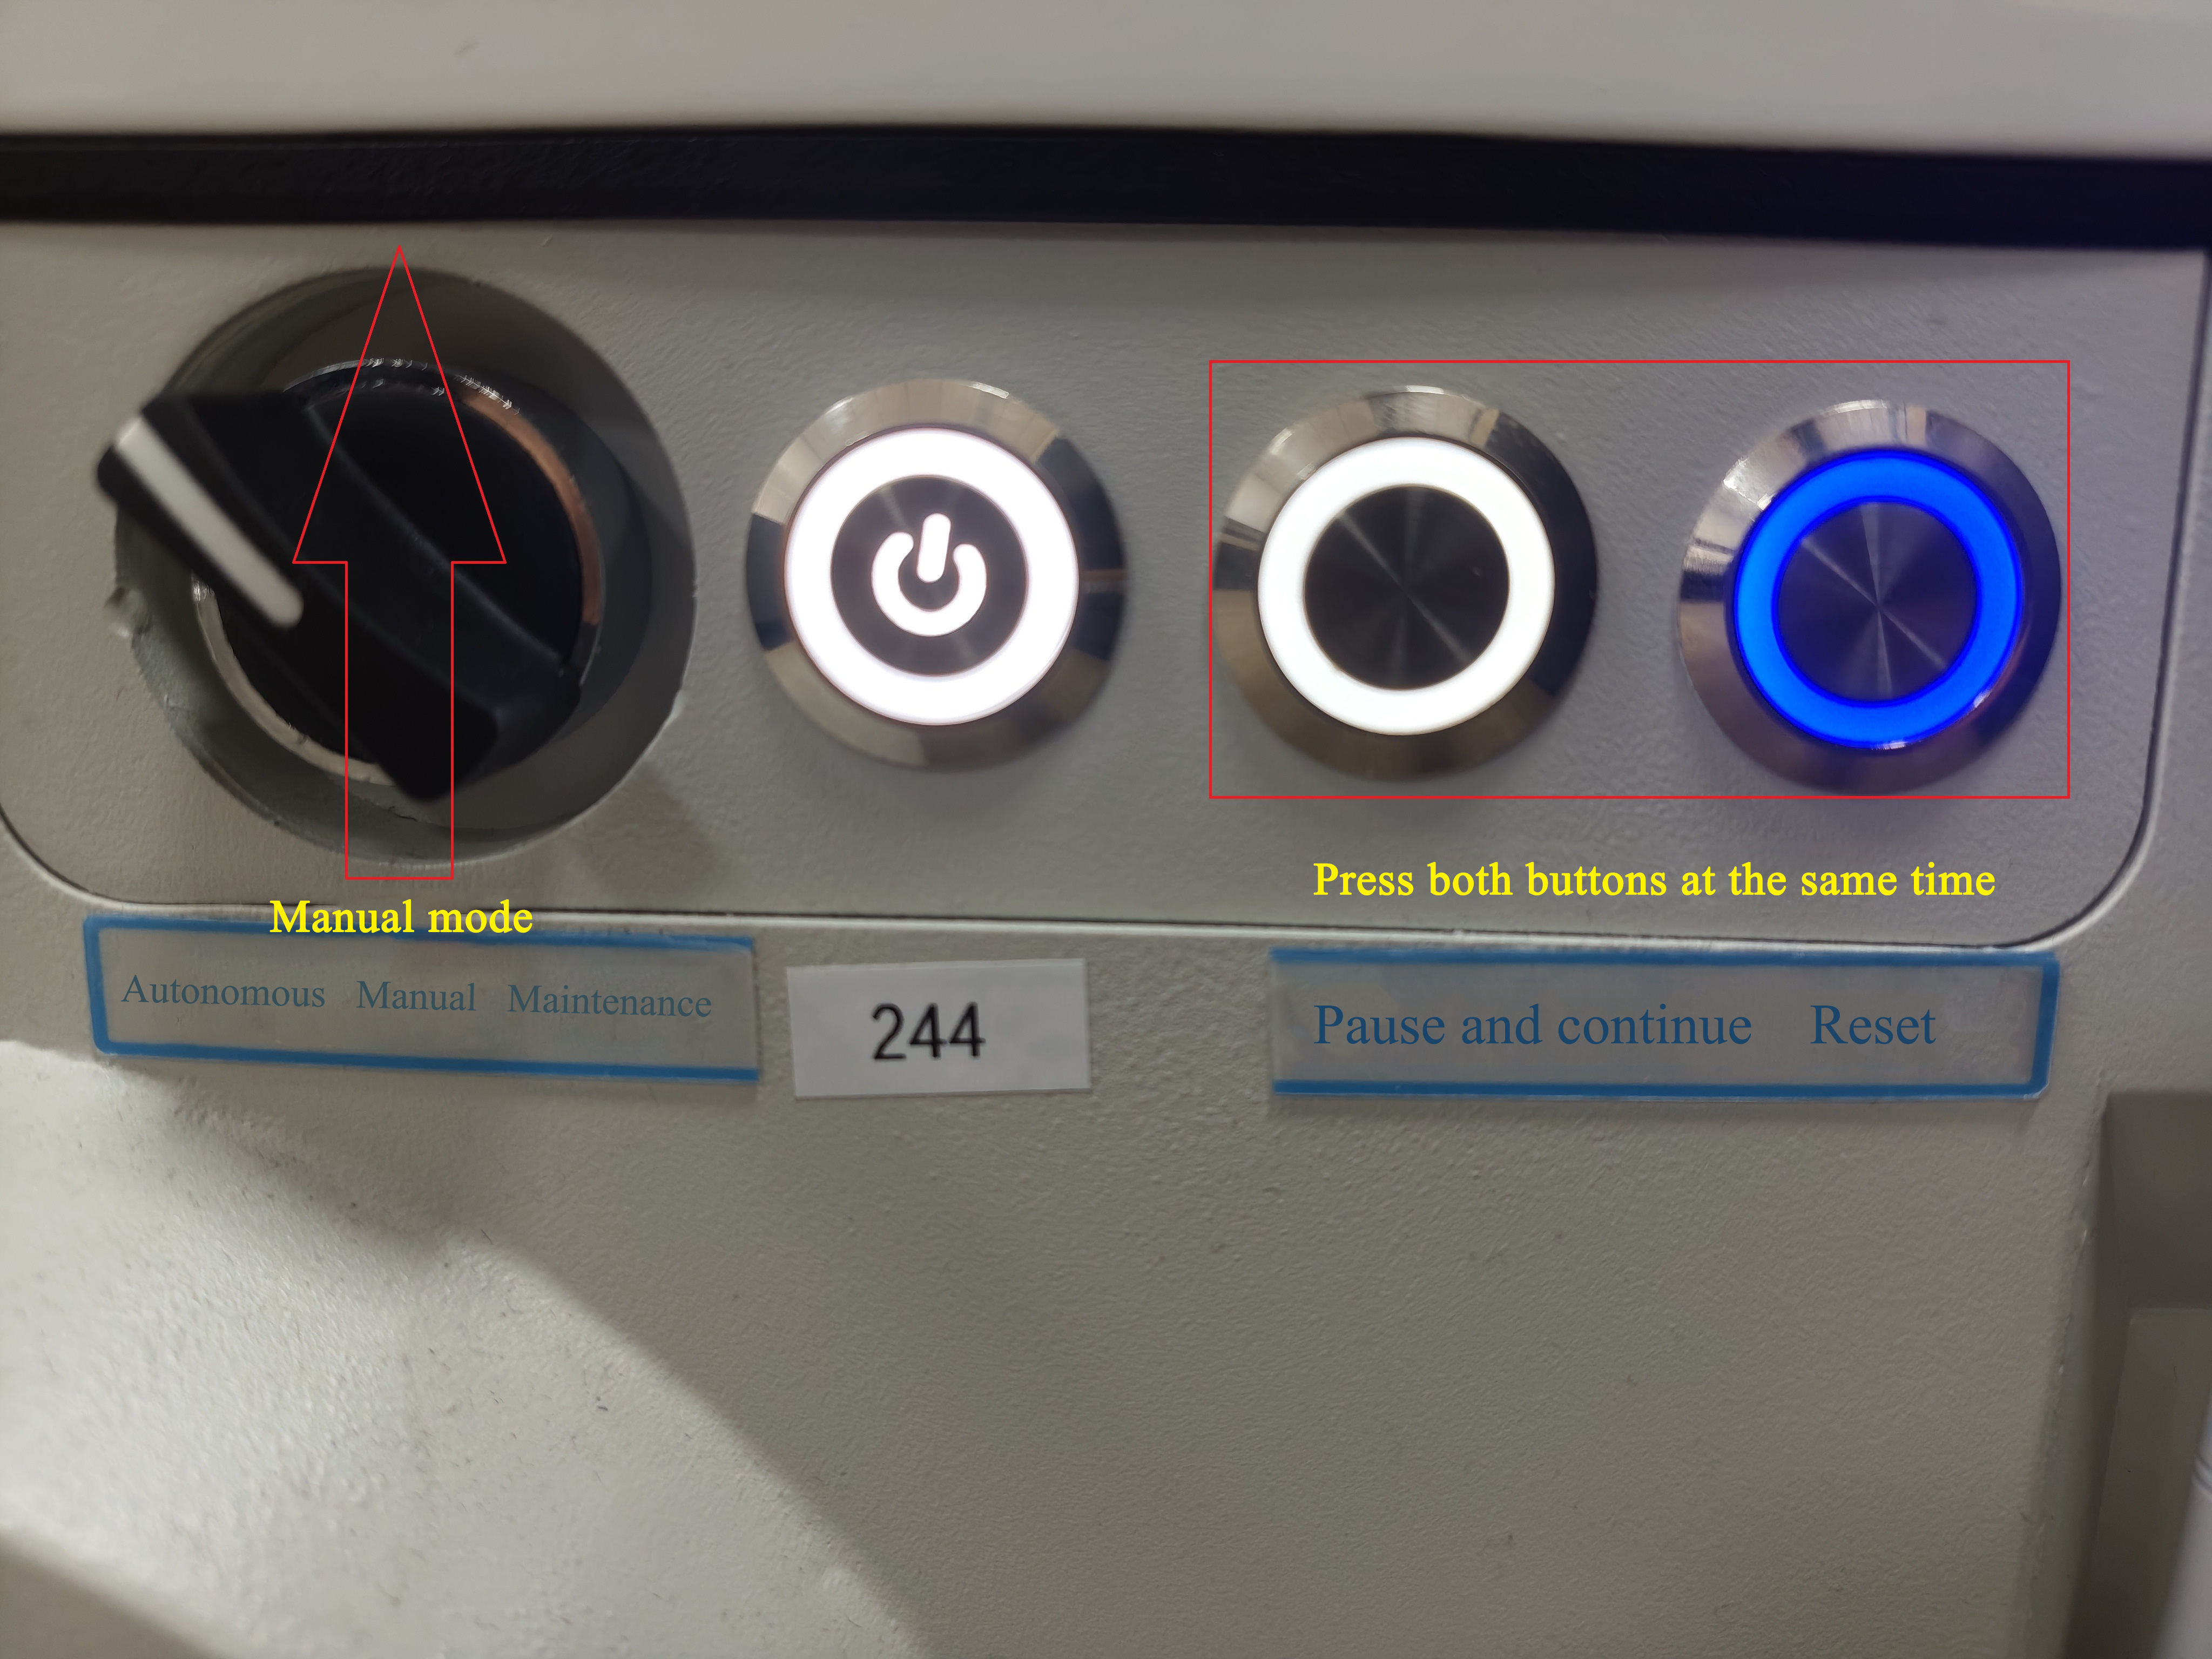
Rotate the knob to the vertical upward position (switching to manual mode), then simultaneously press and hold the Pause/Resume and Reset buttons until both indicators blink and the device broadcasts an audio cue similar to a "WIFI connected" notification.
Click
Disconnectedin the Mobile software to pop up the robot connection dialog box.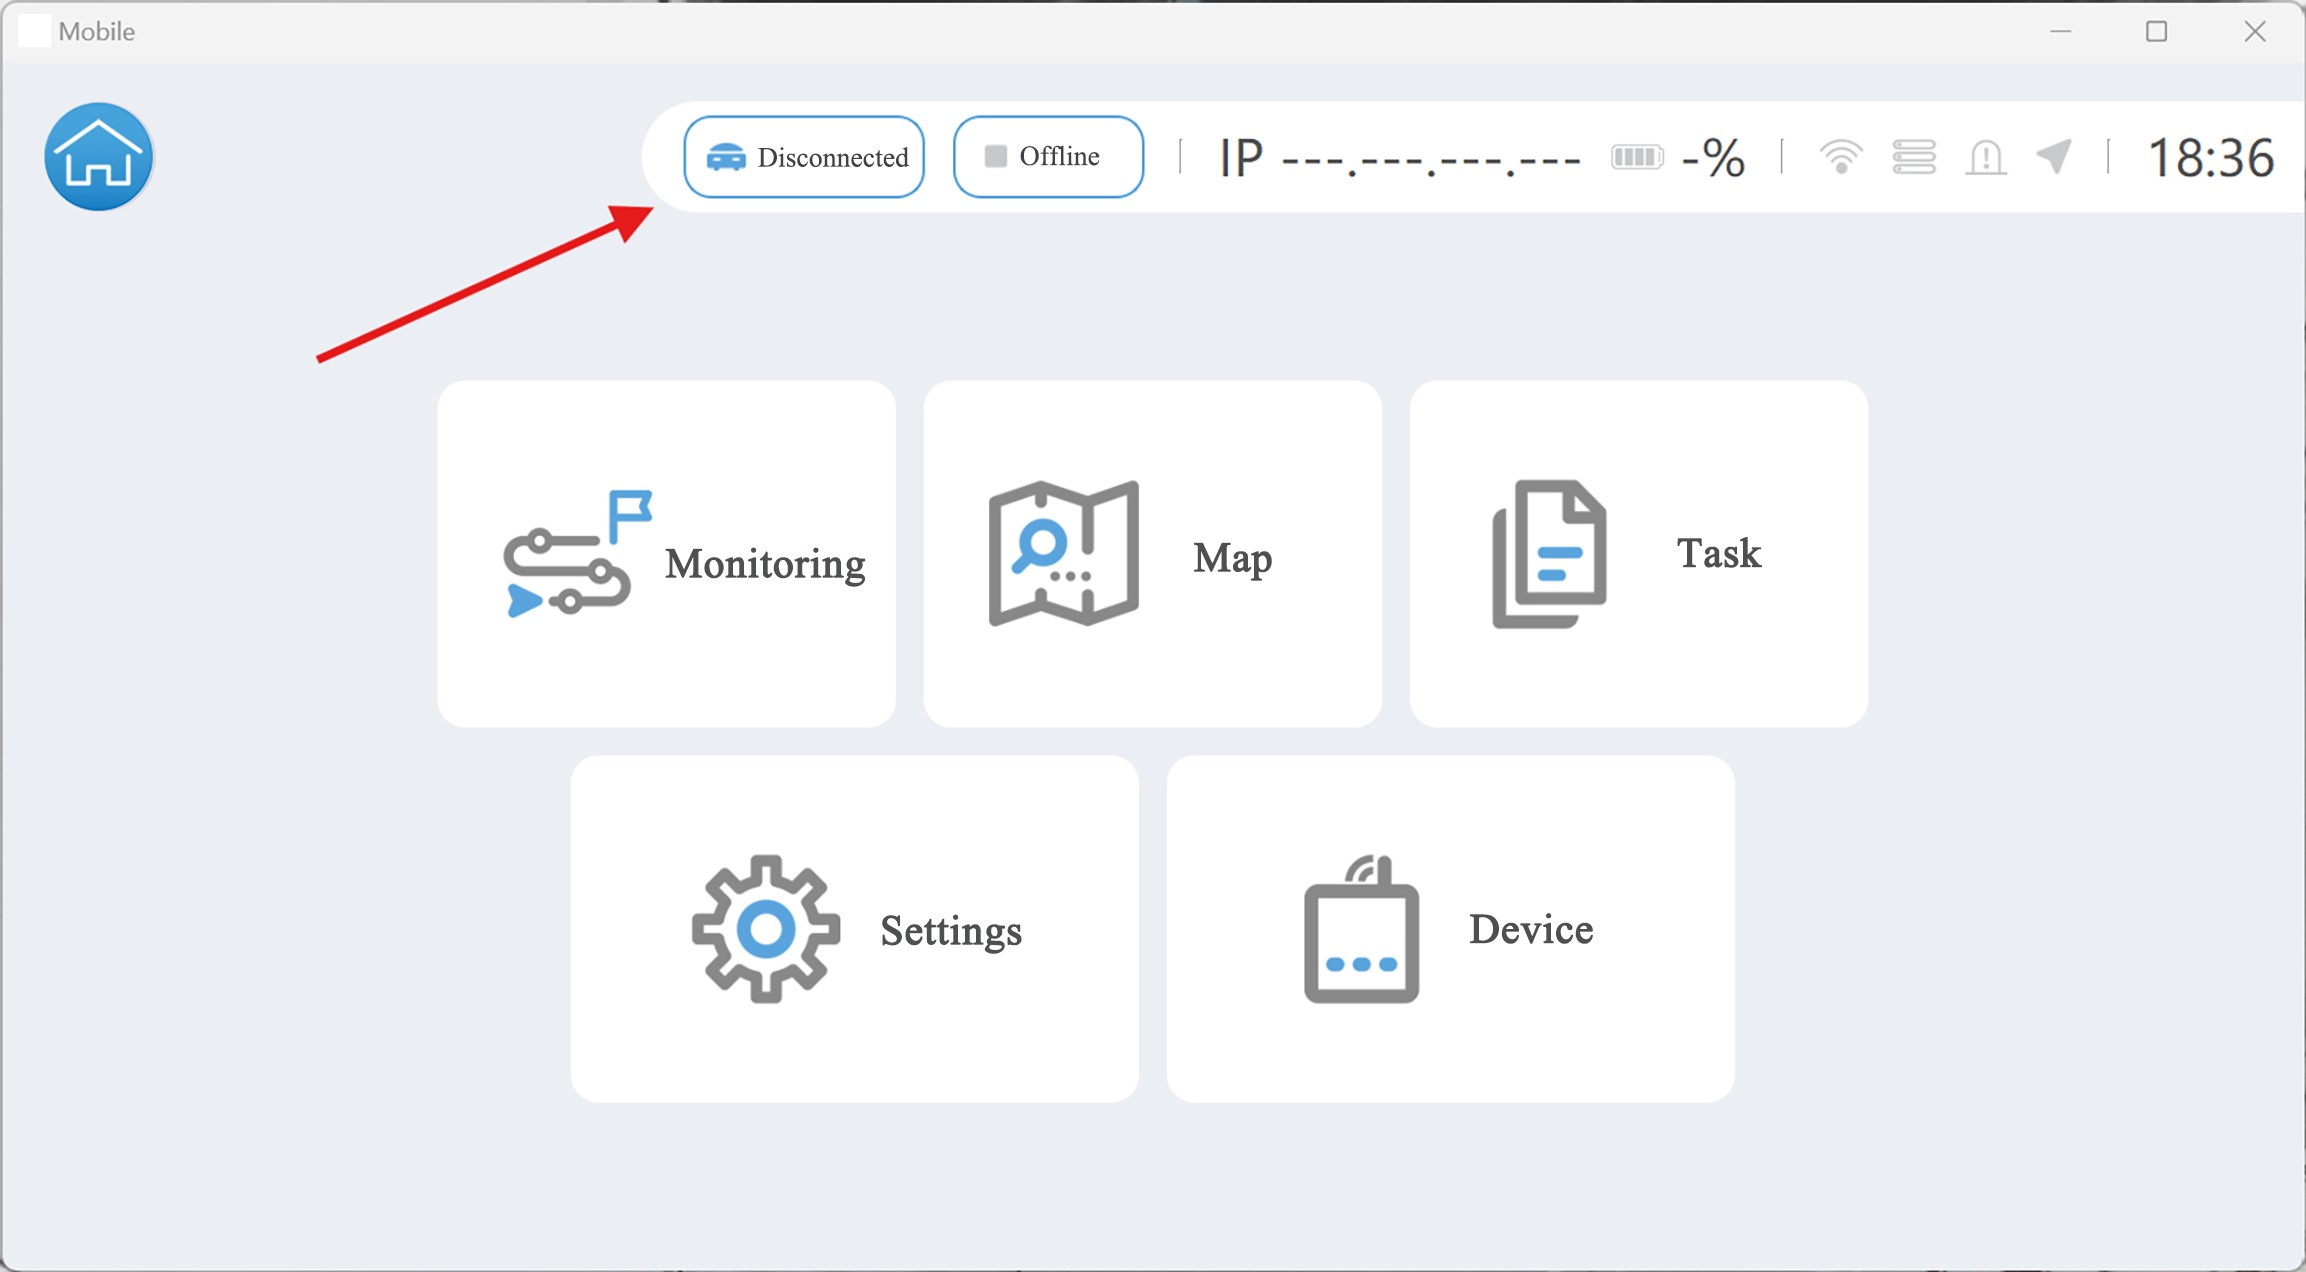
After entering the robot WIFI and password, click
ConnectConnect Robot.
Default WIFI name of the robot:WOOSH_000000Z, default password:woosh888.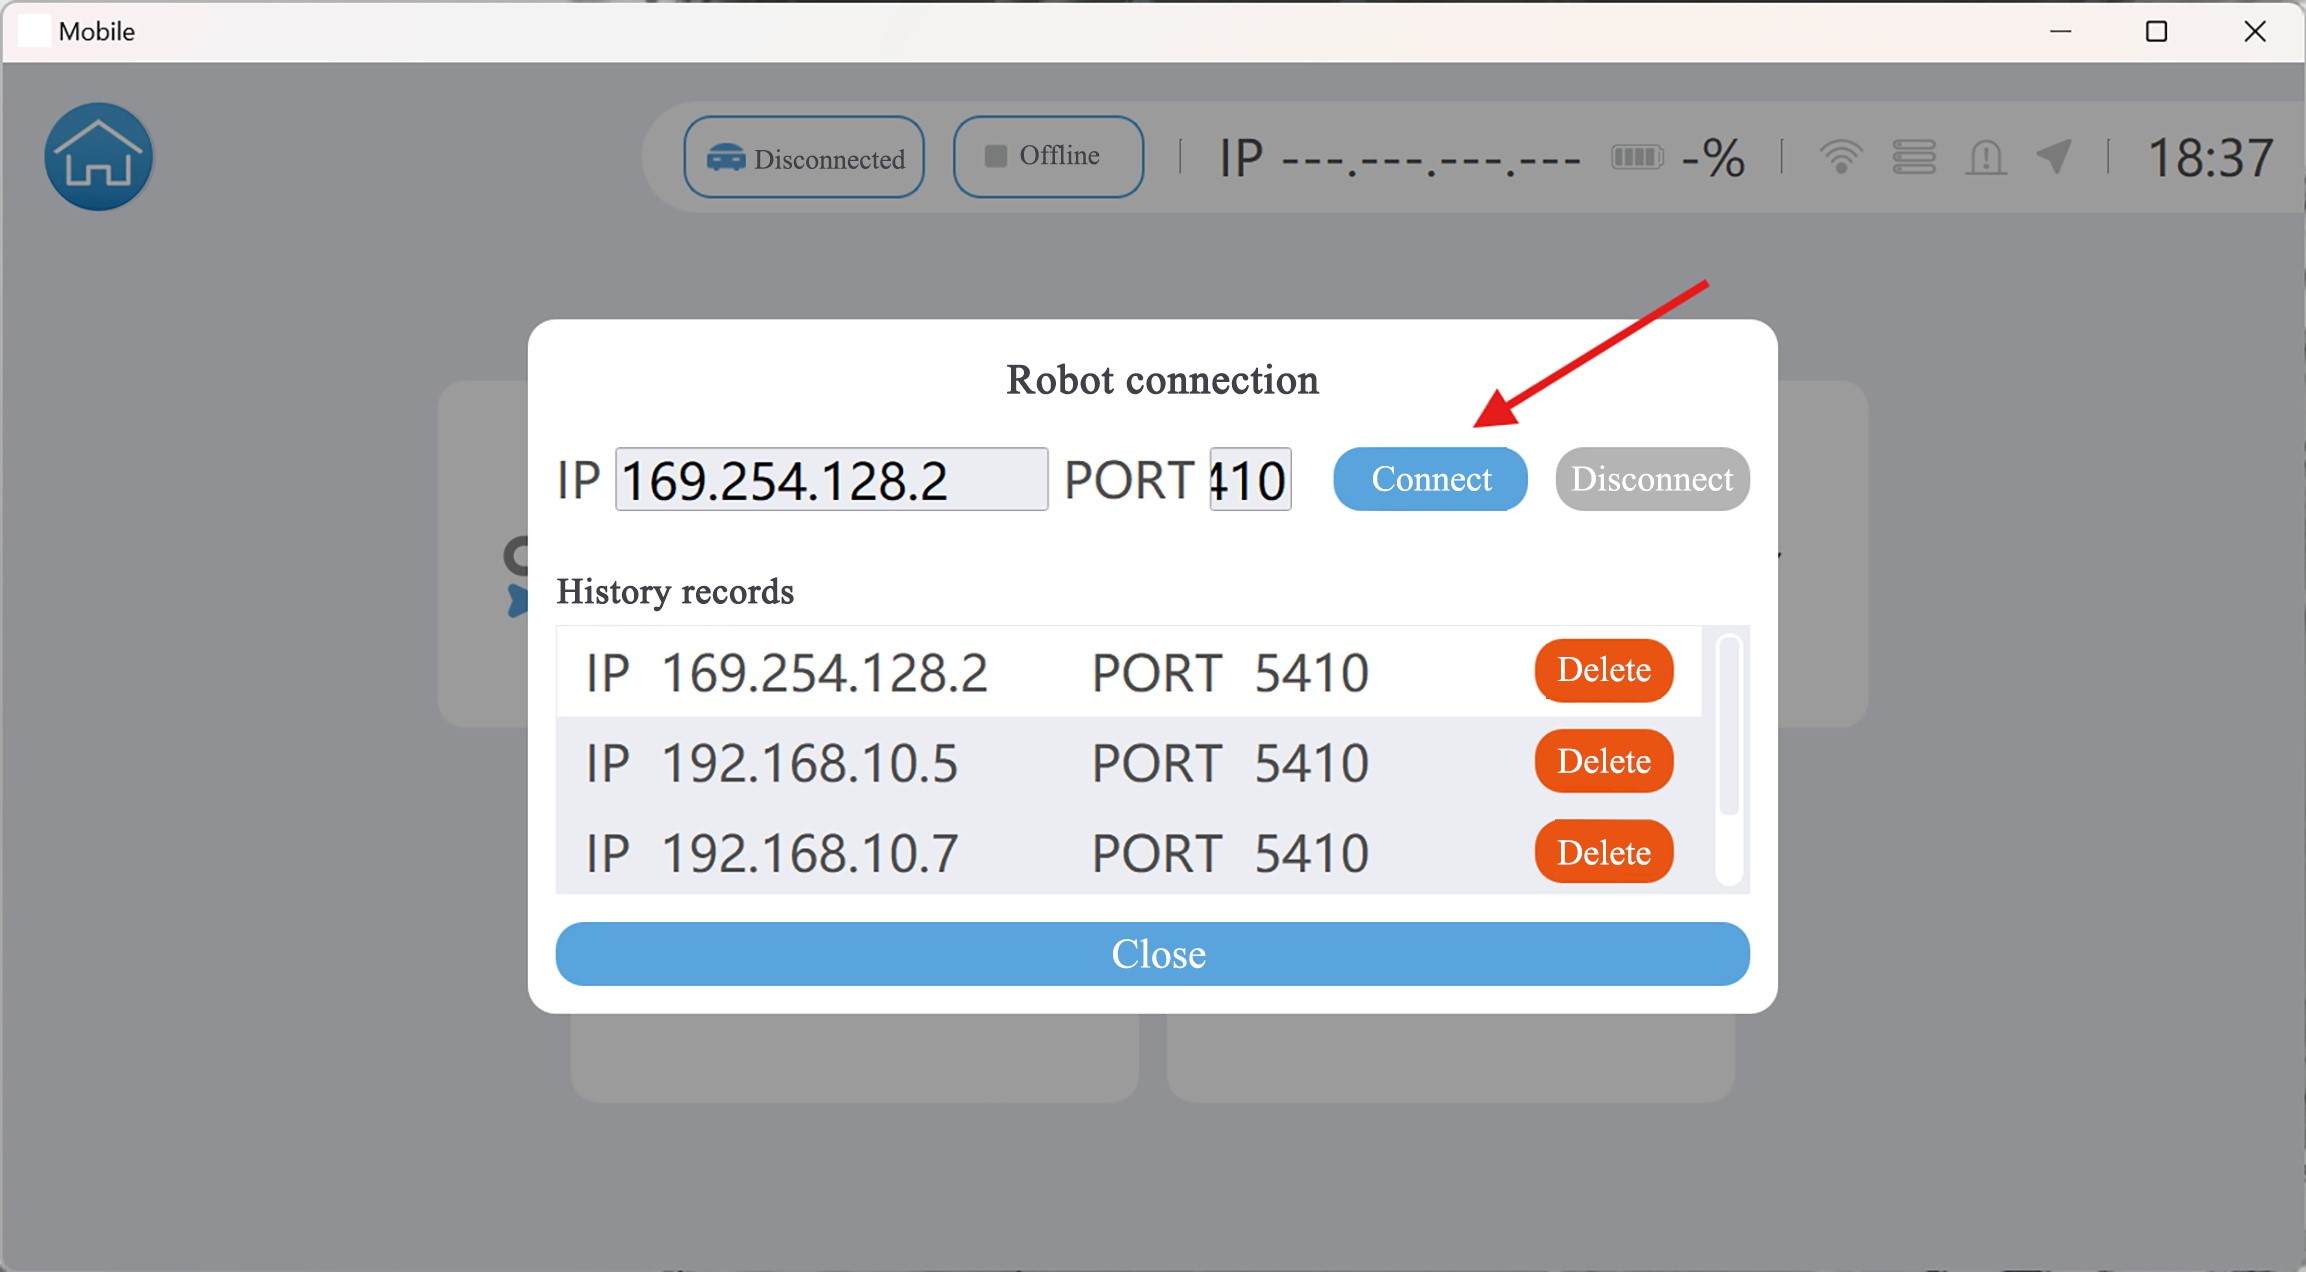
When the connection is successful, the system automatically presents basic information of the current robot such as the name, mode, power and so on.
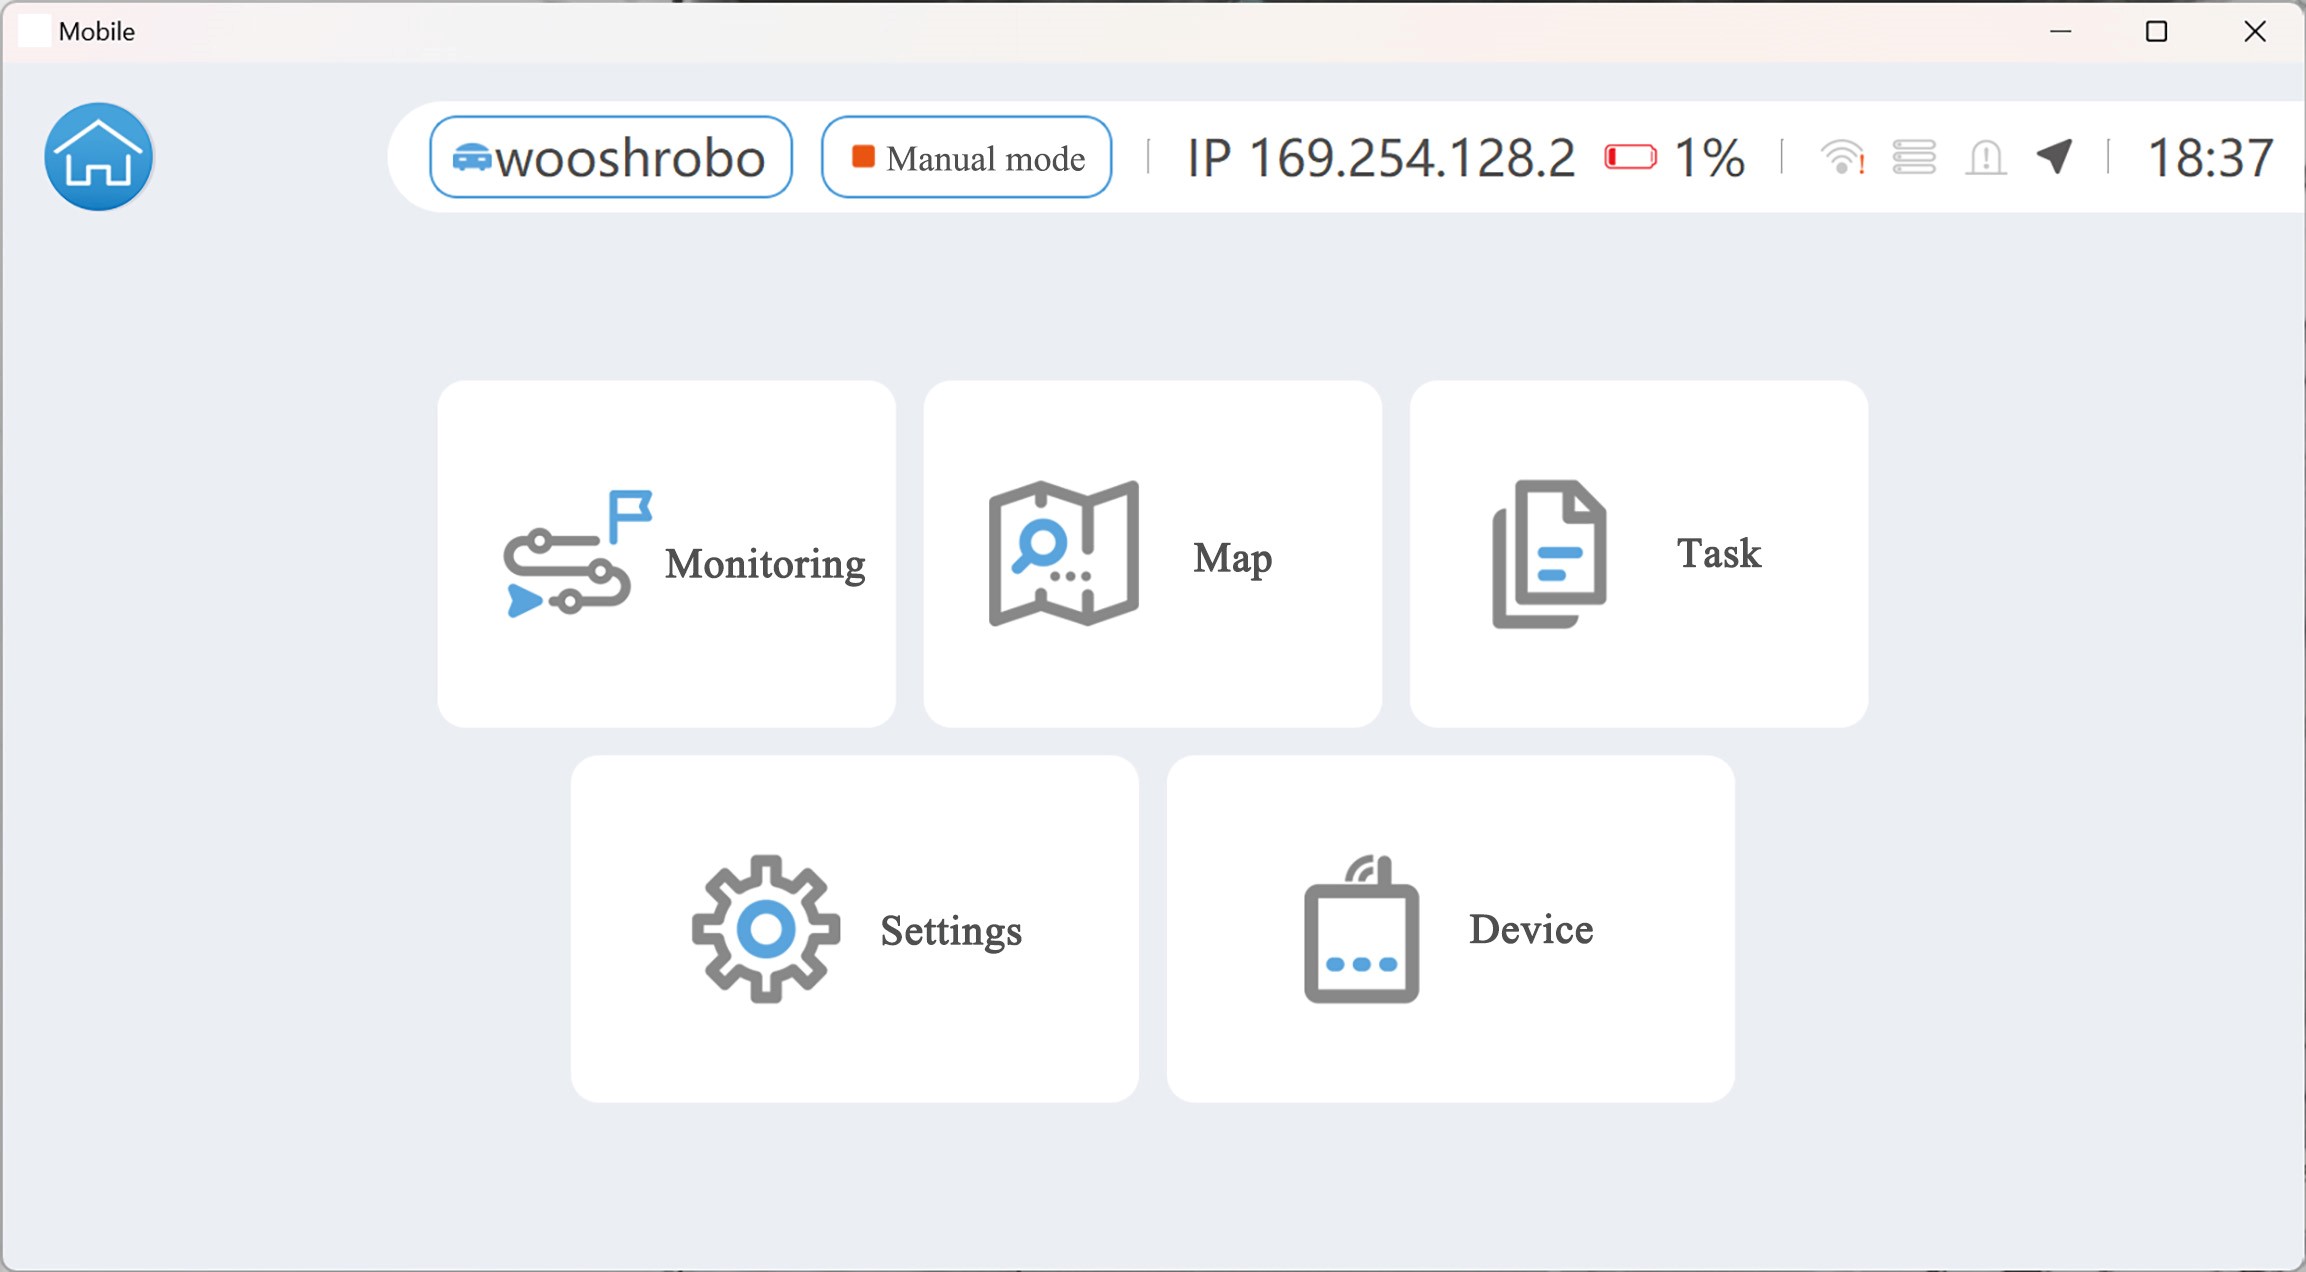
Start Mapping
- Click
Mapto enter the map management page.
- Click
Add Sceneto start mapping.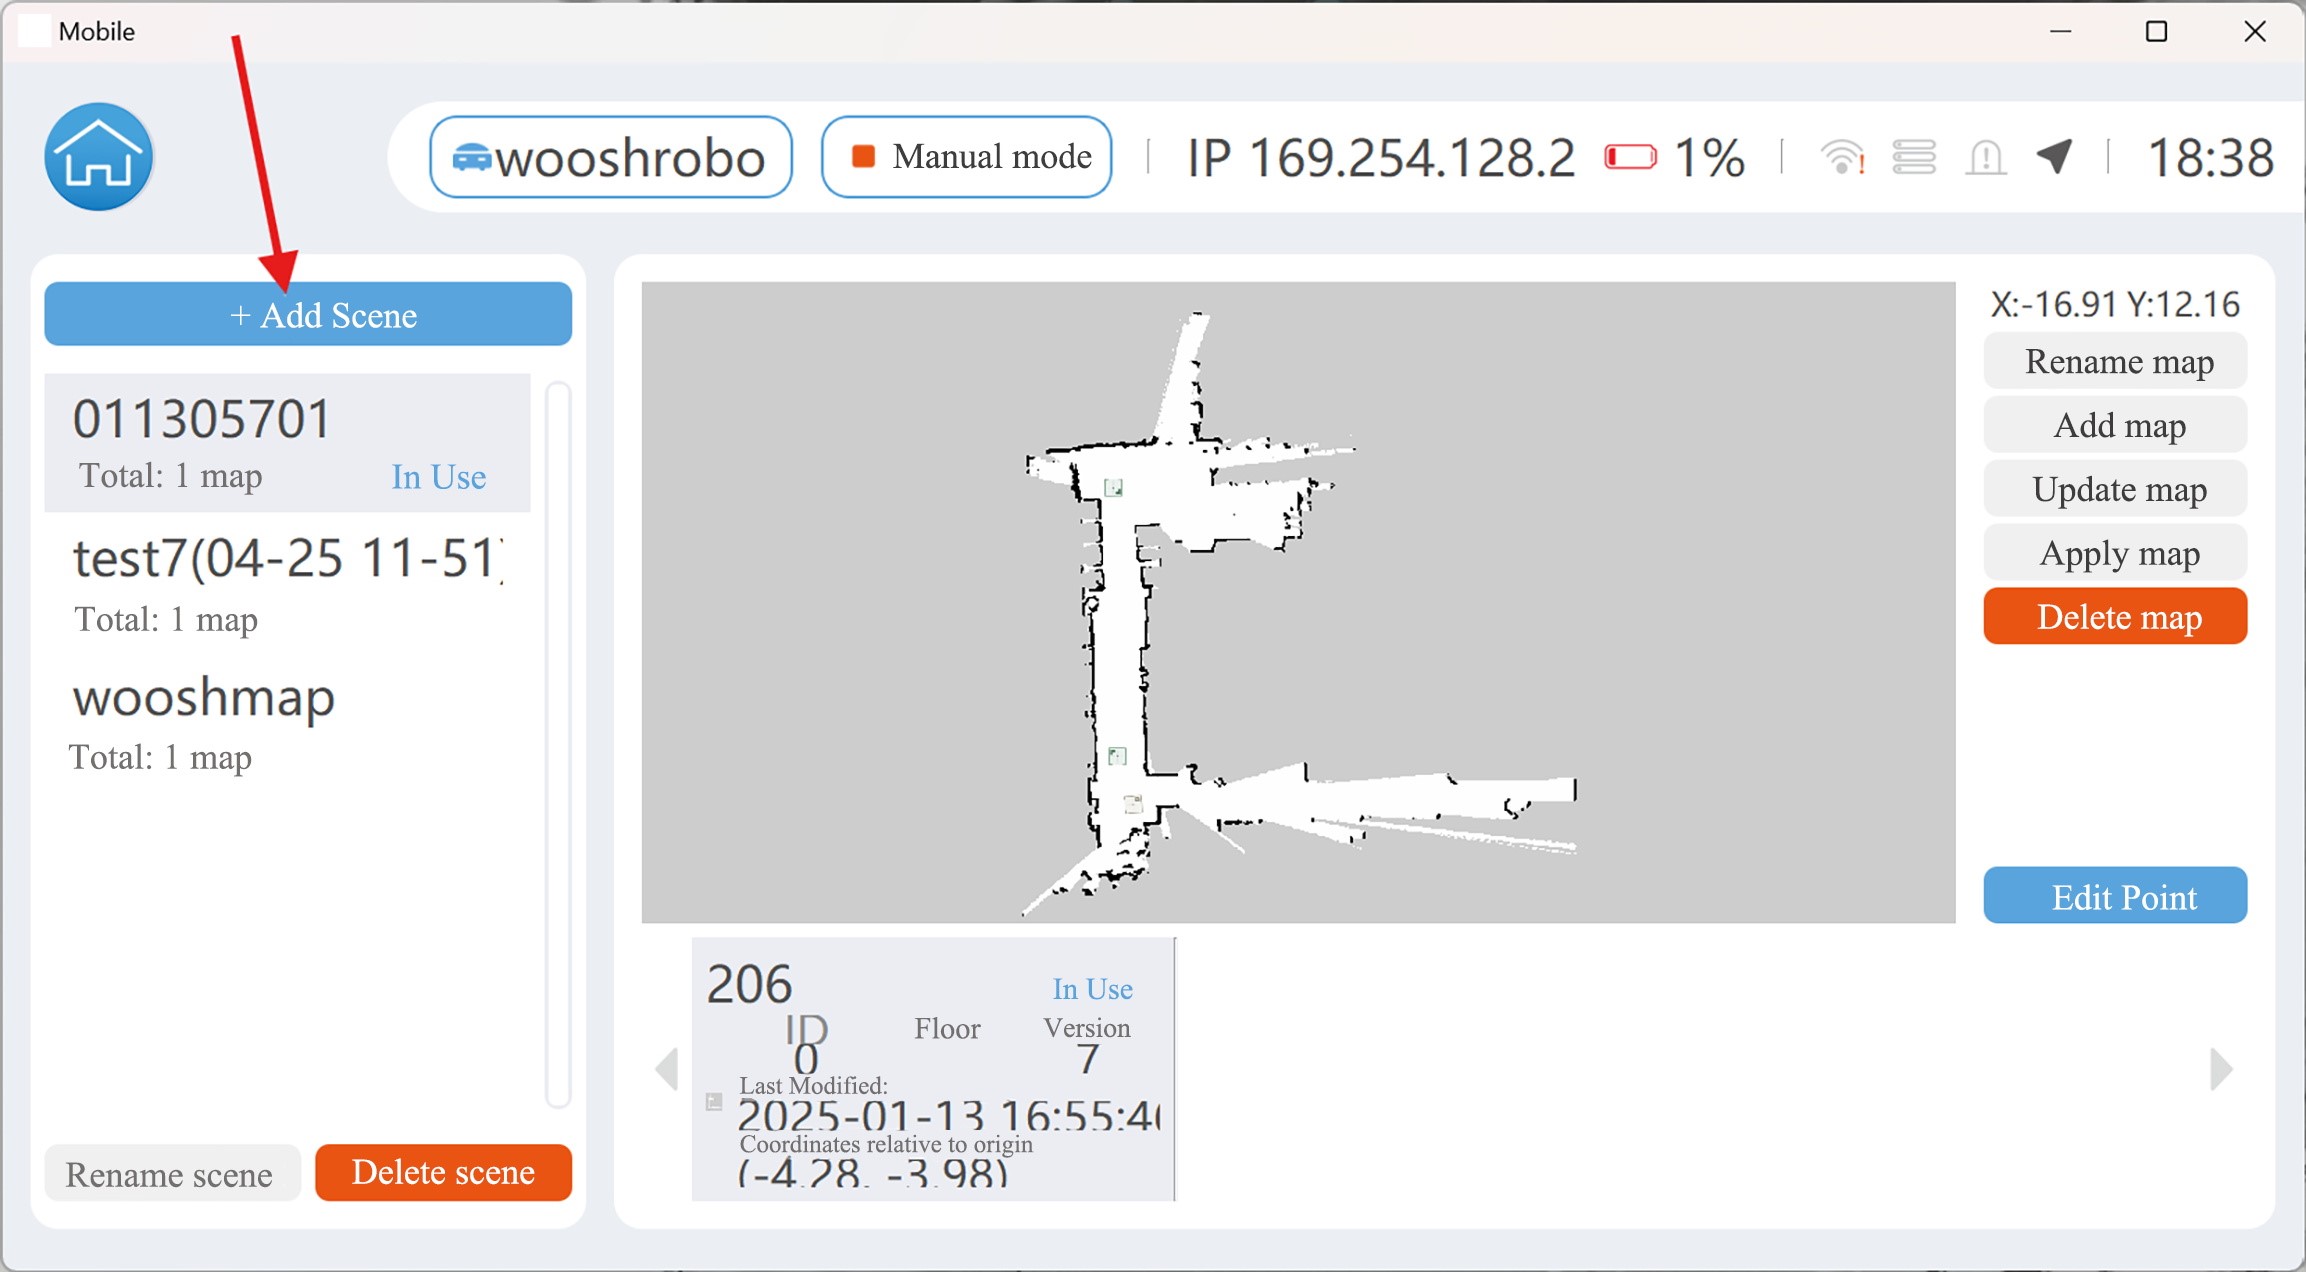
- Select
Deploymentmode.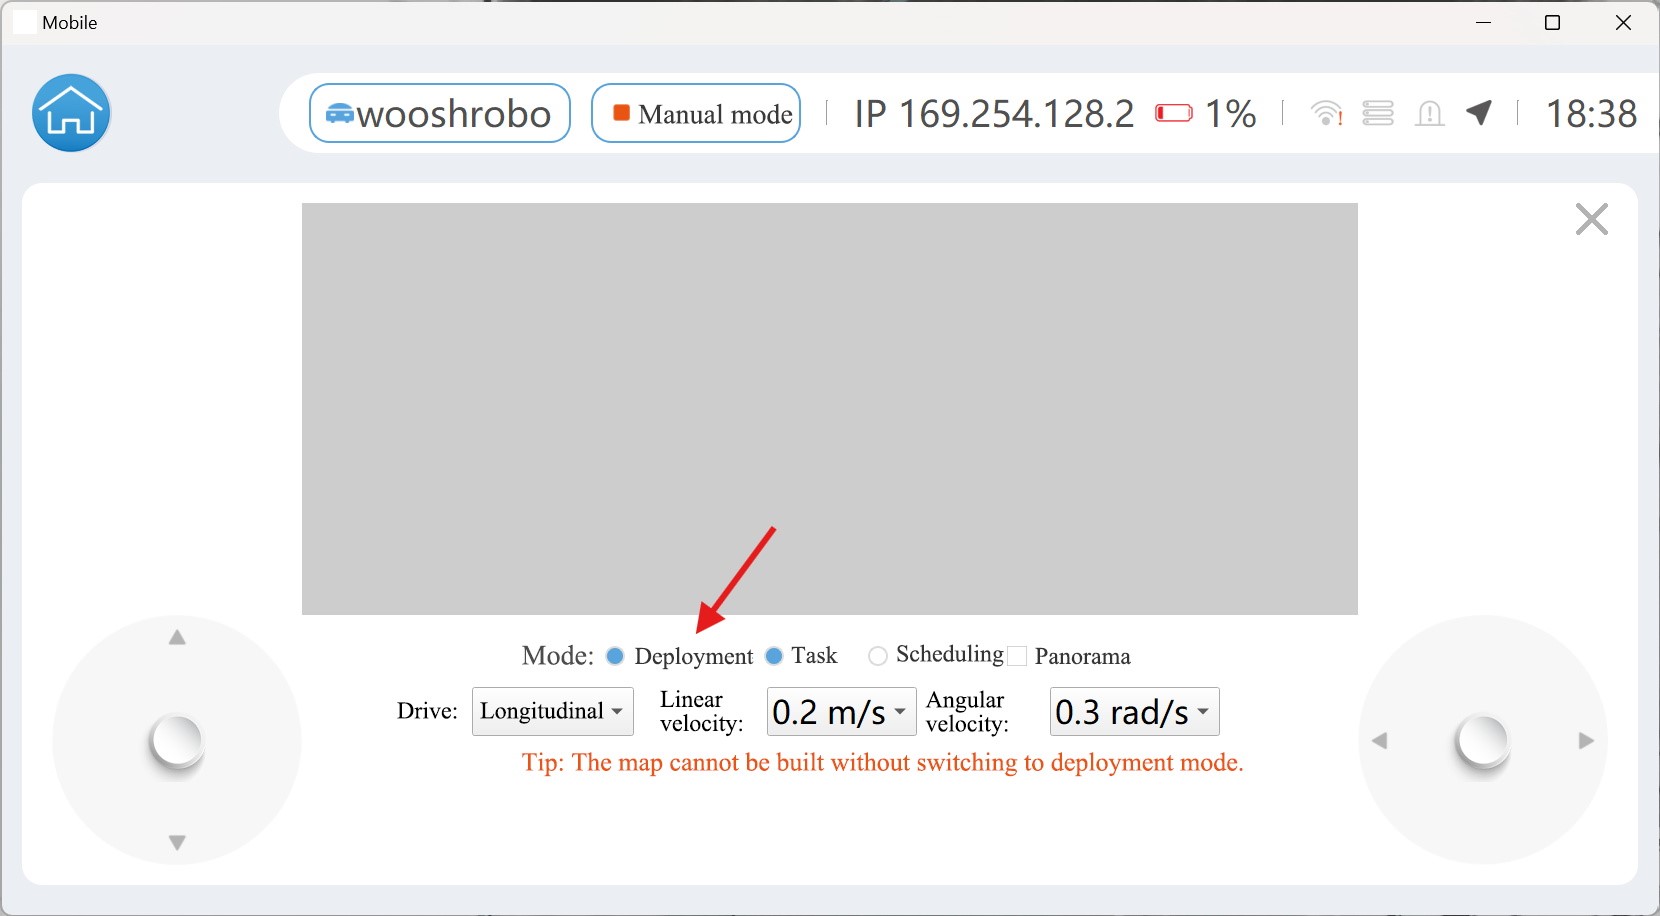
- Click
Startto start mapping.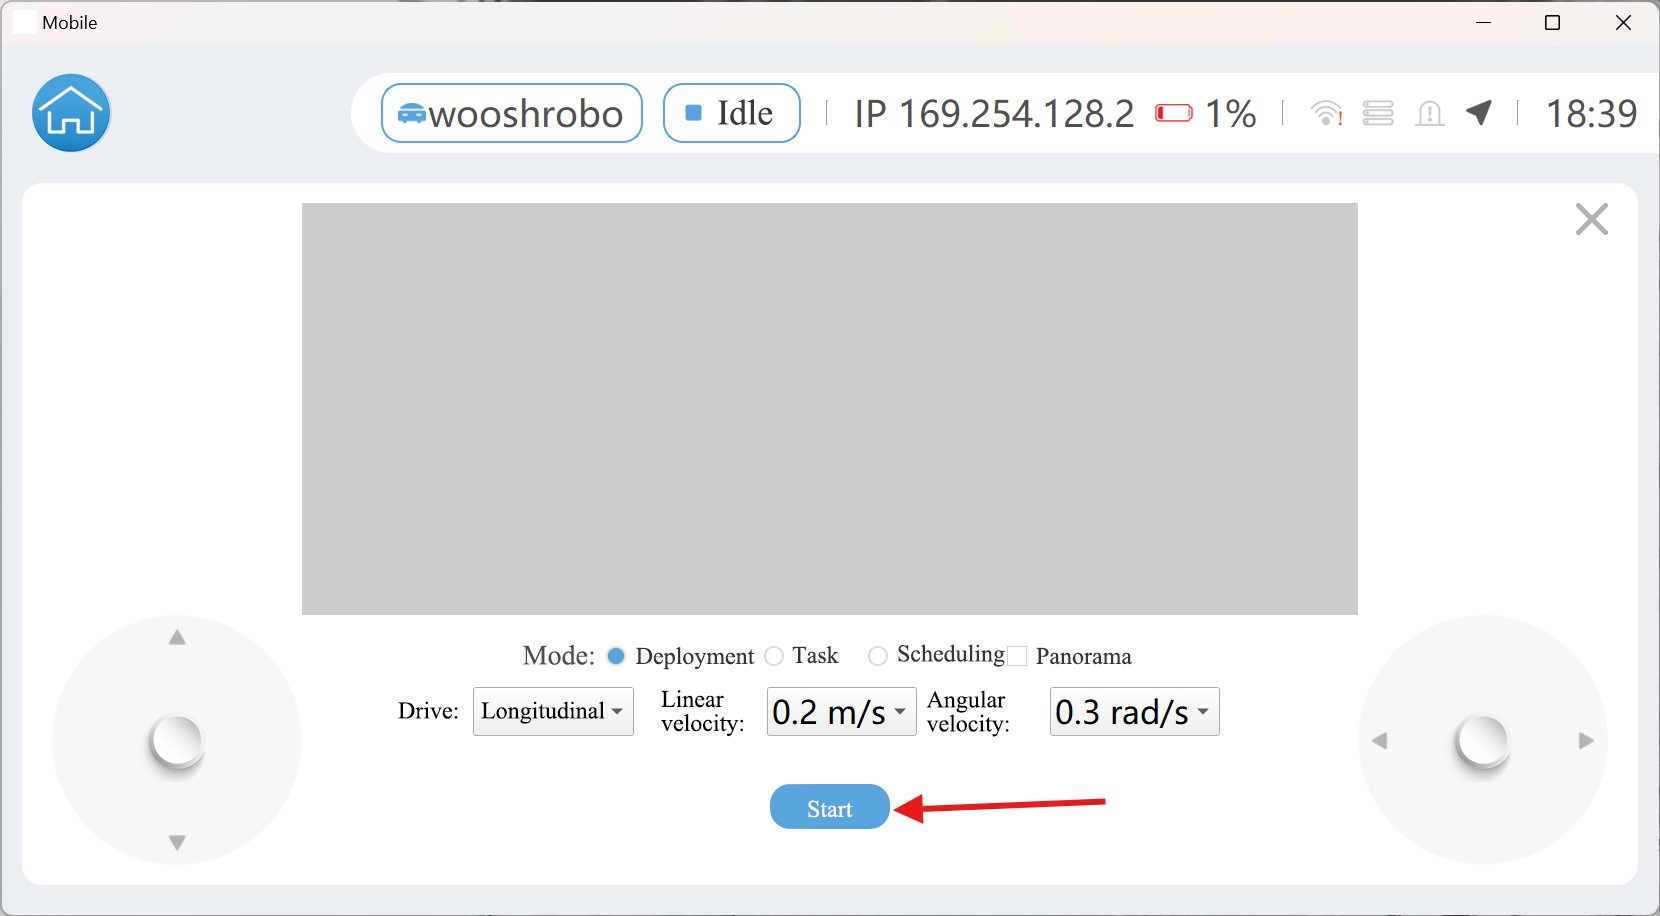
- When the map is successfully created, save it.
- Click
Sampling of Navigation points
Brief description:
According to the Demo requirements, the robot fills two material boxes by default.
- The shelves are divided into four layers, and the robot can operate on the first and second layers.
- The shelves are divided into two columns, and each material frame grabbing point is related to a specific shelf column. In addition, a charging point of about 1 to 1.5m should be set up in front of the charging pile.
Operation steps:
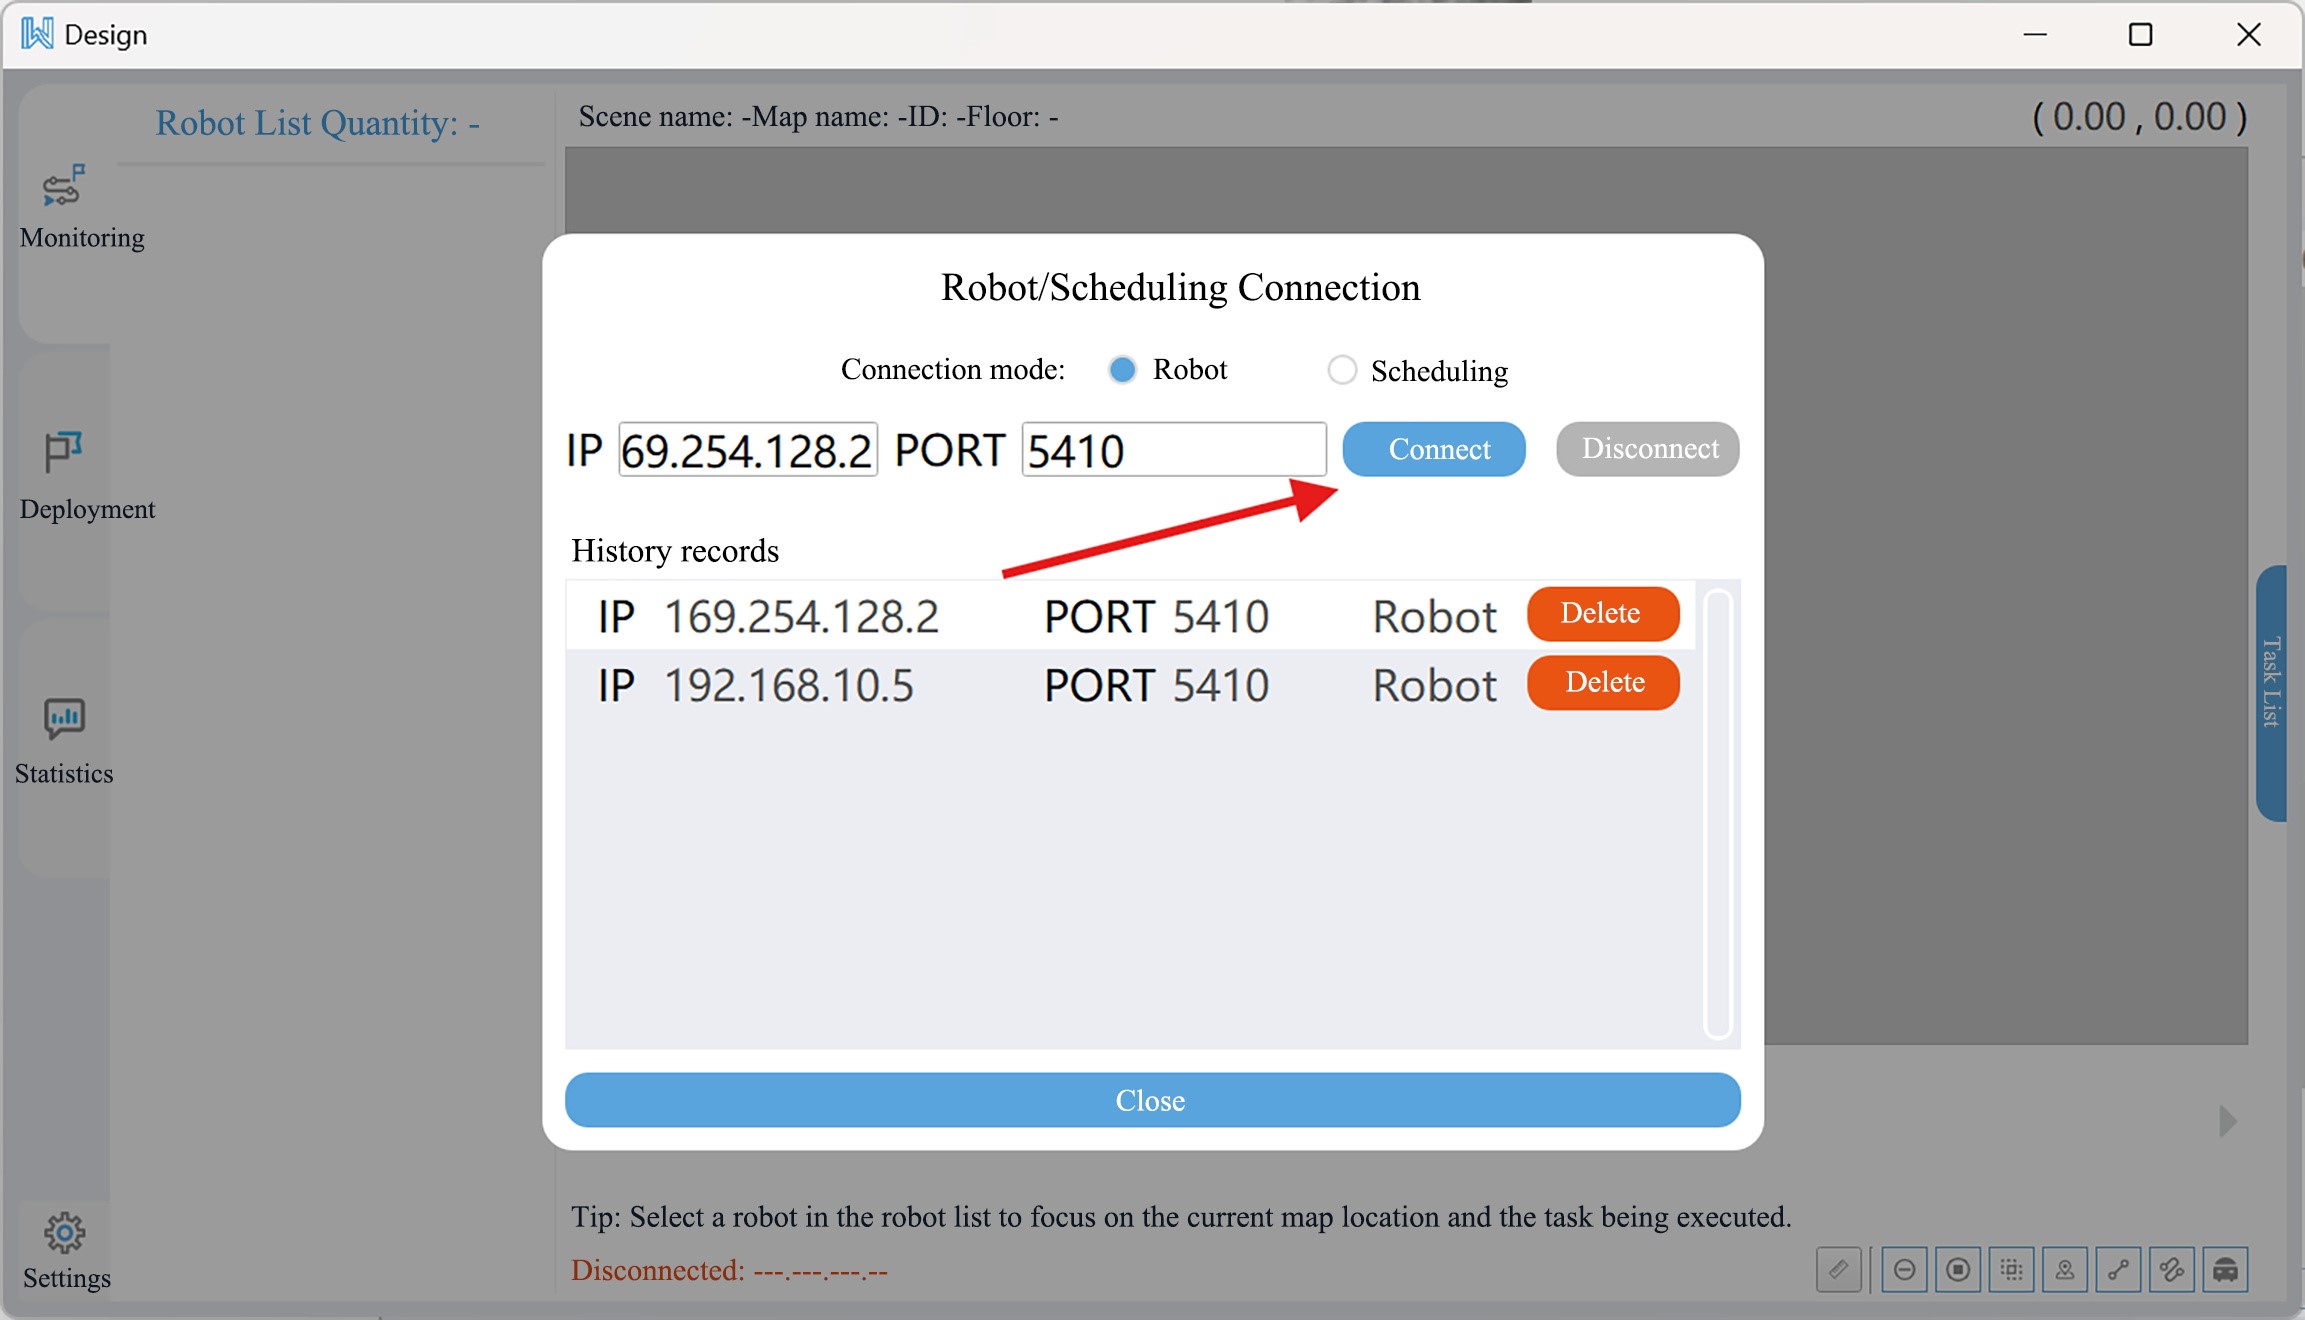
First open the software Woosh Design.

Click the
Settingsbutton and in the pop-up drop-down box, click theConnectbutton.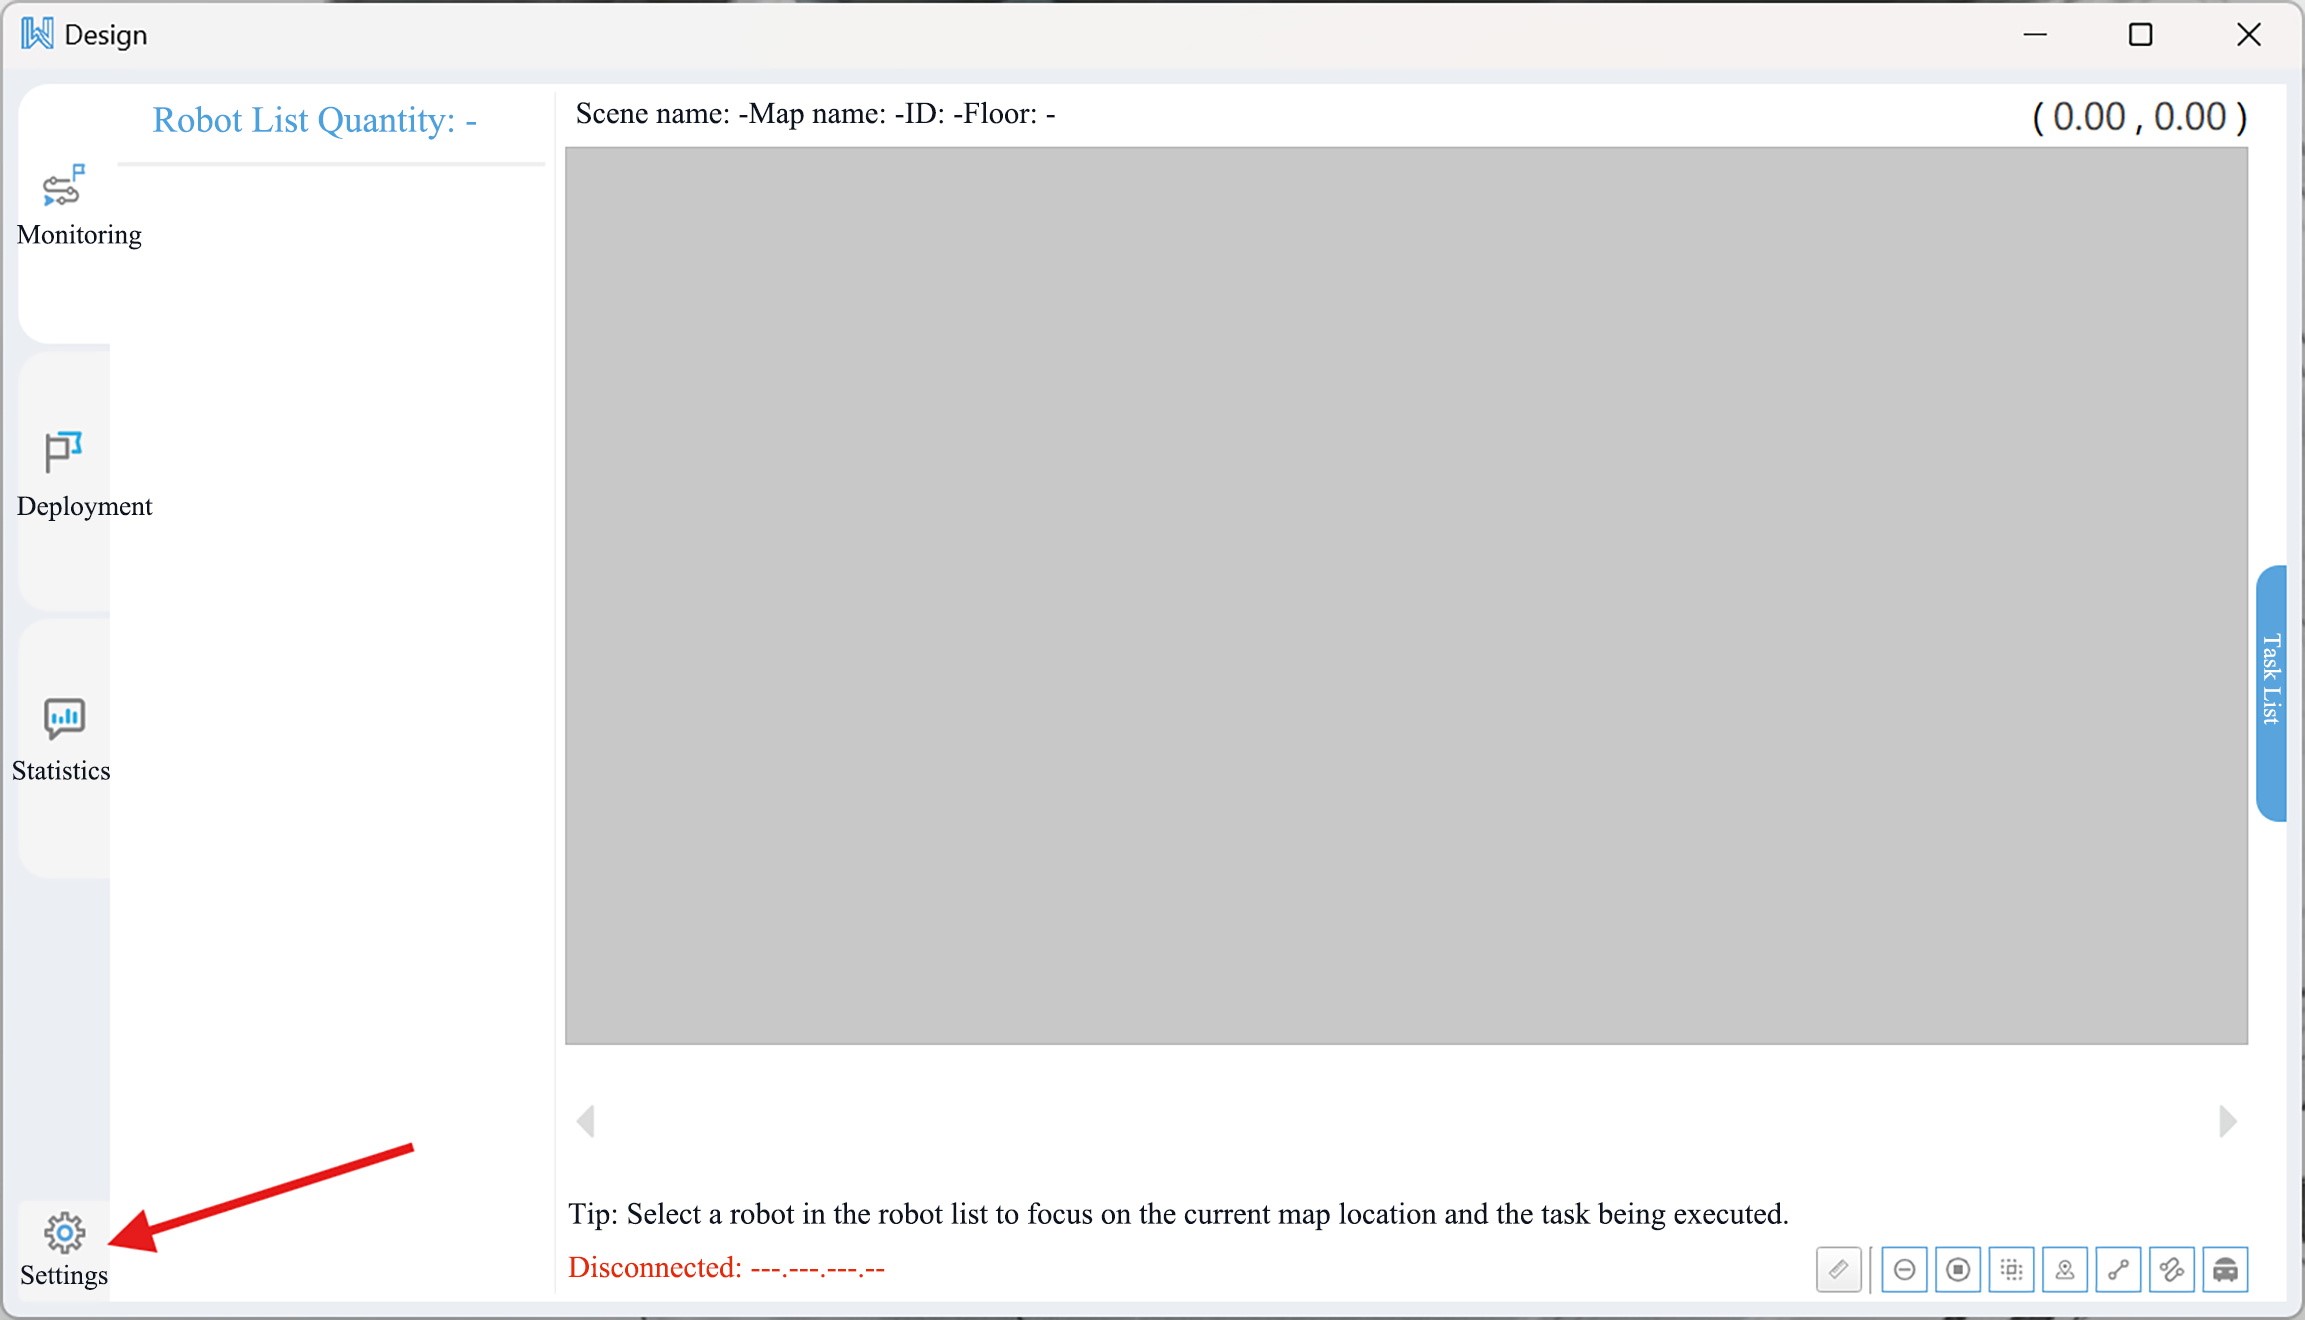
In the pop-up Robot/Scheduling Connection dialog box, select the robot to be connected.
Then, click the
Deploybutton in the middle of the left side of the window.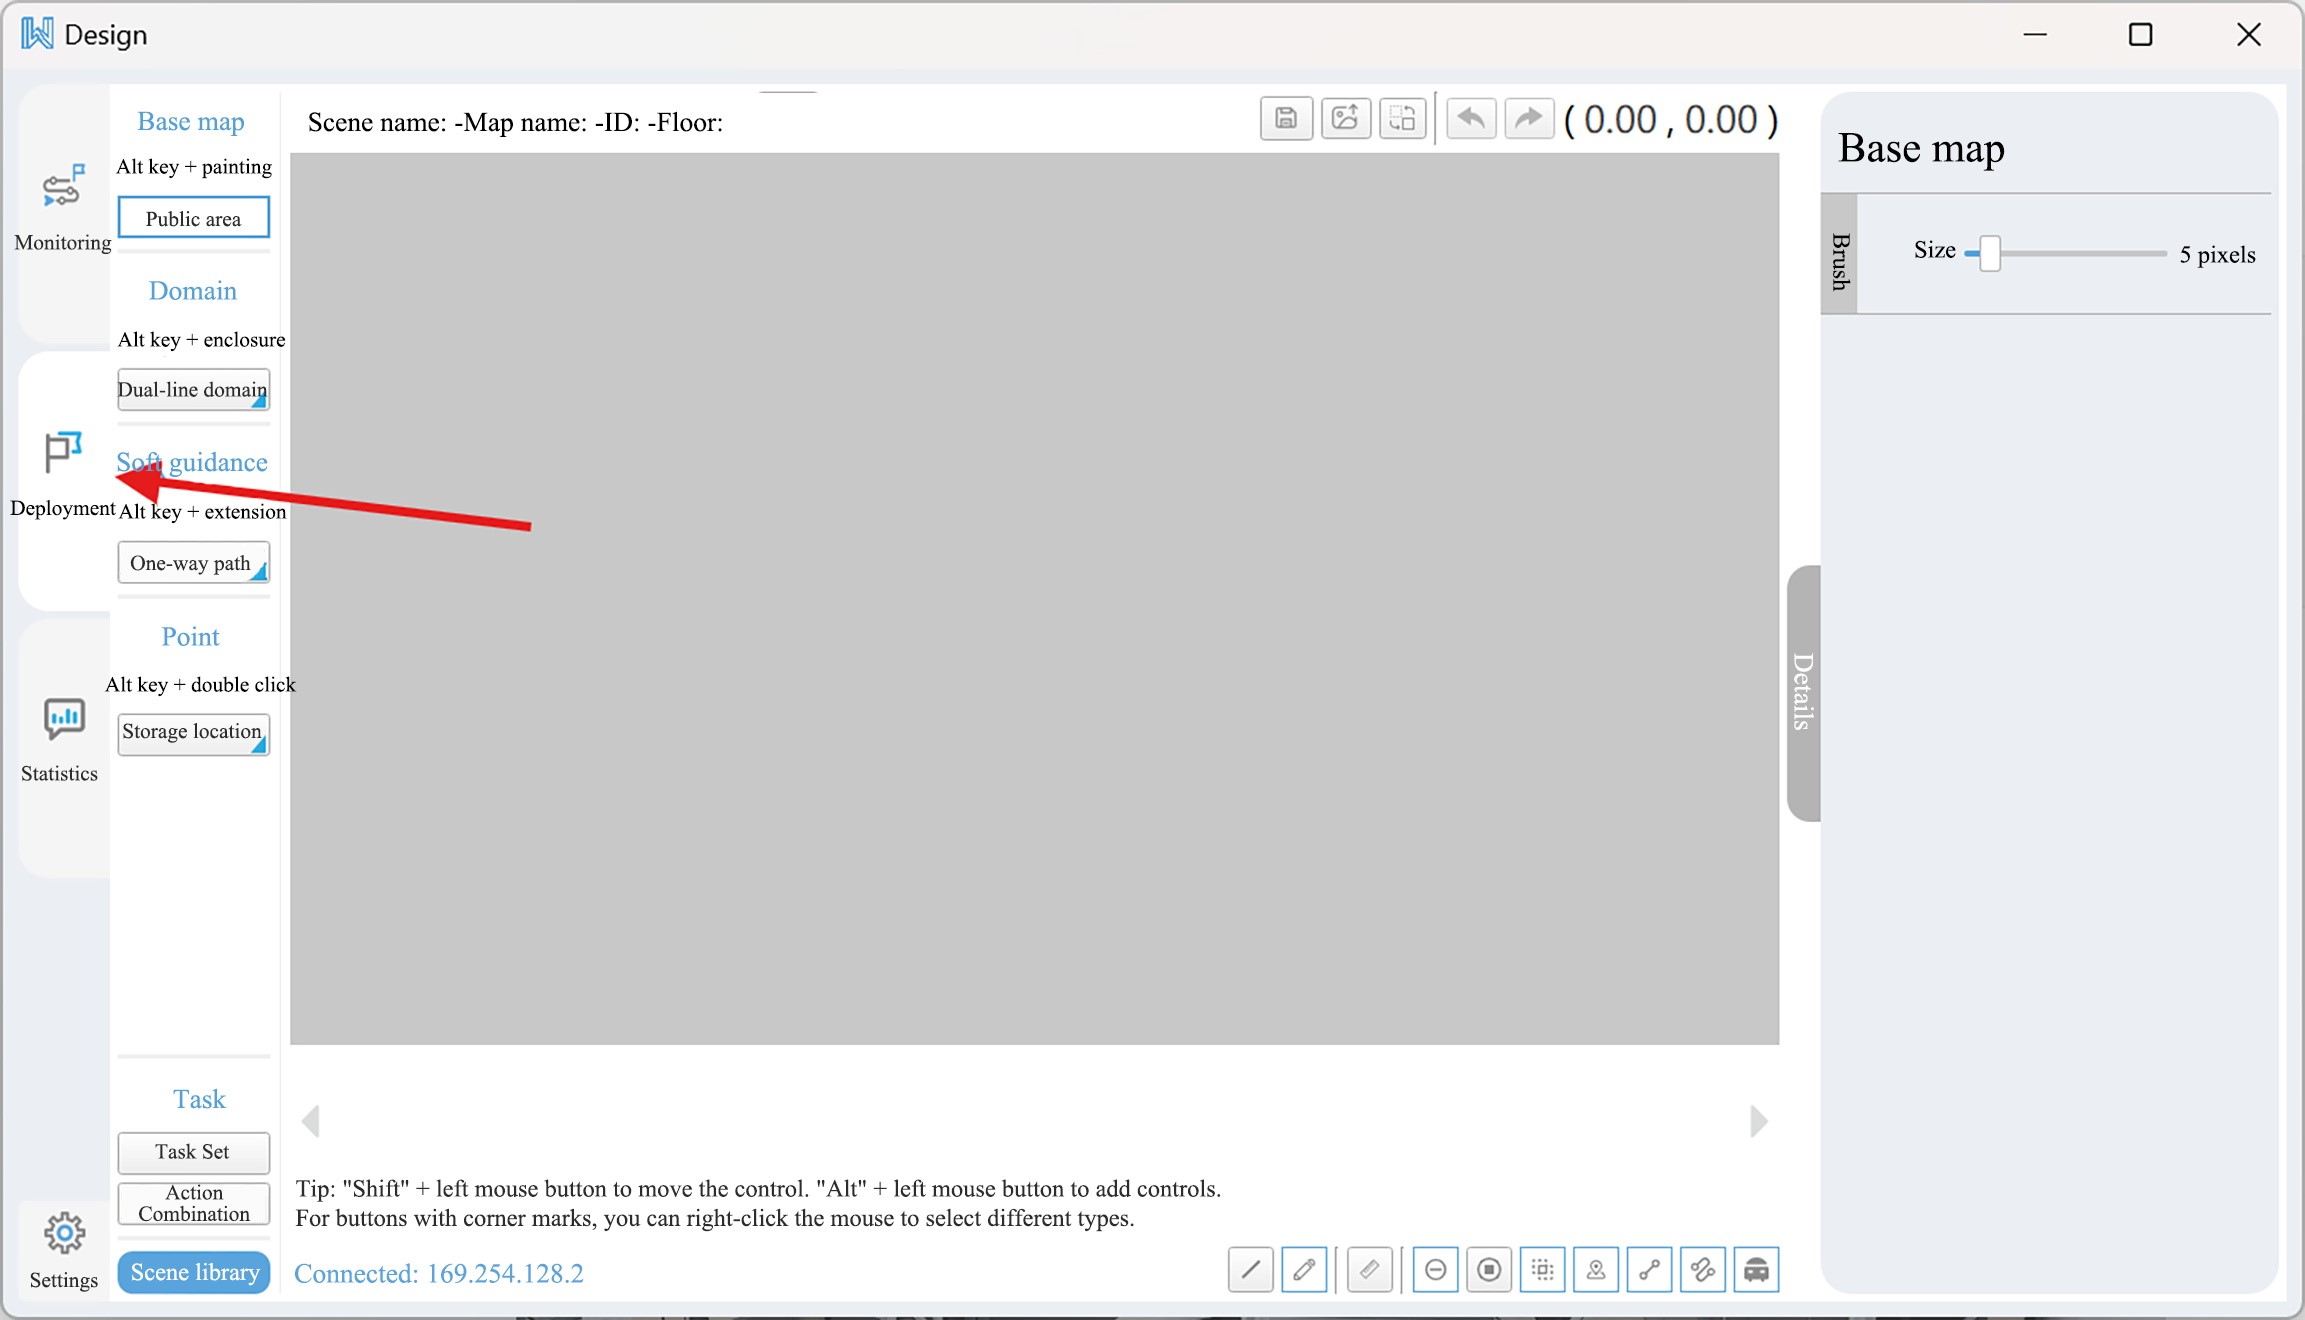
Click the
Scene Librarybutton in the lower left corner, then wait until the scene is successfully obtained before clickingRobot Scene, and then open the scene being used.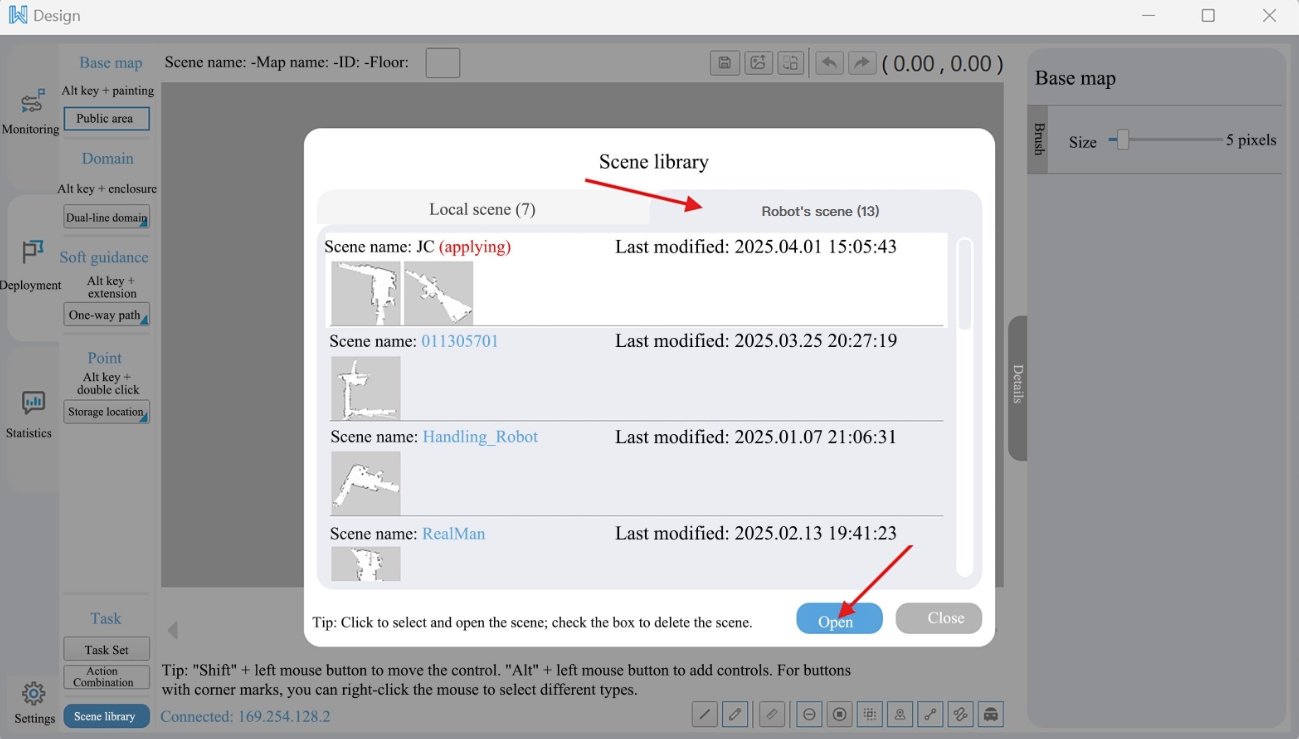
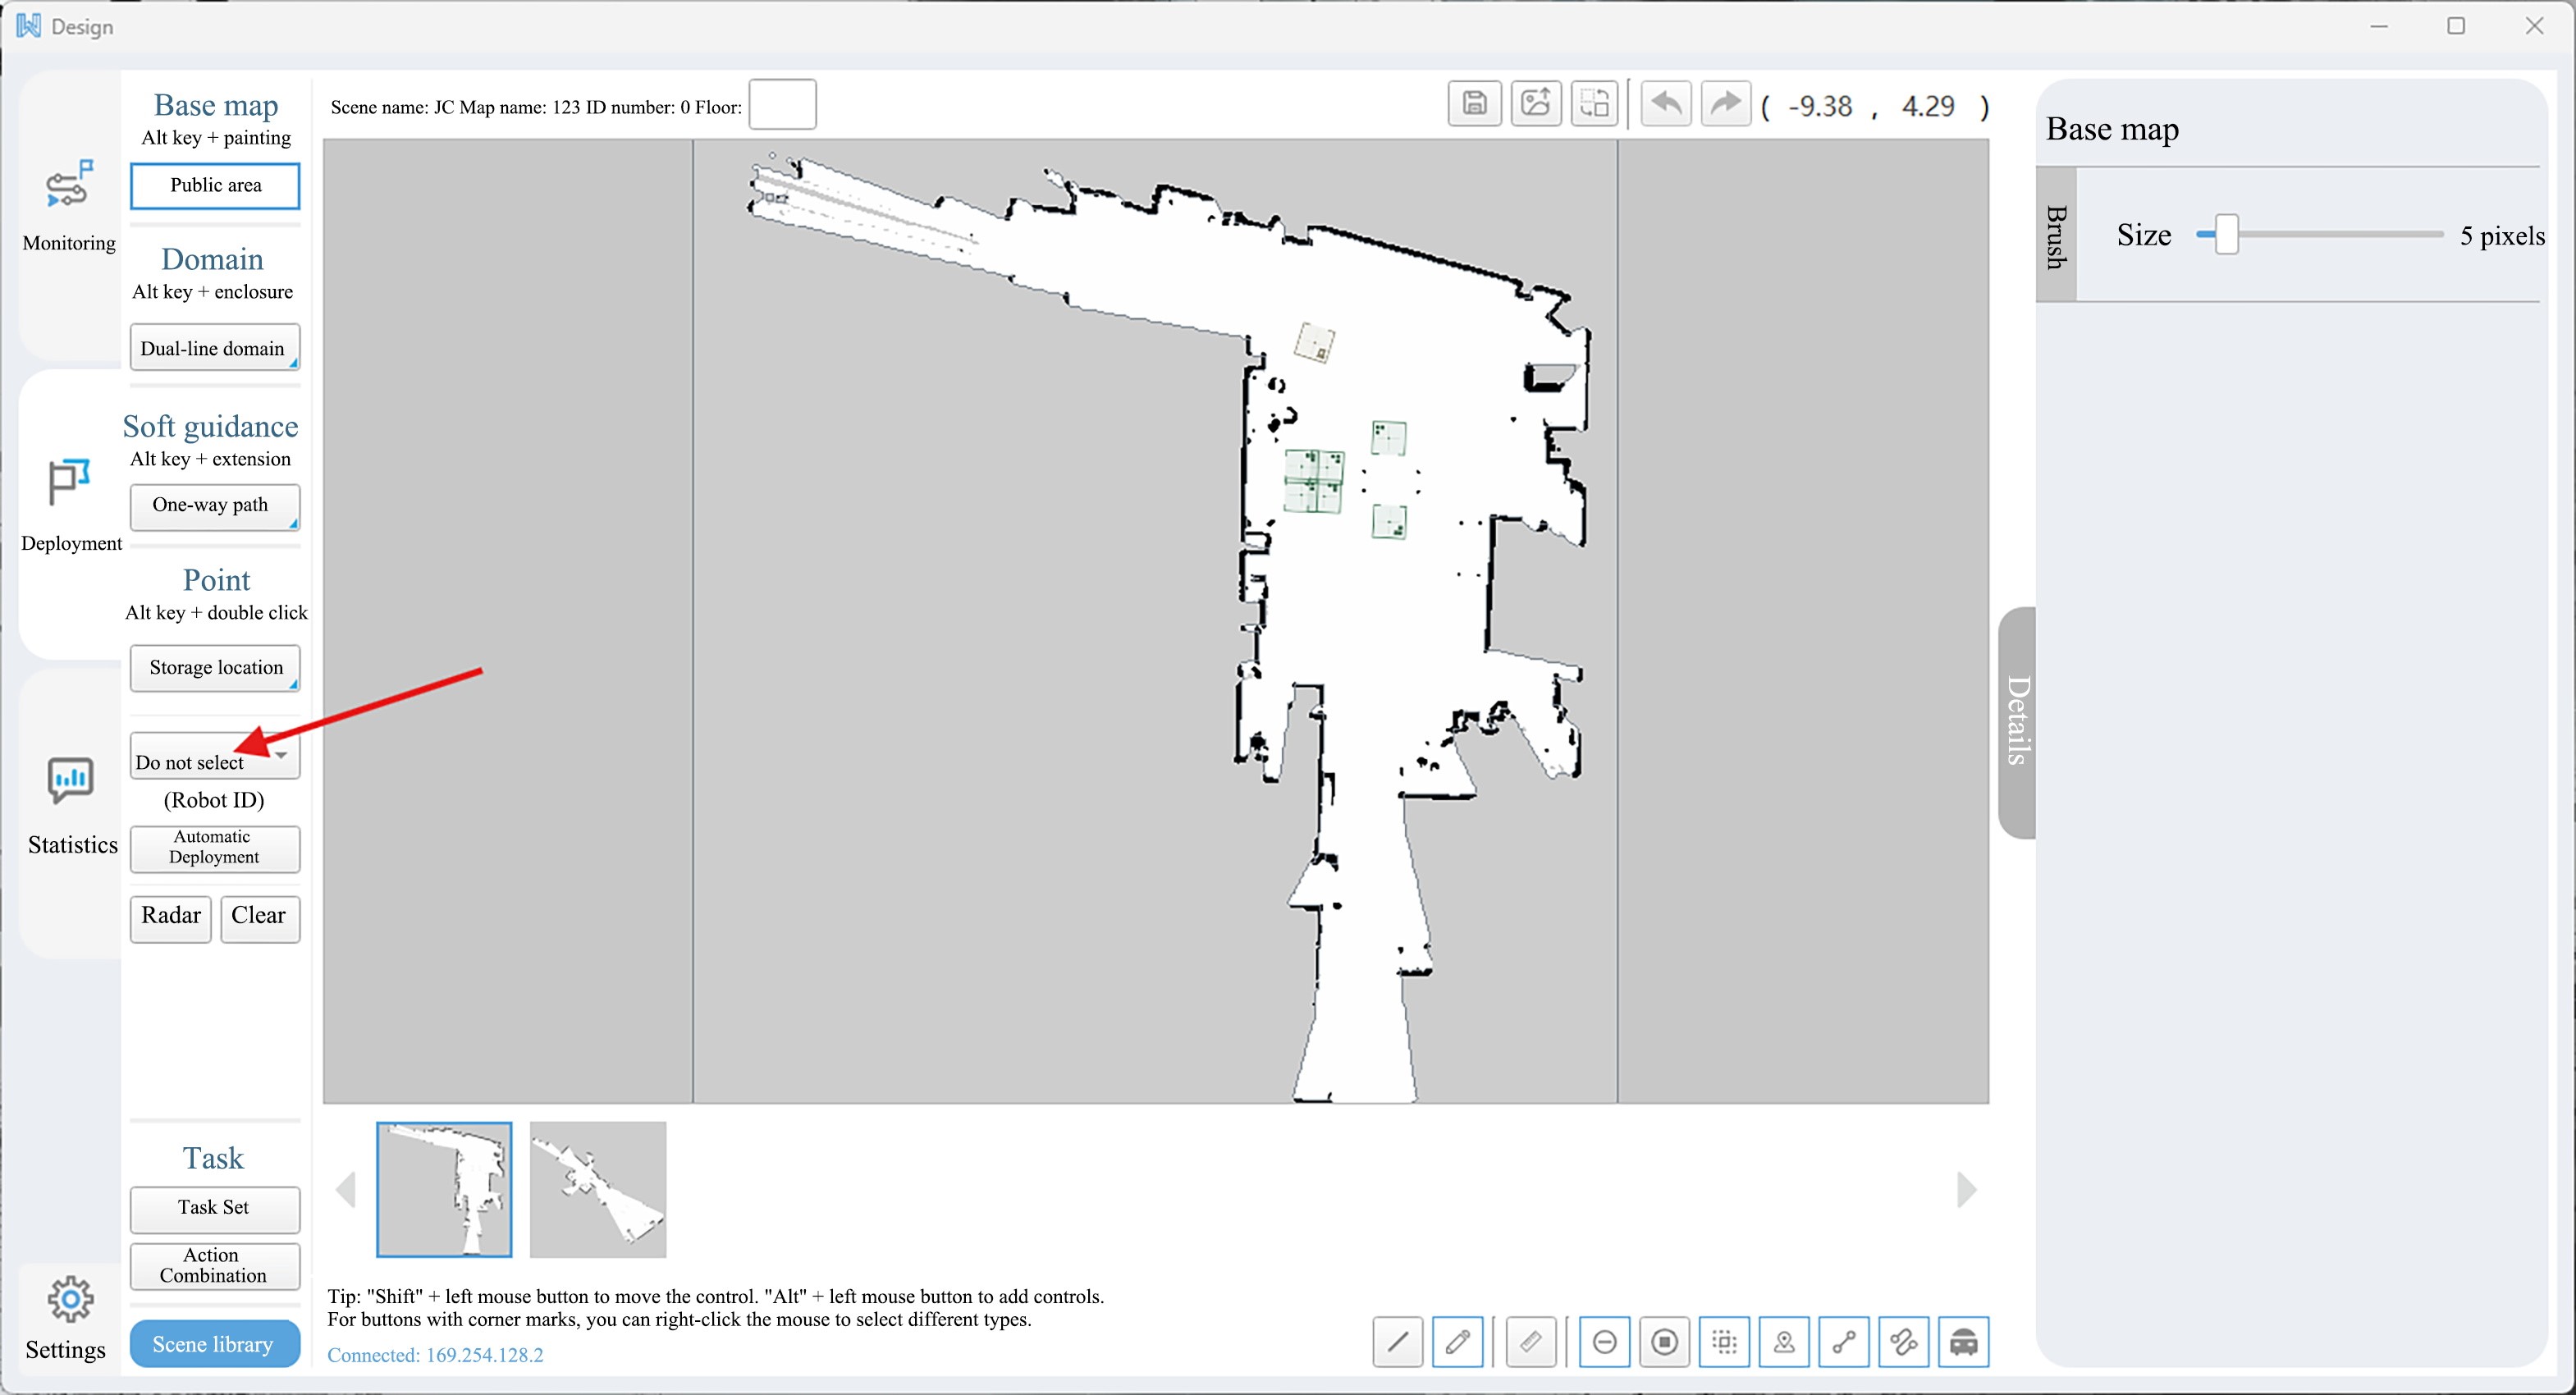
In the scene configuration options on the left, select the robot ID (usually 10001).
To create a point, right-click the
Storage Locationbutton. A storage location type menu will be displayed. After selecting the storage location type (only 'Charging Pile' and 'Storage Location' are used in this demo), click 'Auto-Deploy Points'. Then enter the corresponding data in the text box on the right. After filling in, please click theSavebutton. When the deployed point is created, click theUploadbutton to upload the created positioning information.TIP
The arrival type must be accurate, otherwise the positioning error will be excessive. Be sure to click the upload button after clicking the
Savebutton, otherwise it will not be created.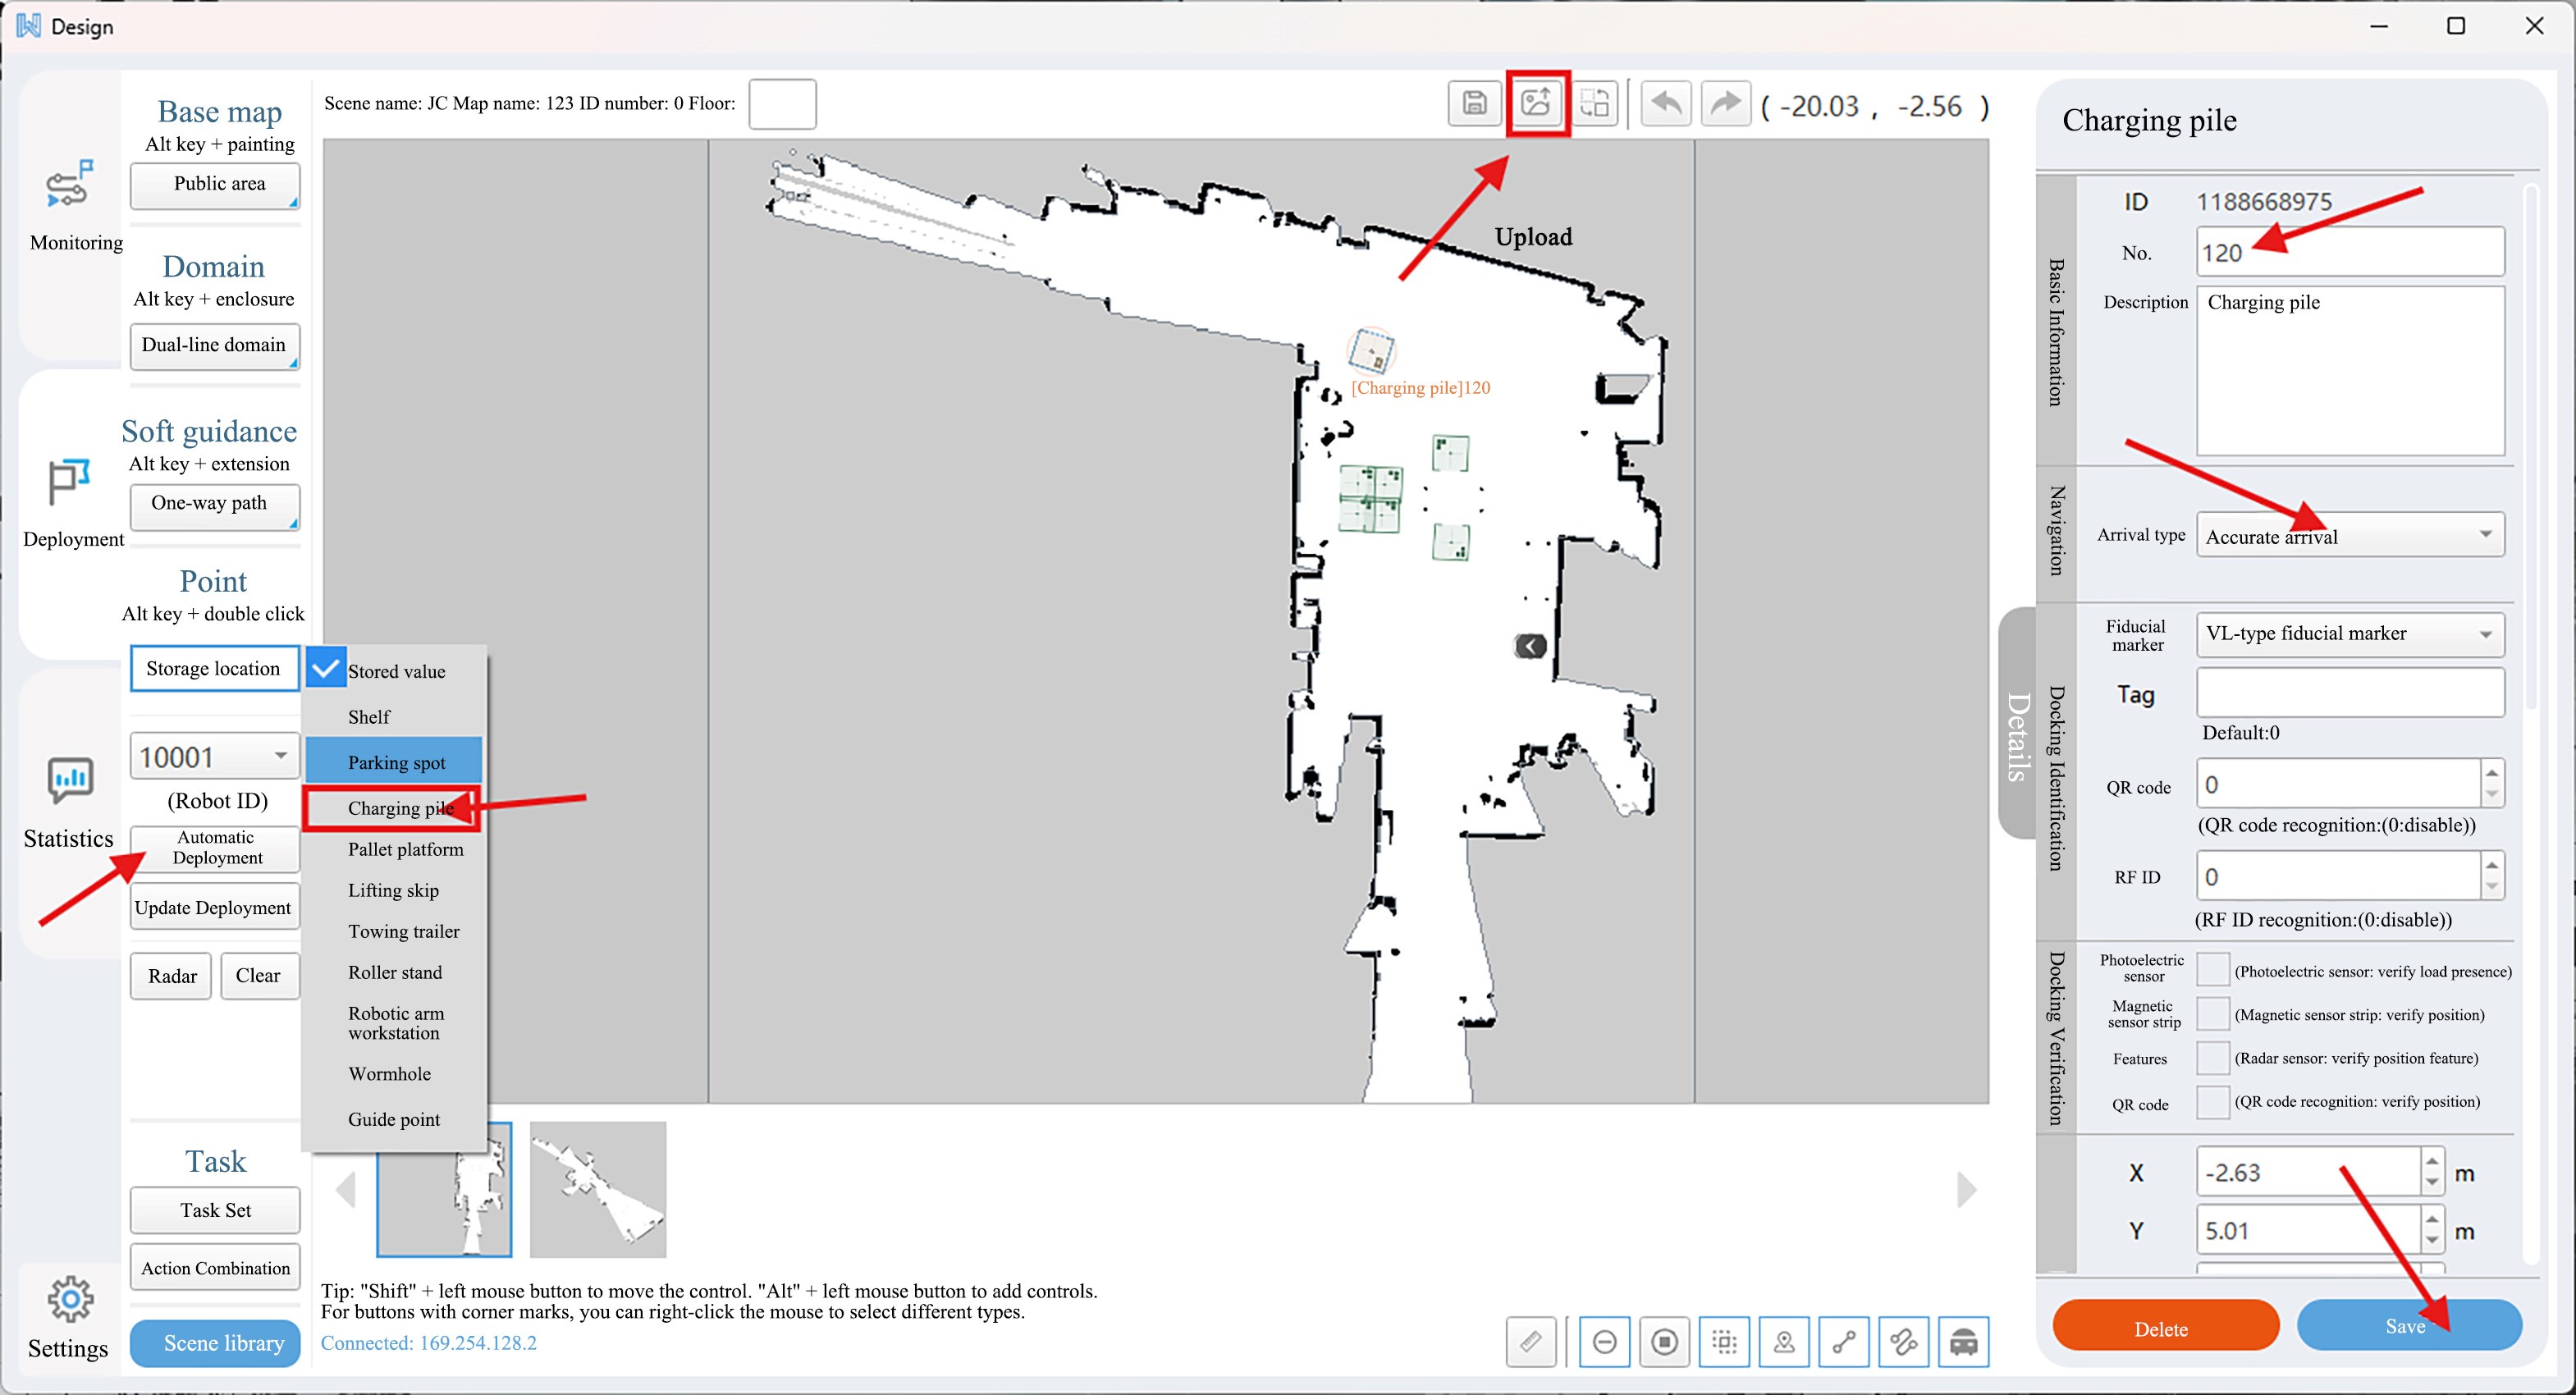
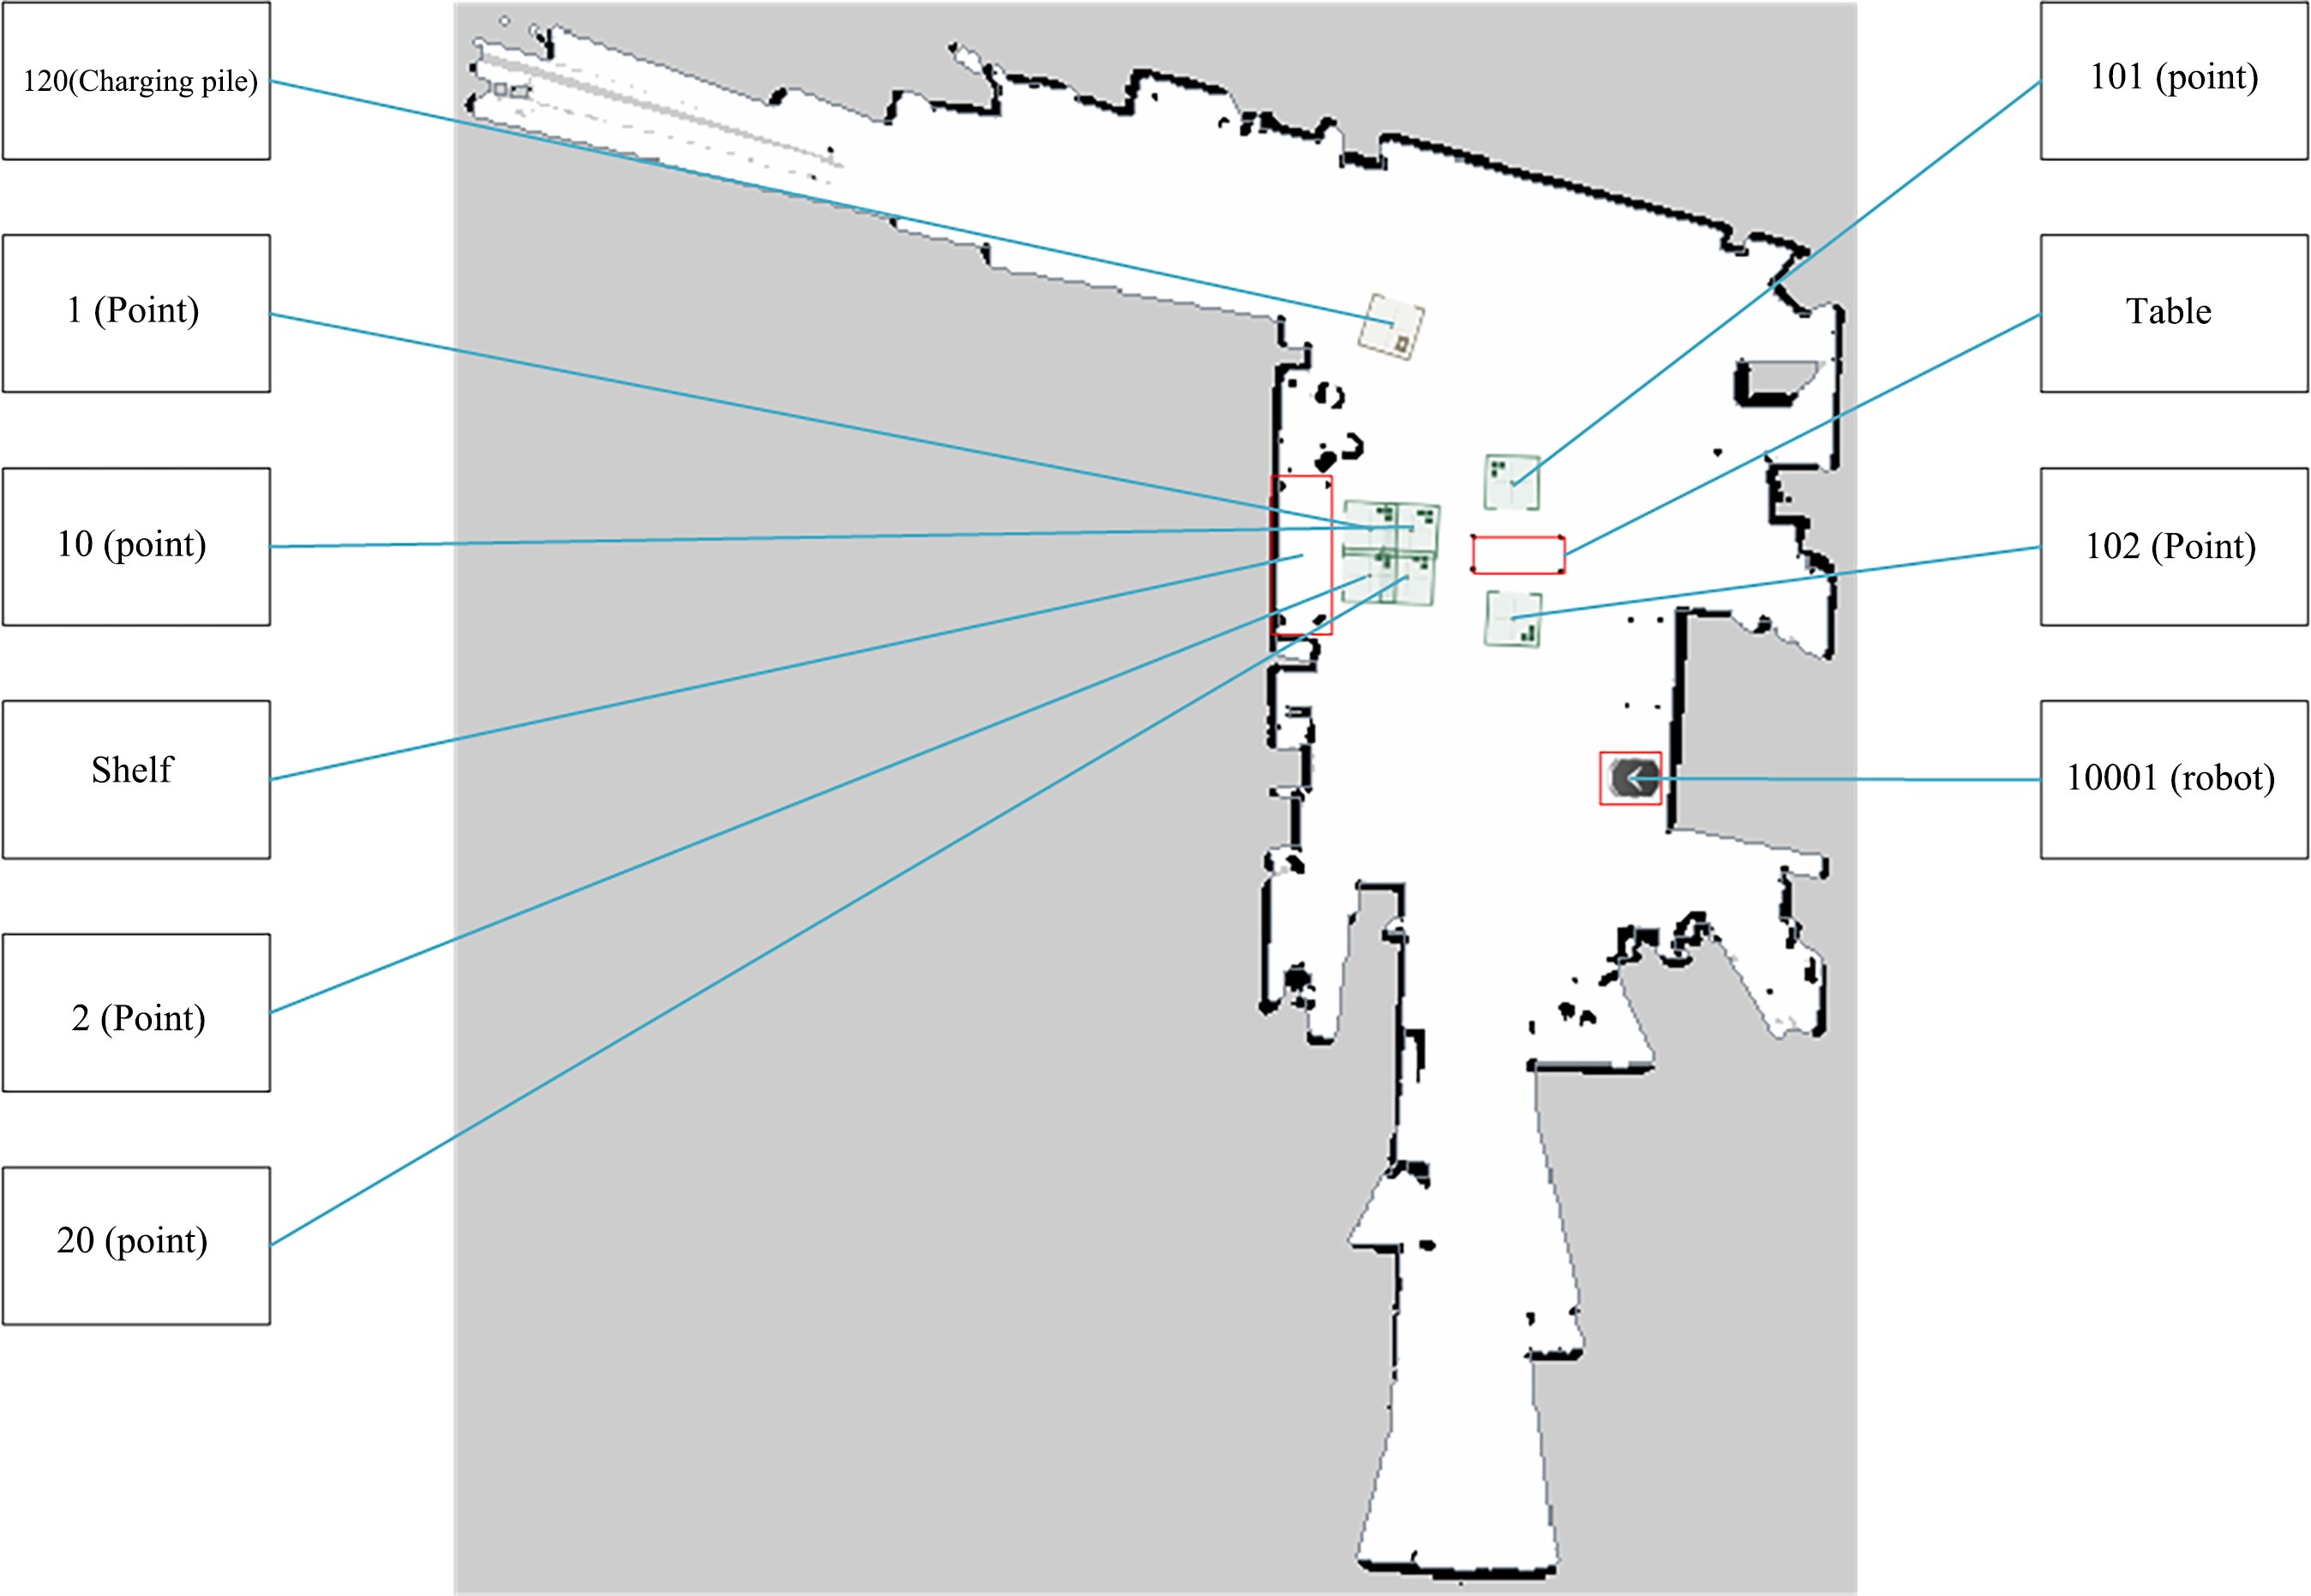
Point Name Rule Description
| Point type | Point Name Rules | Demo Point Name |
|---|---|---|
| Charging point | No need to change. At present, there is only one point for the charging pile. | 120 |
| Empty material box grabbing point | Stand directly in front of the shelves and count columns 1 and 2 from left to right (the orange box in front of the robot shall be approximately 300mm away from the shelves) | 1,2,... |
| Height adjustment on shelf approach point | Directly to the rear of the empty material box grabbing point, count 1 and 2 columns from left to right (append a “0 “ after the corresponding empty material box grabbing point name) (the orange box in front of the robot shall be no less than 500mm away from the shelves). | 10,20,... |
| Material grabbing point | The name shall begin with the characters '10', followed by corresponding numbers appended based on the material placement sequence. (the machine chest is 150mm away from the material table) | 101,102,... |
IV. Software Environment Description
4.1 Structure of Package
For packages, please visit the Resource download to download the 功能包.zip file.
# tree -P "*.txt|*.py|*.cpp|*.msg|*.srv|*.action|*.launch|*.yaml|*.xml" > tree_special_files.txt

./src
├── body_handling_control  => Folder for placing robotic arm and servo driver function packages
│   ├── arm_control
│   │   ├── arm_driver  => Robotic arm driver function package
│   │   │   ├── CMakeLists.txt
│   │   │   ├── launch
│   │   │   │   ├── dual_arm_65_driver.launch
│   │   │   │   └── dual_arm_75_driver.launch
│   │   │   ├── package.xml
│   │   │   └── src
│   │   │       └── arm_driver.cpp  => Driver source code
│   │   └── dual_arm_msgs  => Robotic arm message type
│   │       ├── CMakeLists.txt
│   │       ├── msg
│   │       │   ├── Arm_Analog_Output.msg
│   │       │   ├── Arm_Current_State copy.msg
│   │       │   ├── Arm_Current_State.msg
│   │       │   ├── Arm_Digital_Output.msg
│   │       │   ├── Arm_IO_State.msg
│   │       │   ├── Arm_Joint_Speed_Max.msg
│   │       │   ├── Arm_Pose_Euler.msg
│   │       │   ├── Arm_Software_Version.msg
│   │       │   ├── ArmState.msg
│   │       │   ├── Cabinet.msg
│   │       │   ├── CarteFdPose.msg
│   │       │   ├── CartePos.msg
│   │       │   ├── ChangeTool_Name.msg
│   │       │   ├── ChangeTool_State.msg
│   │       │   ├── ChangeWorkFrame_Name.msg
│   │       │   ├── ChangeWorkFrame_State.msg
│   │       │   ├── Force_Position_Move_Joint.msg
│   │       │   ├── Force_Position_Move_Pose.msg
│   │       │   ├── Force_Position_State.msg
│   │       │   ├── GetArmState_Command copy.msg
│   │       │   ├── GetArmState_Command.msg
│   │       │   ├── Gripper_Pick.msg
│   │       │   ├── Gripper_Set.msg
│   │       │   ├── Hand_Angle.msg
│   │       │   ├── Hand_Force.msg
│   │       │   ├── Hand_Posture.msg
│   │       │   ├── Hand_Seq.msg
│   │       │   ├── Hand_Speed.msg
│   │       │   ├── IO_Update.msg
│   │       │   ├── Joint_Current.msg
│   │       │   ├── Joint_Enable.msg
│   │       │   ├── Joint_Error_Code.msg
│   │       │   ├── Joint_Max_Speed.msg
│   │       │   ├── JointPos.msg
│   │       │   ├── Joint_Step.msg
│   │       │   ├── Joint_Teach.msg
│   │       │   ├── Lift_Height.msg
│   │       │   ├── Lift_Speed.msg
│   │       │   ├── LiftState.msg
│   │       │   ├── Manual_Set_Force_Pose.msg
│   │       │   ├── MoveC.msg
│   │       │   ├── MoveJ.msg
│   │       │   ├── MoveJ_P.msg
│   │       │   ├── MoveJ_PO.msg
│   │       │   ├── MoveL.msg
│   │       │   ├── Ort_Teach.msg
│   │       │   ├── Plan_State.msg
│   │       │   ├── Pos_Teach.msg
│   │       │   ├── Servo_GetAngle.msg
│   │       │   ├── Servo_Move.msg
│   │       │   ├── Set_Force_Position.msg
│   │       │   ├── Set_Realtime_Push.msg
│   │       │   ├── Six_Force.msg
│   │       │   ├── Socket_Command.msg
│   │       │   ├── Start_Multi_Drag_Teach.msg
│   │       │   ├── Stop.msg
│   │       │   ├── Stop_Teach.msg
│   │       │   ├── Tool_Analog_Output.msg
│   │       │   ├── Tool_Digital_Output.msg
│   │       │   ├── Tool_IO_State.msg
│   │       │   └── Turtle_Driver.msg
│   │       └── package.xml
│   └── servo_control
│       ├── servo_demo  => Servo driver function package
│       │   ├── CMakeLists.txt
│       │   ├── package.xml
│       │   └── scripts
│       │       └── servo_control_demo.py  => Servo Demo test script
│       └── servo_ros  => Servo driver script
│           ├── CMakeLists.txt
│           ├── launch
│           │   └── servo_start.launch
│           ├── msg
│           │   ├── ServoAngle.msg
│           │   └── ServoMove.msg
│           ├── package.xml
│           └── src
│               └── servo_controller.cpp  => Robotic arm driver source code
├── body_handling_demo
│   ├── CMakeLists.txt
│   ├── include
│   │   └── body_handling_demo
│   ├── launch
│   │   ├── body_handling_action.launch  => Overall Demo startup script  *
│   │   ├── body_handling_change.launch  => Charging Demo startup script
│   │   ├── body_handling_detect.launch
│   │   ├── body_handling_double_gripper.launch  => Double-arm Material Frame Grasping Demo Startup Script
│   │   └── body_handling_driver.launch  => Overall driver startup script *
│   ├── package.xml
│   ├── scripts
│   │   ├── body_handling_action.py  => Overall Demo script
│   │   ├── body_handling_change.py  => Charging function verification Demo script
│   │   ├── calculate_position.py  => Coordinate system conversion module
│   │   ├── cam_double_gripper_new.py  => Dual-arm grasping Demo script, latest
│   │   ├── cam_double_gripper.py
│   │   ├── realsense_double_gripper.py  => Dual-arm grasping Demo script based on Realsense ROS interface
│   │   ├── robot_detect.py
│   │   ├── test.py
│   │   └── woosh_api_test.py  => Woosh voice module test script
│   └── src
│       └── test.cpp
├── cam_vision  => Folder for placing camera recognition function packages
│   ├── cam_demo
│   ├── cam_identify  => Camera recognition function package
│   │   ├── CMakeLists.txt
│   │   ├── files_pth  => Model weight file saving path
│   │   ├── include
│   │   │   └── cam_identify
│   │   ├── launch
│   │   │   ├── cam_identify.launch  => Recognition script that drives the camera to obtain data through Python's built-in Realsense library
│   │   │   └── realsense_identify.launch  => Recognition script that drives the camera to obtain data through Realsense official ROS library
│   │   ├── package.xml
│   │   ├── scripts
│   │   │   ├── cam_identify.py  => Recognition script
│   │   │   ├── custom_import.py
│   │   │   ├── new_retail_identify.py
│   │   │   ├── realsense_identify.py
│   │   │   └── test.py
│   │   └── src
│   └── cam_msgs  => Camera recognition message type
│       ├── CMakeLists.txt
│       ├── include
│       │   └── cam_msgs
│       ├── msg
│       │   └── Cabinet.msg
│       ├── package.xml
│       ├── src
│       └── srv
│           ├── DetectResult.srv
│           ├── HandResult.srv  => Dual-arm camera recognition service
│           └── HeadResult.srv  => Head camera recognition service
├── d435_control  => Function package for opening the camera with Python-built Realsense interface
│   ├── d435_demo
│   │   ├── CMakeLists.txt
│   │   ├── package.xml
│   │   └── scripts
│   │       ├── get_frame_demo.py
│   │       └── get_pixel_depth_demo.py
│   └── d435_ros
│       ├── CMakeLists.txt
│       ├── launch
│       │   └── camera_start.launch
│       ├── msg
│       │   └── RealsenseImage.msg
│       ├── package.xml
│       ├── scripts
│       │   └── camera_service.py
│       └── srv
│           ├── CameraSetting.srv
│           └── PixelToCoordinate.srv
├── tf_transform  => TF coordinate setting and conversion function package
│   ├── tf_calculate
│   │   ├── CMakeLists.txt
│   │   ├── include
│   │   │   └── tf_calculate
│   │   ├── launch
│   │   │   ├── tfcoordinate_tree_copy.launch
│   │   │   └── tfcoordinate_tree.launch  => Coordinate tree startup script
│   │   ├── package.xml
│   │   ├── rviz
│   │   ├── scripts
│   │   │   └── tf_get.py
│   │   └── src
│   │       └── rm_arm_trans.cpp
│   ├── tf_demo  => TF coordinate test process function package
│   │   ├── CMakeLists.txt
│   │   ├── include
│   │   │   └── tf_demo
│   │   ├── launch
│   │   ├── package.xml
│   │   ├── scripts
│   │   │   └── tf_demo.py
│   │   └── src
│   └── tf_msgs  => TF coordinate message type function package (abbreviated)
│       ├── action
│       │   └── Shoot.action
│       ├── CMakeLists.txt
│       ├── include
│       ├── msg
│       │   ├── GraspPose.msg
│       │   └── TargetResult.msg
│       ├── package.xml
│       └── srv
│           ├── ControlArmMoveitPose.srv
│           ├── ControlArmMoveitTarget.srv
│           ├── ControlArm.srv
│           ├── ControlGripper.srv
│           ├── ControlLift.srv
│           ├── Ldle_Action.srv
│           ├── Target2Agv.srv
│           ├── Target2Base.srv
│           ├── TargetDetect.srv
│           └── WaterAgv.srv
└── tree_special_files.txt  => File structure tree
4.2 Basic Software Environment
4.2.1 Software environment
- System Version
- Ubuntu version: 20.04
- System architecture: X86/ARM64
- Software version
- ROS: ros1-noetic
- Python: Python3.8
4.2.2 Python Basic Environment
After the main control has the ROS environment installed, the Python environment can be completed through the Python library in the requirements.txt script downloaded from the Resource download . The execution commands are as follows:
pip3 install -r requirements.txt -i https://pypi.doubanio.com/simple/4.3 Parameter Configuration Description
4.3.1 Built-in Parameters of body_handling_driver.launch
Path: .src\body_handling_demo\launch\body_handling_driver.launch
<arg name="open_base" value="Base" />    <!-- The name of the global coordinate system of the robotic arm used; Demo is Base -->
<arg name="display" value="true" />    <!-- Whether to enable rviz visualization -->
4.3.2 Built-in Parameters of body_handling_action.launch
Path:.src\body_handling_demo\launch\body_handling_action.launch
<?xml version="1.0"?>
<launch>

    <node pkg="body_handling_demo" type="body_handling_action.py" name="body_handling_action" output="screen" >
        <!-- Position of the cargo box -->
        <param name="cargo_box_col" value="1" type="int"/>
        <param name="cargo_box_row" value="2" type="int"/>
        <param name="cargo_box_num" value="1" type="int"/>

        <!-- Position of the cargo -->
        <rosparam param="cargoes_name">["JiaoHuanJi", "NSK", "AnNiu", "YiHeDa"]</rosparam>

        <!-- Floor number -> Lift height -->
        <param name="floor1" value="0.105" type="double"/>
        <param name="floor2" value="0.585" type="double"/>
        <param name="floor3" value="1.080" type="double"/>
        <param name="floor4" value="9.999" type="double"/>

        <!-- Fixed position -> Lift height -->
        <param name="lift_send" value="0.645" type="double"/>
        <param name="lift_table" value="0.305" type="double"/>

        <!-- Speed control -->
        <param name="lift_speed" value="80" type="int"/>
        <param name="arms_speed" value="50" type="int"/>

        <!-- Name of the tool coordinate system -->
        <param name="left_tool1" value="grip_left" type="string"/>
        <param name="left_tool2" value="nip_left" type="string"/>
        <param name="left_tool3" value="tip_left" type="string"/>
        <param name="right_tool1" value="grip_right" type="string"/>
        <param name="right_tool2" value="nip_right" type="string"/>
        <param name="right_tool3" value="tip_right" type="string"/>

        <!-- Set the duration of automatic mode (seconds)-->
        <param name="auto_mode_time" value="86400" type="int"/>

        <!-- Set the duration of manual mode (seconds)-->
        <param name="manual_mode_time" value="86400" type="int"/>

        <!-- Set the autonomous charging position -->
        <rosparam param="charge_range">[20, 90]</rosparam>
        <param name="charge_pose" value="120" type="string"/>

        <!-- Set the rotation angle of the head servo -->
        <rosparam param="servo_motor">[360, 500]</rosparam>
        <rosparam param="servo_tolerant">[3, 3]</rosparam>

        <!-- Whether to perform voice broadcast -->
        <param name="talk_flag" value="true" type="bool"/>

        <!-- Preset position data of left and right arms -->
        <rosparam command="load" file="$(find body_handling_demo)/config/joints.yaml"/>
        <rosparam command="load" file="$(find body_handling_demo)/config/poses.yaml"/>

    </node>

</launch>
4.3.3 Built-in Parameters of poses.yaml
Path: .\src\body_handling_demo\config\poses.yaml
left_arm_poses:
- [[0.07492, -0.45138, 0.14876], [1.577, -0.757, 0]]    # Left arm extending into the shelf
- [[0.12100, -0.14400, 0.07963], [-1.57, -0.786, 3.141]]    # Left arm retracting
right_arm_poses:
- [[-0.07492, -0.45138, 0.14876], [-1.577, -0.757, 3.147]]    # Right arm extending into the shelf
- [[-0.12100, -0.14400, 0.07963], [1.57, -0.786, 0]]    # Right arm retracting
4.3.4 Built-in Parameters of joints.yaml
Path: .\src\body_handling_demo\config\joints.yaml
left_arm_joints:
- [0, -90, -130, 90, 90, 85]    # Left arm in tightened state
- [-78.068, -77.349, -93.606, 16.438, 83.680, -47.068]    # Left arm retracting from the shelf
- [-87.761, -70.033, -92.774, 6.623, 75.427, -43.667]    # Left arm in cargo box placing state
- [-75.226, -65.018, -90.613, 15.552, 66.080, -53.004]    # Left arm moving away from the cargo box
- [-111.321, -7.430, -90.332, 45.072, -98.473, -25.041]    # Left arm in target object recognition posture
- [-120.000, -10.000, -75.000, 45.000, -110.000, -20.000]    # Left arm in grasping transition posture
- [-121.120, -76.013, -36.879, 39.977, -75.353, -14.467]    # Left arm in material placing state
- [-79.906, -73.633, -127.319, 15.287, 111.774, -37.600]    # Left arm retracting the cargo box
- [-86.796, -70.679, -93.996, 6.333, 77.678, -43.493]    # Left arm placing the cargo box onto the shelf

right_arm_joints:
- [0, 90, 130, -90, -90, -85]    # Right arm in tightened state
- [73.843, 78.015, 92.094, -15.814, -80.145, 49.309]    # Right arm retracting from the shelf
- [81.654, 71.927, 89.154, -8.213, -70.918, 49.307]    # Right arm in cargo box placing state
- [75.226, 65.018, 90.613, -15.552, -66.080, 53.004]    # Right arm moving away from the cargo box
- [111.321, 7.430, 90.332, -45.072, 98.473, 25.041]    # Right arm recognizing the target object
- [120.000, 10.000, 75.000, -45.000, 110.000, 20.000]    # Right arm in grasping transition posture
- [121.120, 76.013, 36.879, -39.977, 75.353, 14.467]    # Right arm in material placing state
- [74.952, 72.032, 127.261, -15.250, -108.318, 41.667]    # Right arm retracting the cargo box
- [81.651, 71.930, 89.174, -10.310, -69.756, 48.190]    # Right arm placing the cargo box onto the shelf
4.3.5 Camera_service.py Parameters
Path: .\src\d435_control\d435_ros\scripts\camera_service.py
# Line 12
# Camera name dictionary: Camera name : Serial number
CAMERA_NAME = {
    "camera_left": '152122078151',
    "camera_right": '152222072647',
    "camera_middle": '052522070156'
}
Camera parameter acquisition method:
Open a new terminal window and execute the
realsense-viewercommand as follows: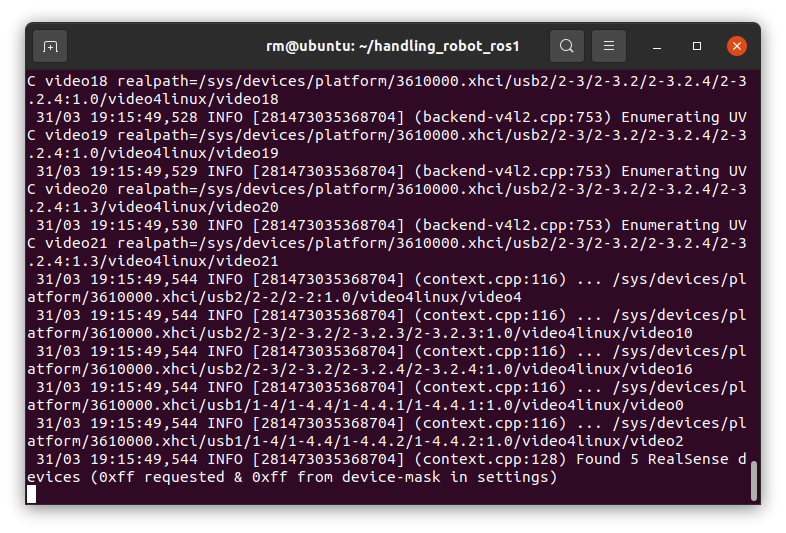
When the last output shows a
Found 5 Realsense devicesfield, it indicates that all cameras are turned on successfully.After executing the command, the interface shown in the figure below will be displayed. Click
Add Sourceto add the corresponding realsense device to enter the status window of the corresponding camera.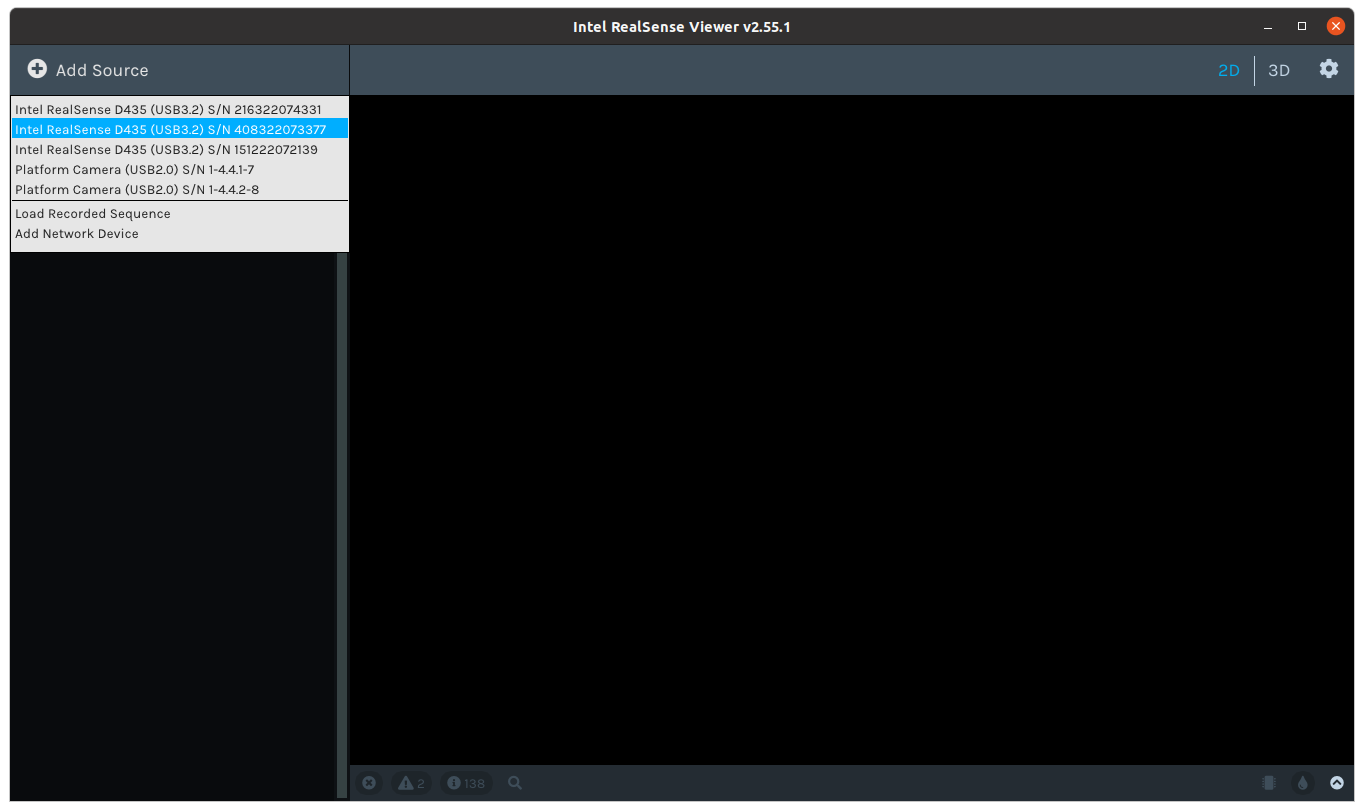
Switch the
RGB Camerastatus toonand you can obtain 2D/3D data of the camera. Then you can determine which camera it is according to the data.
Turn on
infobutton on the camera and modify the correspondingSerial Numberdata to the corresponding parameters in camera_service.py.
4.3.6 Camera Calibration Results
Path: .\src\tf_transform\tf_calculate\src\rm_arm_trans.cpp
// Line 126
int main(int argc, char **argv)
{
    // Initialize the node
    ros::init(argc, argv, "arm_state_publisher");
    ros::NodeHandle n("~");
    Listen_Arm_State arm_state_publisher(n);

    // Set the publishing frequency
    ros::Rate loop_rate(10);

    while (ros::ok())
    {
        //Create tf broadcasters
        static tf::TransformBroadcaster l_top_camera, r_top_camera, m_top_camera;
        // Initialize left arm tf data, left arm camera calibration
        tf::Transform camera_transform_l;
        camera_transform_l.setOrigin(tf::Vector3(0.083744, -0.040517, 0.009167));  // (x, y, z)
        tf::Quaternion quater_l;
        quater_l.setW(0.7057);
        quater_l.setX(-0.0124);
        quater_l.setY(-0.0082);
        quater_l.setZ(0.7083);
        camera_transform_l.setRotation(quater_l);

        // Broadcast tf data between flange and base
        l_top_camera.sendTransform(tf::StampedTransform(camera_transform_l, ros::Time::now(),
                                arm_state_publisher.left_top_name, arm_state_publisher.left_camera_name));

        // Initialize right arm tf data, right arm camera calibration
        tf::Transform camera_transform_r;
        camera_transform_r.setOrigin(tf::Vector3(0.083744, -0.043517, 0.009167));  // (x, y, z)
        tf::Quaternion quater_r;
        quater_r.setW(0.7057);
        quater_r.setX(-0.0124);
        quater_r.setY(-0.0082);
        quater_r.setZ(0.7083);
        camera_transform_r.setRotation(quater_r);

        r_top_camera.sendTransform(tf::StampedTransform(camera_transform_r, ros::Time::now(),
                                arm_state_publisher.right_top_name, arm_state_publisher.right_camera_name));

        /* Head camera calibration data */
        // Initialize head tf data, left head camera calibration
        tf::Transform camera_transform_midl;

        camera_transform_midl.setOrigin(tf::Vector3(-0.160368, -0.091956, 0.114612));  // (x, y, z)
        tf::Quaternion quater_midl;
        quater_midl.setW(0.32180899);
        quater_midl.setX(0.22992885);
        quater_midl.setY(0.79605872);
        quater_midl.setZ(-0.4581072);
        camera_transform_midl.setRotation(quater_midl);

        // Broadcast tf data between flange and base
        m_top_camera.sendTransform(tf::StampedTransform(camera_transform_midl, ros::Time::now(),
                                arm_state_publisher.left_base_name, arm_state_publisher.midl_camera_name));

        // Initialize head tf data, right head camera calibration
        tf::Transform camera_transform_midr;

        camera_transform_midr.setOrigin(tf::Vector3(0.198955, -0.109685, 0.068842));
        tf::Quaternion quater_midr;
        quater_midr.setW(-0.35264227);
        quater_midr.setX(-0.17364313);
        quater_midr.setY(0.80492861);
        quater_midr.setZ(-0.44450133);
        camera_transform_midr.setRotation(quater_midr);

        // Broadcast tf data between flange and base
        m_top_camera.sendTransform(tf::StampedTransform(camera_transform_midr, ros::Time::now(),
                                arm_state_publisher.right_base_name, arm_state_publisher.midr_camera_name));

        // Loop at the set frequency
        ros::spinOnce();
        loop_rate.sleep();
    }

    return 0;
}
V. Demo Module Function Test
5.1 Functional Test
Enter the workspace
bashcd <the workspace> # Enter the workspace source devel/setup.bash # Refresh the environment variablesRun ros drive node
bashroslaunch body_handling_demo body_handling_driver.launch # Launch the control nodes of each hardwareTest the functions of each module
Test grabbing
bashroslaunch body_handling_demo body_handling_double_gripper.launchTest charging
bashroslaunch body_handling_demo body_handling_change.launchTest end-to-end task
bashroslaunch body_handling_demo body_handling_action.launch # 启动整体
TIP
The above three scripts cannot be launched at the same time.
5.2 Code Examples
Execution Function of body_handling_action.py
python# ------------------------------------ Main execution program def execute(self): # Check if the chassis is functional # Initialize the number of checks test_times = 0 while not rospy.is_shutdown(): # Determine the robot's working mode if self.work_mode != 2: # judge, three times if test_times >= 3: time.sleep(1) else: rospy.logwarn("请将机器人设置成任务模式!") time.sleep(6) elif self.robot_state != 2 and self.robot_state != 8: # judge, three times if test_times >= 3: time.sleep(1) else: if self.robot_state == 0: rospy.logwarn("机器人状态未被定义!") elif self.robot_state == 1: rospy.logwarn("机器人未被初始化!") elif self.robot_state == 3: rospy.logwarn("机器人正在泊车!") elif self.robot_state == 4: rospy.logwarn("机器人正在执行任务中,请关闭当前任务!") else: rospy.logwarn("机器人状态异常!") time.sleep(6) else: break test_times += 1 # Delay time.sleep(1) # Check servo error if self._servo_error[0] >= self.servo_tolerant[0] or self._servo_error[1] >= self.servo_tolerant[1]: rospy.logwarn(f"舵机角度需要重新设置,请确保一号舵机值为{ self.servo_motor[0] }, 二号舵机值为{ self.servo_motor[1] }!") return False rospy.logwarn("程序初始化完毕!") # Execute actions in a loop until the node is closed while not rospy.is_shutdown(): # ************Block the robot************ # Refresh the event self._wait_manual_event.clear() # Create a timestamp to check if the robot is in manual mode timer = rospy.Timer(rospy.Duration(0.5), self._monitor_manual_status, oneshot=False) if not self._wait_manual_event.wait(timeout=self.manual_mode_time): # 等5分钟 rospy.logerr(f"{ self.manual_mode_time / 60.0 }分钟内没有切换至手动模式去调整机器人!") return False else: rospy.logwarn("机器人已切换至手动模式,请及时还原案例演示场景!") timer.shutdown() # Move away from the lift position self._set_lift_height(self.lift_height["5"], self.lift_speed) self._wait_arm_planned(1) # Tighten the robotic arm (as a signal: the robot will stop first, and manual operations will be performed before handling) self._double_movej_s(0, speed=self.arms_speed) # Dual-arm grasping self._grip_materiel("open", 1) self._grip_materiel("open", 2) rospy.sleep(3) # Check if autonomous charging is required if self._auto_electricize: # Robot charging upgrade, autonomous charging self._auto_electricize = 2 # Create an event stamp to check if the robot is in automatic mode self._wait_auto_event.clear() timer = rospy.Timer(rospy.Duration(0.5), self._monitor_auto_status, oneshot=False) if not self._wait_auto_event.wait(timeout=self.auto_mode_time): # 等24小时 rospy.logerr(f"{ self.auto_mode_time / 60.0 }分钟内没有充满电,请检查充电装置!") return False else: rospy.logwarn("自主充电成功!") time.sleep(5) timer.shutdown() else: # Create an event stamp to check if the robot is in automatic mode self._wait_auto_event.clear() timer = rospy.Timer(rospy.Duration(0.5), self._monitor_auto_status, oneshot=False) if not self._wait_auto_event.wait(timeout=self.auto_mode_time): # 等24小时 rospy.logerr(f"{ self.auto_mode_time / 60.0 }分钟内没有切换至自动模式!") return False else: rospy.logwarn("成功切换至自动模式!") time.sleep(5) timer.shutdown() # Loop through n overall tasks for index in range(self.cargo_box_num): if self._navigation_point != self.cargo_boxes[index][0]: # Reach the transition point self._navigation_wait(self._navigation_plan(self.cargo_boxes[index][0] + "0")) # print(3) else: pass # Lift the elevator to above the fixed position of the cargo box self._set_lift_height(self.lift_height[self.cargo_boxes[index][1]], self.lift_speed) self._wait_arm_planned(1) # Plan the chassis to the target grasping position self._navigation_wait(self._navigation_plan(self.cargo_boxes[index][0])) self._navigation_point = self.cargo_boxes[index][0] # Extend both arms self._double_movel_s(0, speed=self.arms_speed) # print(4) # Lift the elevator to the fixed position of the cargo box self._set_lift_height(self.lift_height[self.cargo_boxes[index][1]] - 50, self.lift_speed) self._wait_arm_planned(1) # Change the tool coordinate system coor_name = ChangeTool_Name() coor_name.toolname = self.left_tool2 for _ in range(3): self.set_left_tool_frame.publish(coor_name) rospy.sleep(0.1) coor_name.toolname = self.right_tool2 for _ in range(3): self.set_right_tool_frame.publish(coor_name) rospy.sleep(0.1) # print(5) frame_id = "camera_middle" # Recognize the AR code if self._set_camera_status(True, frame_id): # Read the head camera recognition result ar_result = self._get_aruco_detect_result(num=582, link_name=frame_id, delay=10.0) # Grasp the cargo box self._pick_up_the_box(ar_result) if self._set_camera_status(False, frame_id): pass else: rospy.logerr("头部相机关闭失败,请检查装置!") return False else: rospy.logerr("头部相机打开失败,请检察装置!") return False # Lift the elevator upward self._set_lift_height(self.lift_height[self.cargo_boxes[index][1]] + 30, self.lift_speed) self._wait_arm_planned(1) # Retract the robotic arm to the target position self._double_movej_s(1, speed=self.arms_speed) rospy.logwarn(f"机器人将装填第{ self.cargo_boxes[index][0] }列,第{ self.cargo_boxes[index][1] }层的物料框!") # Control the chassis to move backward if not self._base_step_plan(-0.3): rospy.logerr("机器人步进服务回调失败!") # Move to the material target position carry = self._navigation_plan(self.cargoes[index]) # Execute after a 6-second delay to avoid collision with the shelf rospy.sleep(5) # Move the elevator to the transport position self._set_lift_height(self.lift_height["5"], self.lift_speed) self._wait_arm_planned(1) self._navigation_wait(carry=carry) # Place the box with both arms self._double_movej_s(2, speed=self.arms_speed) # Lower the elevator to the table self._set_lift_height(self.lift_height["6"] - 35, self.lift_speed) self._wait_arm_planned(1) # Move both arms away self._double_movej_s(3, speed=self.arms_speed) # Lift the elevator to the recognition position self._set_lift_height(self.lift_height["6"] + 50, self.lift_speed) self._wait_arm_planned(1) # Move both arms to the target recognition posture self._double_movej_s(4, speed=self.arms_speed) # Lift the elevator to the grasping position self._set_lift_height(self.lift_height["6"], self.lift_speed) self._wait_arm_planned(1) # Delay data rospy.sleep(1) # Thread to grasp materials into the cargo box self.left_thread = threading.Thread(target=self._arm_actions_of_thread, args=("camera_left", 1, index, self.arms_speed)) self.right_thread = threading.Thread(target=self._arm_actions_of_thread, args=("camera_right", 2, index, self.arms_speed)) # Arm threads start self.left_thread.start() self.right_thread.start() # Wait for the completion of cargo box grasping self._wait_actions_finish(3600) # Take the cargo box # Change Tool Coordinate System coor_name = ChangeTool_Name() coor_name.toolname = self.left_tool2 for _ in range(3): self.set_left_tool_frame.publish(coor_name) rospy.sleep(0.1) coor_name.toolname = self.right_tool2 for _ in range(3): self.set_right_tool_frame.publish(coor_name) rospy.sleep(0.1) # Lift the elevator to above the table self._set_lift_height(self.lift_height["6"] + 50, self.lift_speed) self._wait_arm_planned(1) # Extend the robotic arm self._double_movej_s(3, speed=self.arms_speed) # Lower the elevator to the table self._set_lift_height(self.lift_height["6"], self.lift_speed) self._wait_arm_planned(1) frame_id = "camera_middle" # Recognize the AR code if self._set_camera_status(True, frame_id): # Read the head camera recognition result ar_result = self._get_aruco_detect_result(num=582, link_name=frame_id, delay=10.0) # Grasp the cargo box self._pick_up_the_box(ar_result) if self._set_camera_status(False, frame_id): pass else: rospy.logerr("头部相机关闭失败,请检查装置!") return False else: rospy.logerr("头部相机打开失败,请检察装置!") return False # Return to the shelf # Lift the elevator up to the transport position self._set_lift_height(self.lift_height["5"], self.lift_speed) self._wait_arm_planned(1) # Retract the robotic arm self._double_movej_s(7, speed=self.arms_speed) # Control the chassis to move backward if not self._base_step_plan(-0.15): rospy.logerr("机器人步进服务回调失败!") # Wait for the elevator to reach the material pickup position self._navigation_wait(self._navigation_plan(self.cargo_boxes[index][0] + "0")) # Lift the elevator to the shelf position self._set_lift_height(self.lift_height[self.cargo_boxes[index][1]], self.lift_speed) self._wait_arm_planned(1) # Move to the shelf target position self._navigation_wait(self._navigation_plan(self.cargo_boxes[index][0])) # Extend the robotic arm to place the loaded box on the shelf self._double_movej_s(8, speed=self.arms_speed) # Lift the elevator to the placement position self._set_lift_height(self.lift_height[self.cargo_boxes[index][1]] - 95, self.lift_speed) self._wait_arm_planned(1) # Move both arms away self._double_movej_s(3, speed=self.arms_speed) # Lift the elevator to the shelf position self._set_lift_height(self.lift_height[self.cargo_boxes[index][1]], self.lift_speed) self._wait_arm_planned(1) # Tighten the robotic arm self._double_movel_s(1, speed=self.arms_speed) # Control the chassis to move backward if not self._base_step_plan(-0.3): rospy.logerr("机器人步进服务回调失败!") rospy.logwarn(f"第{ index + 1 }次任务执行成功!") # Start a new demo round and initialize the reached positions self._navigation_point = ""Coordinate Conversion Program of calculate_position.py
Python#!/usr/bin/env python3 # -*- coding=UTF-8 -*- import numpy as np class Calculate_Position: def __init__(self): pass # Quaternion multiplication: represents rotation by q2 first, then q1. Not commutative. def quaternion_multiply(self, q1, q2): ''' Returns the real part (scalar part) of the quaternion, which represents the "direction" or "angle" after rotation. However, since quaternion rotation representation does not depend on the scalar part, we usually focus on the imaginary part w. Returns the imaginary part (x, y, z) of the quaternion, which represents the components of the rotation axis in the new coordinate system after rotation. ''' w1, x1, y1, z1 = q1 w2, x2, y2, z2 = q2 # Quaternion Multiplication for Matrix Calculation return np.array([ w1*w2 - x1*x2 - y1*y2 - z1*z2, w1*x2 + x1*w2 + y1*z2 - z1*y2, w1*y2 + y1*w2 + z1*x2 - x1*z2, w1*z2 + z1*w2 + x1*y2 - y1*x2 ]) # Calculate the quaternion conjugate matrix (representing the inverse of the quaternion). The real part w remains unchanged, and the imaginary part rotates in the opposite direction. def conjugate_quaternion(self, q): return np.array([q[0], -q[1], -q[2], -q[3]]) # Transform vector v by the rotation represented by quaternion q def transform_vector_by_quaternion(self, q, v): # Calculate the inverse of quaternion q q_conjugate = self.conjugate_quaternion(q) # print(q_conjugate) # Quaternion multiplication can represent and perform rotations in 3D space. When rotating a vector around an axis, we can express the vector as a pure quaternion and apply the rotation using quaternion multiplication. v_quaternion = np.array([0, v[0], v[1], v[2]]) # Quaternion multiplication: equivalent to rotating vector v around the axis defined by quaternion q in 3D space by a specified angle, then converting the result back to the original coordinate system. v_transformed = self.quaternion_multiply(self.quaternion_multiply(q, v_quaternion), q_conjugate) # print(v_transformed) return v_transformed[1:] def euler_to_quaternion(self, roll, pitch, yaw): cy = np.cos(yaw * 0.5) sy = np.sin(yaw * 0.5) cp = np.cos(pitch * 0.5) sp = np.sin(pitch * 0.5) cr = np.cos(roll * 0.5) sr = np.sin(roll * 0.5) w = cr * cp * cy + sr * sp * sy x = sr * cp * cy - cr * sp * sy y = cr * sp * cy + sr * cp * sy z = cr * cp * sy - sr * sp * cy return np.array([w, x, y, z]) def quaternion_to_euler(self, w, x, y, z): # Pitch angle pitch = np.arcsin(2 * (w * y - z * x)) # Roll angle roll = np.arctan2(2 * (w * x + z * y), 1 - 2 * (x * x + y * y)) # Yaw angle yaw = np.arctan2(2 * (w * z + x * y), 1 - 2 * (y * y + z * z)) return np.array([roll, pitch, yaw]) if __name__=='__main__': calculator = Calculate_Position() # Original rotation quaternion and translation vector (w, x, y, z) of target Q q_original = np.array([-0.4050101114235415, -0.6075839806470373, 0.5201112218917696, -0.44304947011371243]) print("初始旋转欧拉角为:", calculator.quaternion_to_euler(*q_original)) p_original = np.array([-0.037342273040243304, -0.34348792978243164, -0.0864955364501239]) # Translation vector with target Q as the reference coordinate system d_vector = np.array([0.0855, 0.17, 0.098]) # Convert d_vector from the target coordinate system to the base coordinate system d_transformed = calculator.transform_vector_by_quaternion(q_original, d_vector) # Calculate the new translation vector p_new = p_original + d_transformed # The new pose consists of the same rotation quaternion and the new translation vector q_new = q_original p_new = p_new print("新的旋转四元数:", q_new) print("新的平移向量:", p_new)
VI. Software Auto-start
6.1 Create a Startup Program
For auto-start programs, please visit Resource download to download auto_upstart.sh and set_exe_of_scripts.sh files in advance.
Create sh auto-start file.
bashgedit ~/<the Workspace>/scripts/auto_upstart.sh # Create an auto-start script. If it fails to open on the first try, use ctrl+C to restart it once.Add sh script data.
sh#!/bin/bash gnome-terminal --tab "driver" -- bash -c " cd ~/handling_robot_ros1; source devel/setup.bash; roslaunch body_handling_demo body_handling_driver.launch; exec bash" gnome-terminal --tab "demo" -- bash -c " cd ~/handling_robot_ros1; source devel/setup.bash; sleep 10; roslaunch body_handling_demo body_handling_action.launch; exec bash"Create the sh permission modification script.
Since there is no guarantee that you have executable permissions when copying or just creating .sh and .py scripts, you can modify the executable permissions of all python and shell scripts in the current directory of the terminal through the following scripts:
bashgedit ~/<the Workspace>/scripts/set_exe_of_scripts.sh # Create an auto-start script. If it fails to open on the first try, use ctrl+C to restart it once.Add sh script data.
shfind ./ -type f -name "*.py" -exec chmod +x {} + find ./ -type f -name "*.sh" -exec chmod +x {} +Enter the workspace directory and execute the set_exe_of_scripts.sh script to modify the .py and .sh script permissions in the entire workspace directory, making it easy for the program to start.
bashcd ~/<the Workspace> # Navigate to the workspace directory sh ./scripts/set_exe_of_scripts.sh # Run the sh script file that modifies permissions
6.2 Auto-start Configuration
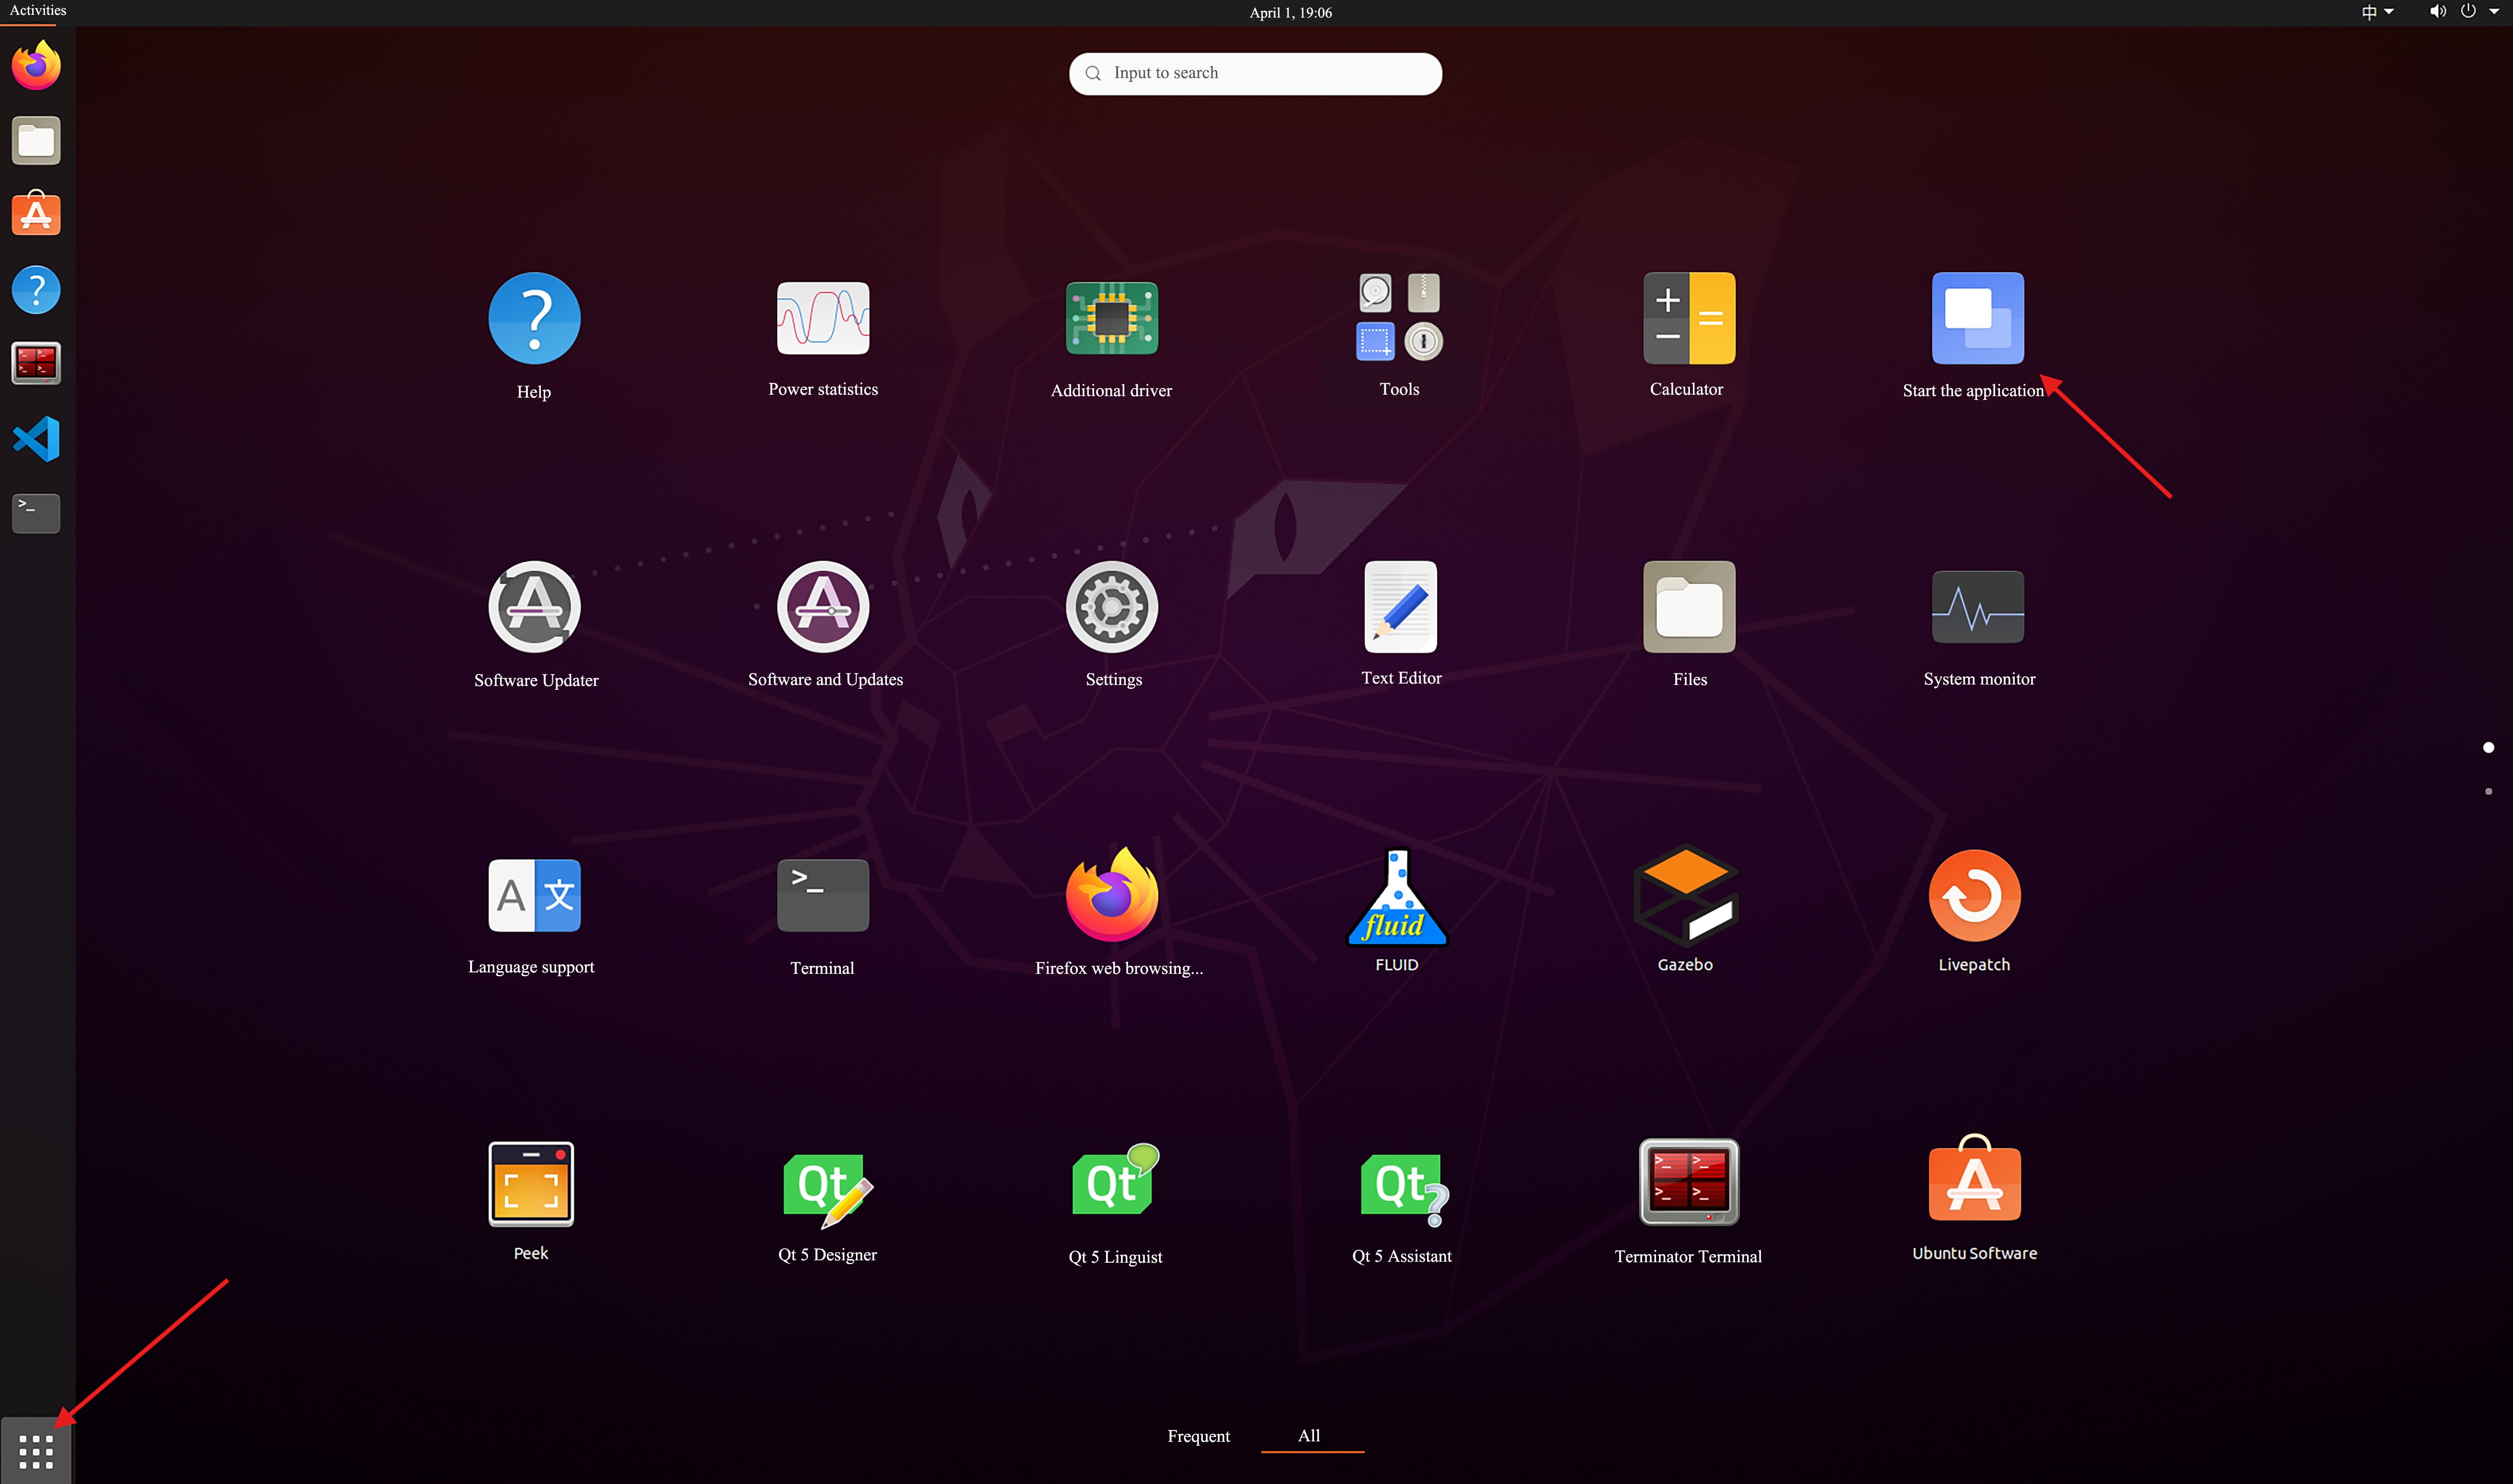
Enable auto-start for the program:
- Click the button in the lower left corner of the desktop.
- Click
Launch the Applicationon the software.
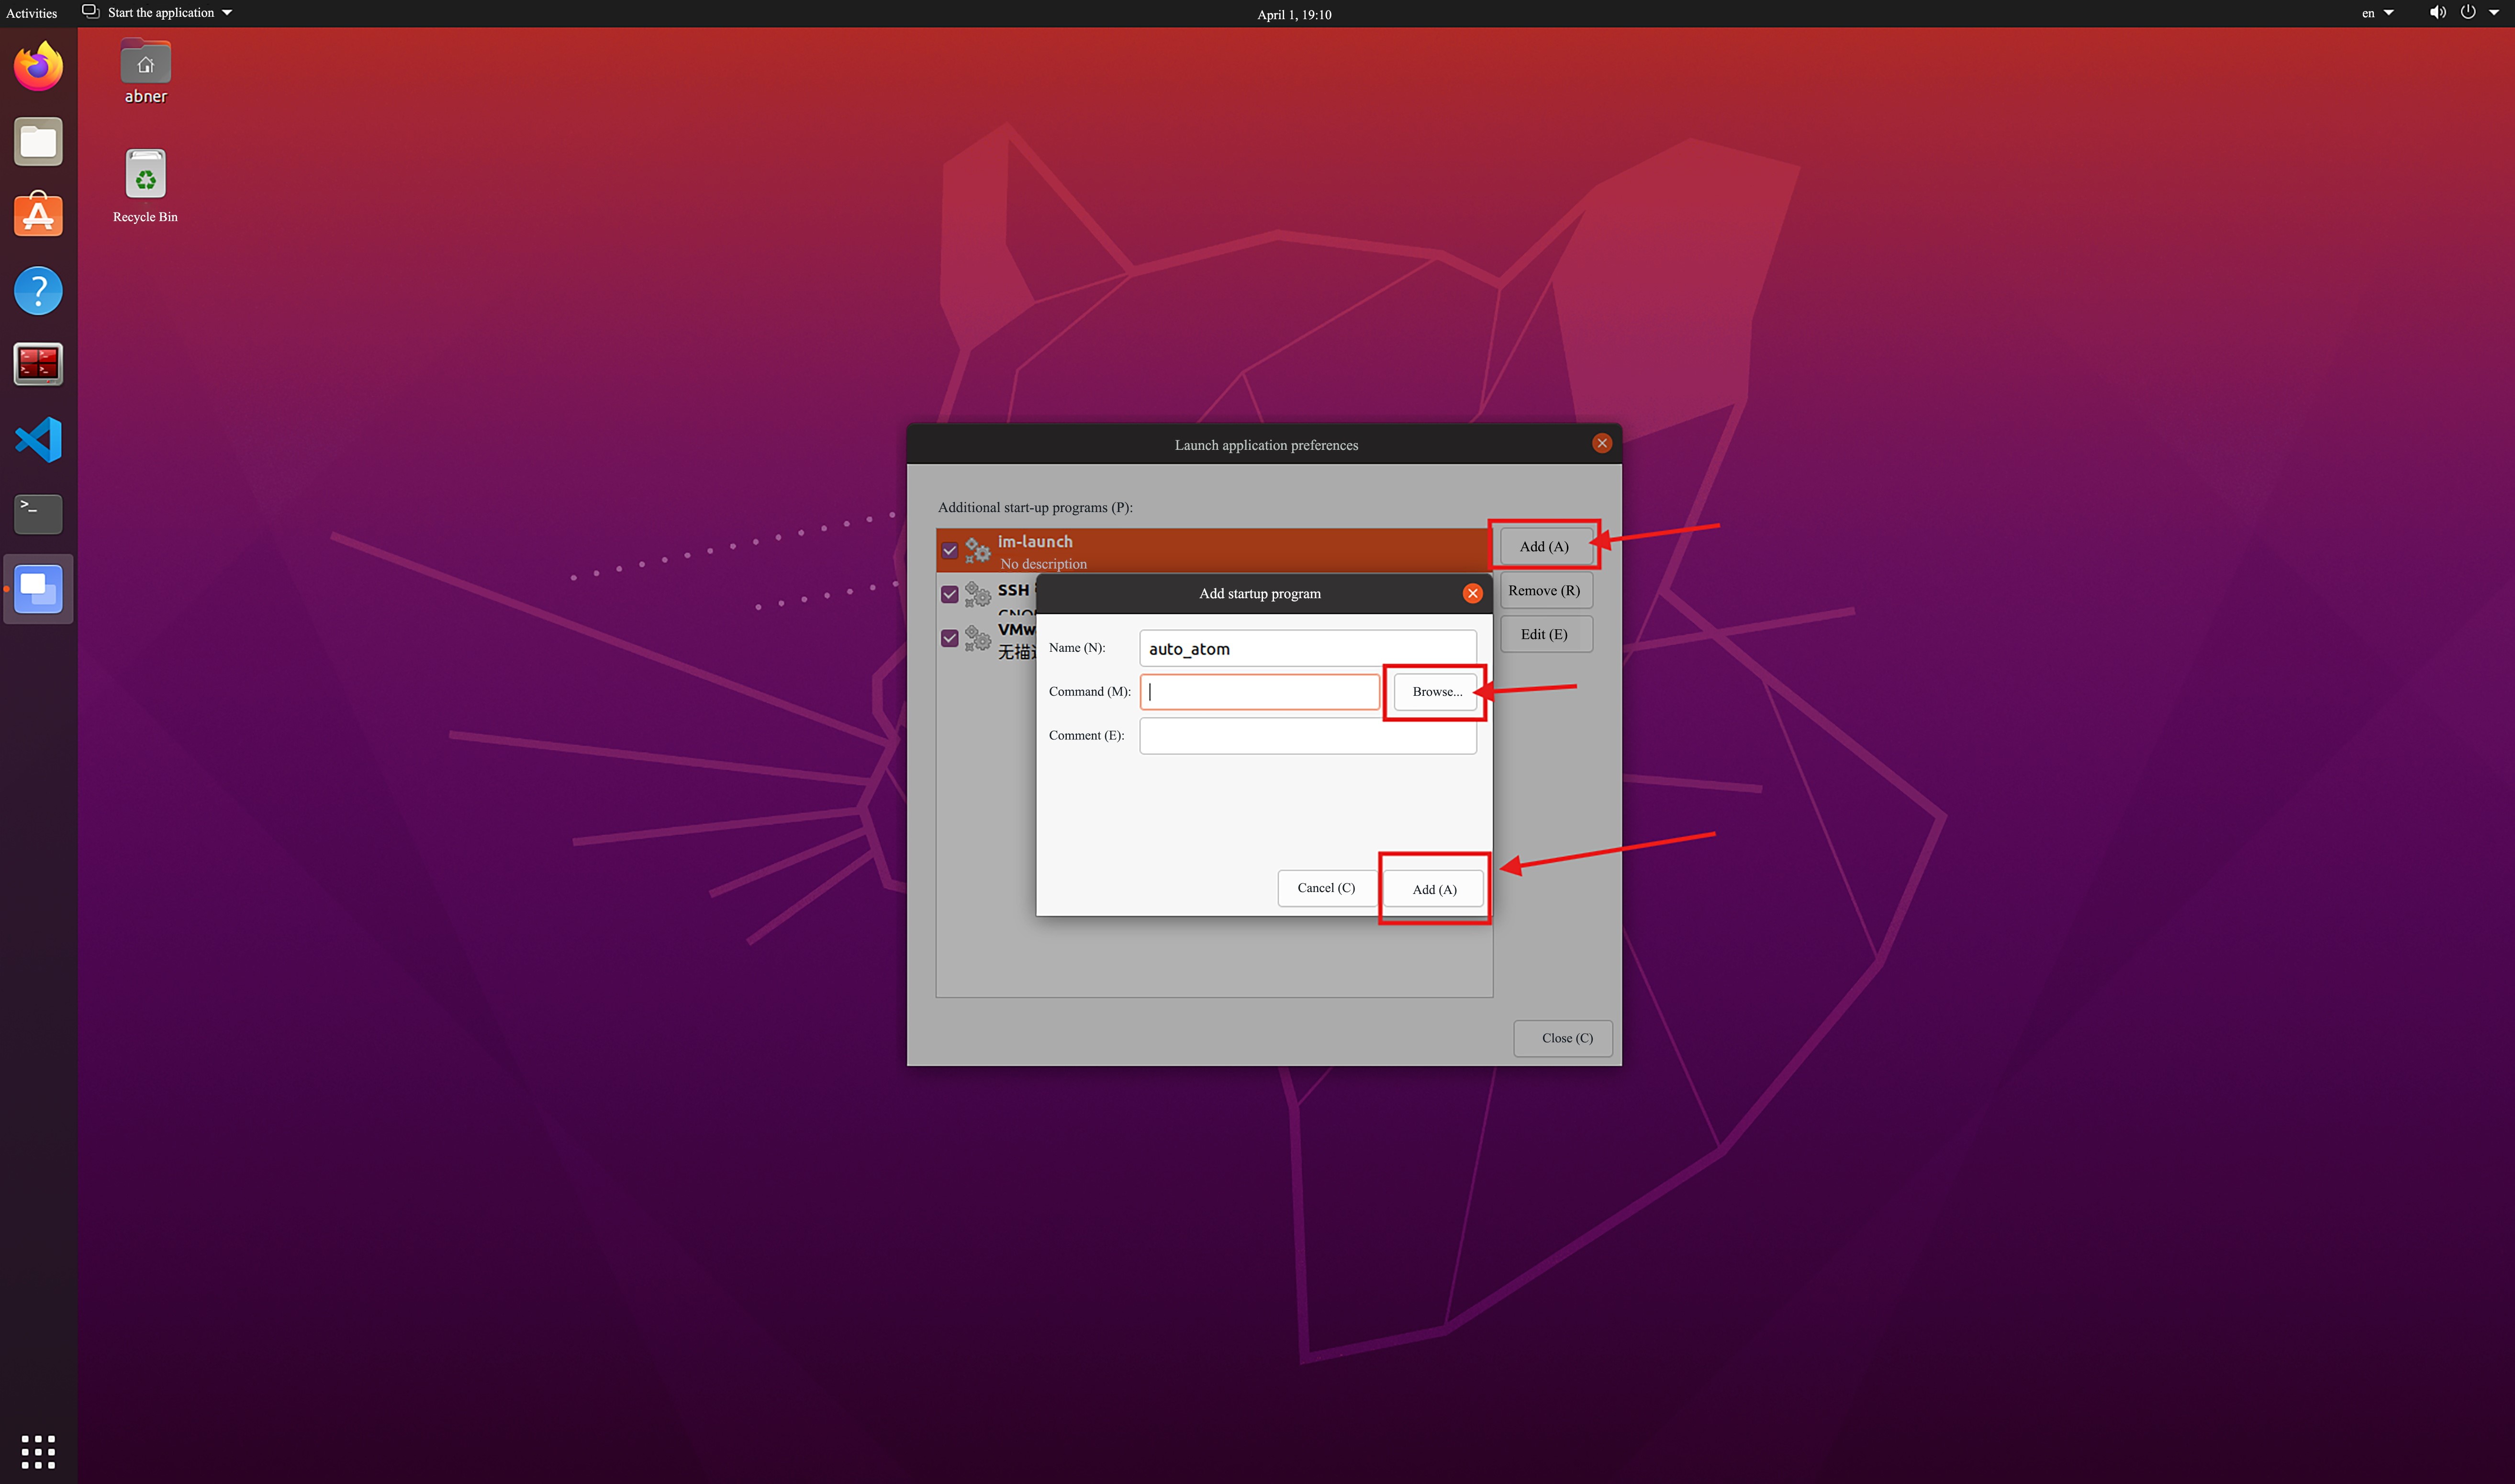
Configure auto-start items:
- After the software starts, click the
Addbutton and it will pop-upAdd startup programpage. - Enter the name of the auto-start service (taking
auto_atomas an example in the figure). - Click the
Browsebutton and select theauto_upstart.shscript written in Create a Startup Program. - The auto-start service will be successfully set up after clicking
Add.
- After the software starts, click the
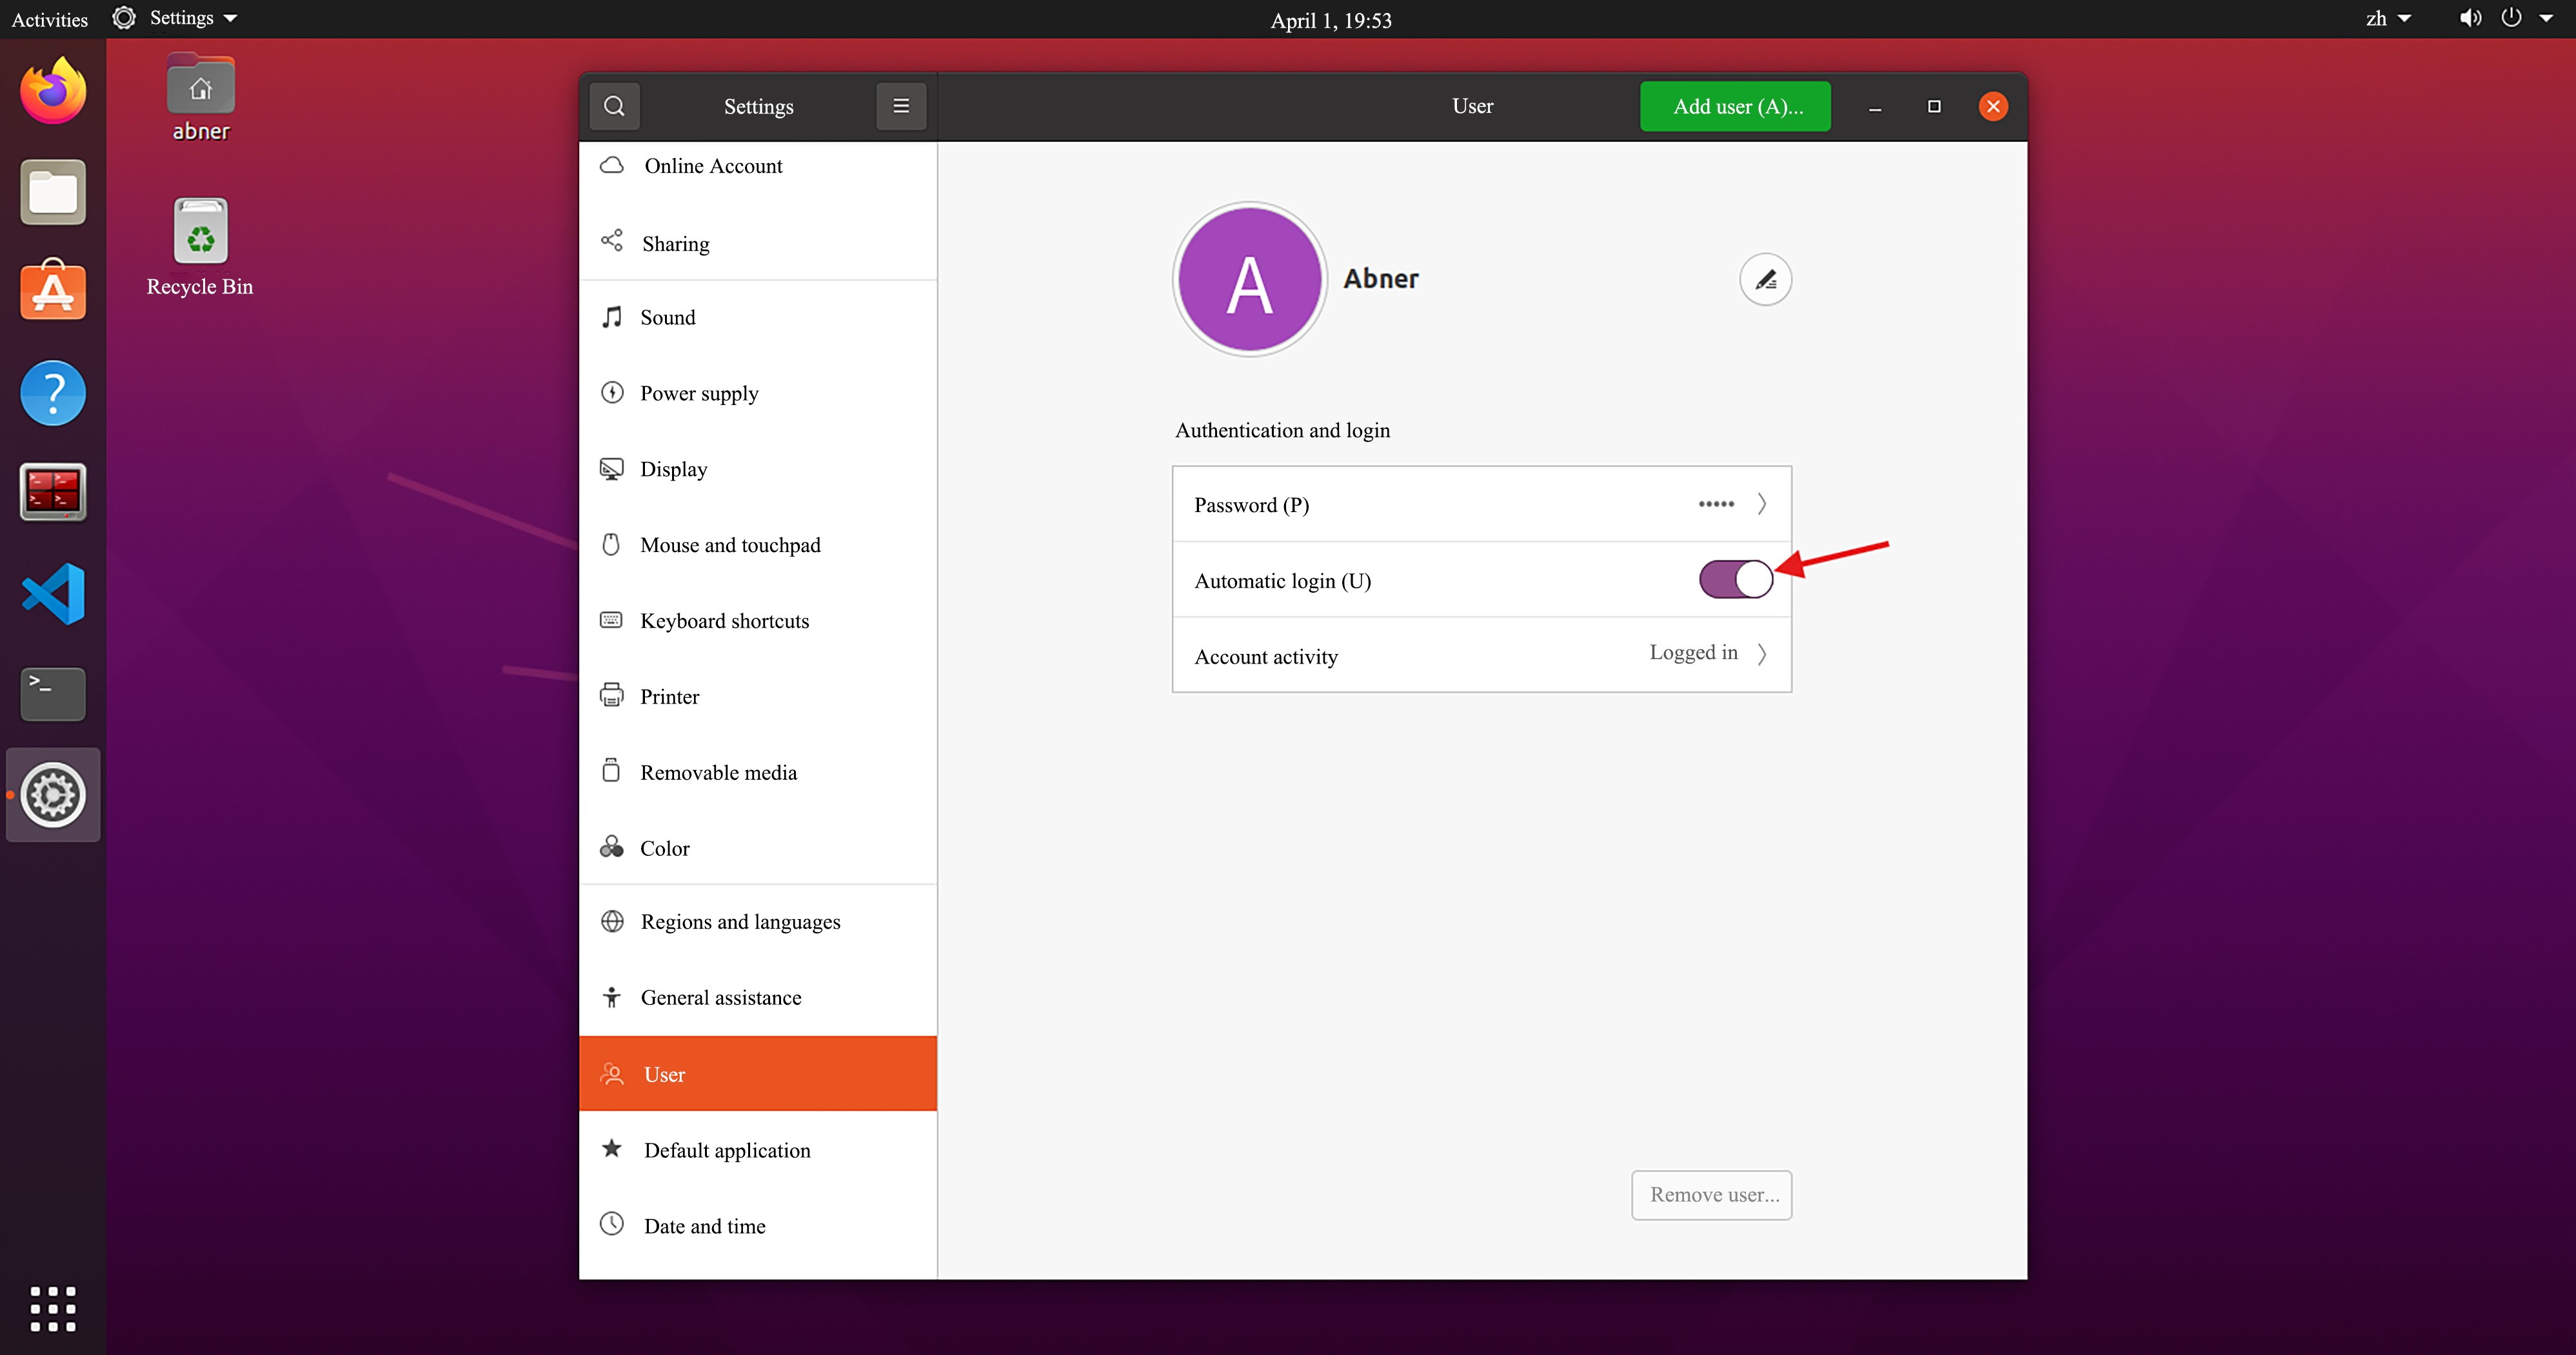
6.3 Automatic User Login
To enable a robot's auto-start on boot, it is generally necessary to configure automatic user login: Settings => User => Unlock... => Enter Password => Authentication => Authentication Successful => Open-Auto Login(U).
Note: Open the new terminal input reboot to restart the device directly to verify whether the auto-start configuration is successful.
VII. Video Demonstration
Video won't load? Click to view
VIII. Resource Download
| Serial Number | File Name | Description | Download Address |
|---|---|---|---|
| 1 | Function Package | Integrates case software function packages. | Click theDownload Addressto download. |
| 2 | Python Environment | Used to complete Python environment configuration. | |
| 3 | Left Arm Tool Coordinate System File | Used to set the left arm tool coordinate system. | |
| 4 | Right Arm Tool Coordinate System File 件 | Used to set the right arm tool coordinate system. | |
| 5 | Aruco Code of Cargo Box | Used for the visual recognition system to identify the positioning of the cargo box. | |
| 6 | Auto-Start File | Used to configure the software auto-start program. | |
| 7 | Woosh Chassis Data | Related data of Woosh chassis. |