Application Integration Case:
RealMan Robotic Arm_Empowering Robot Dog I. Project Overview
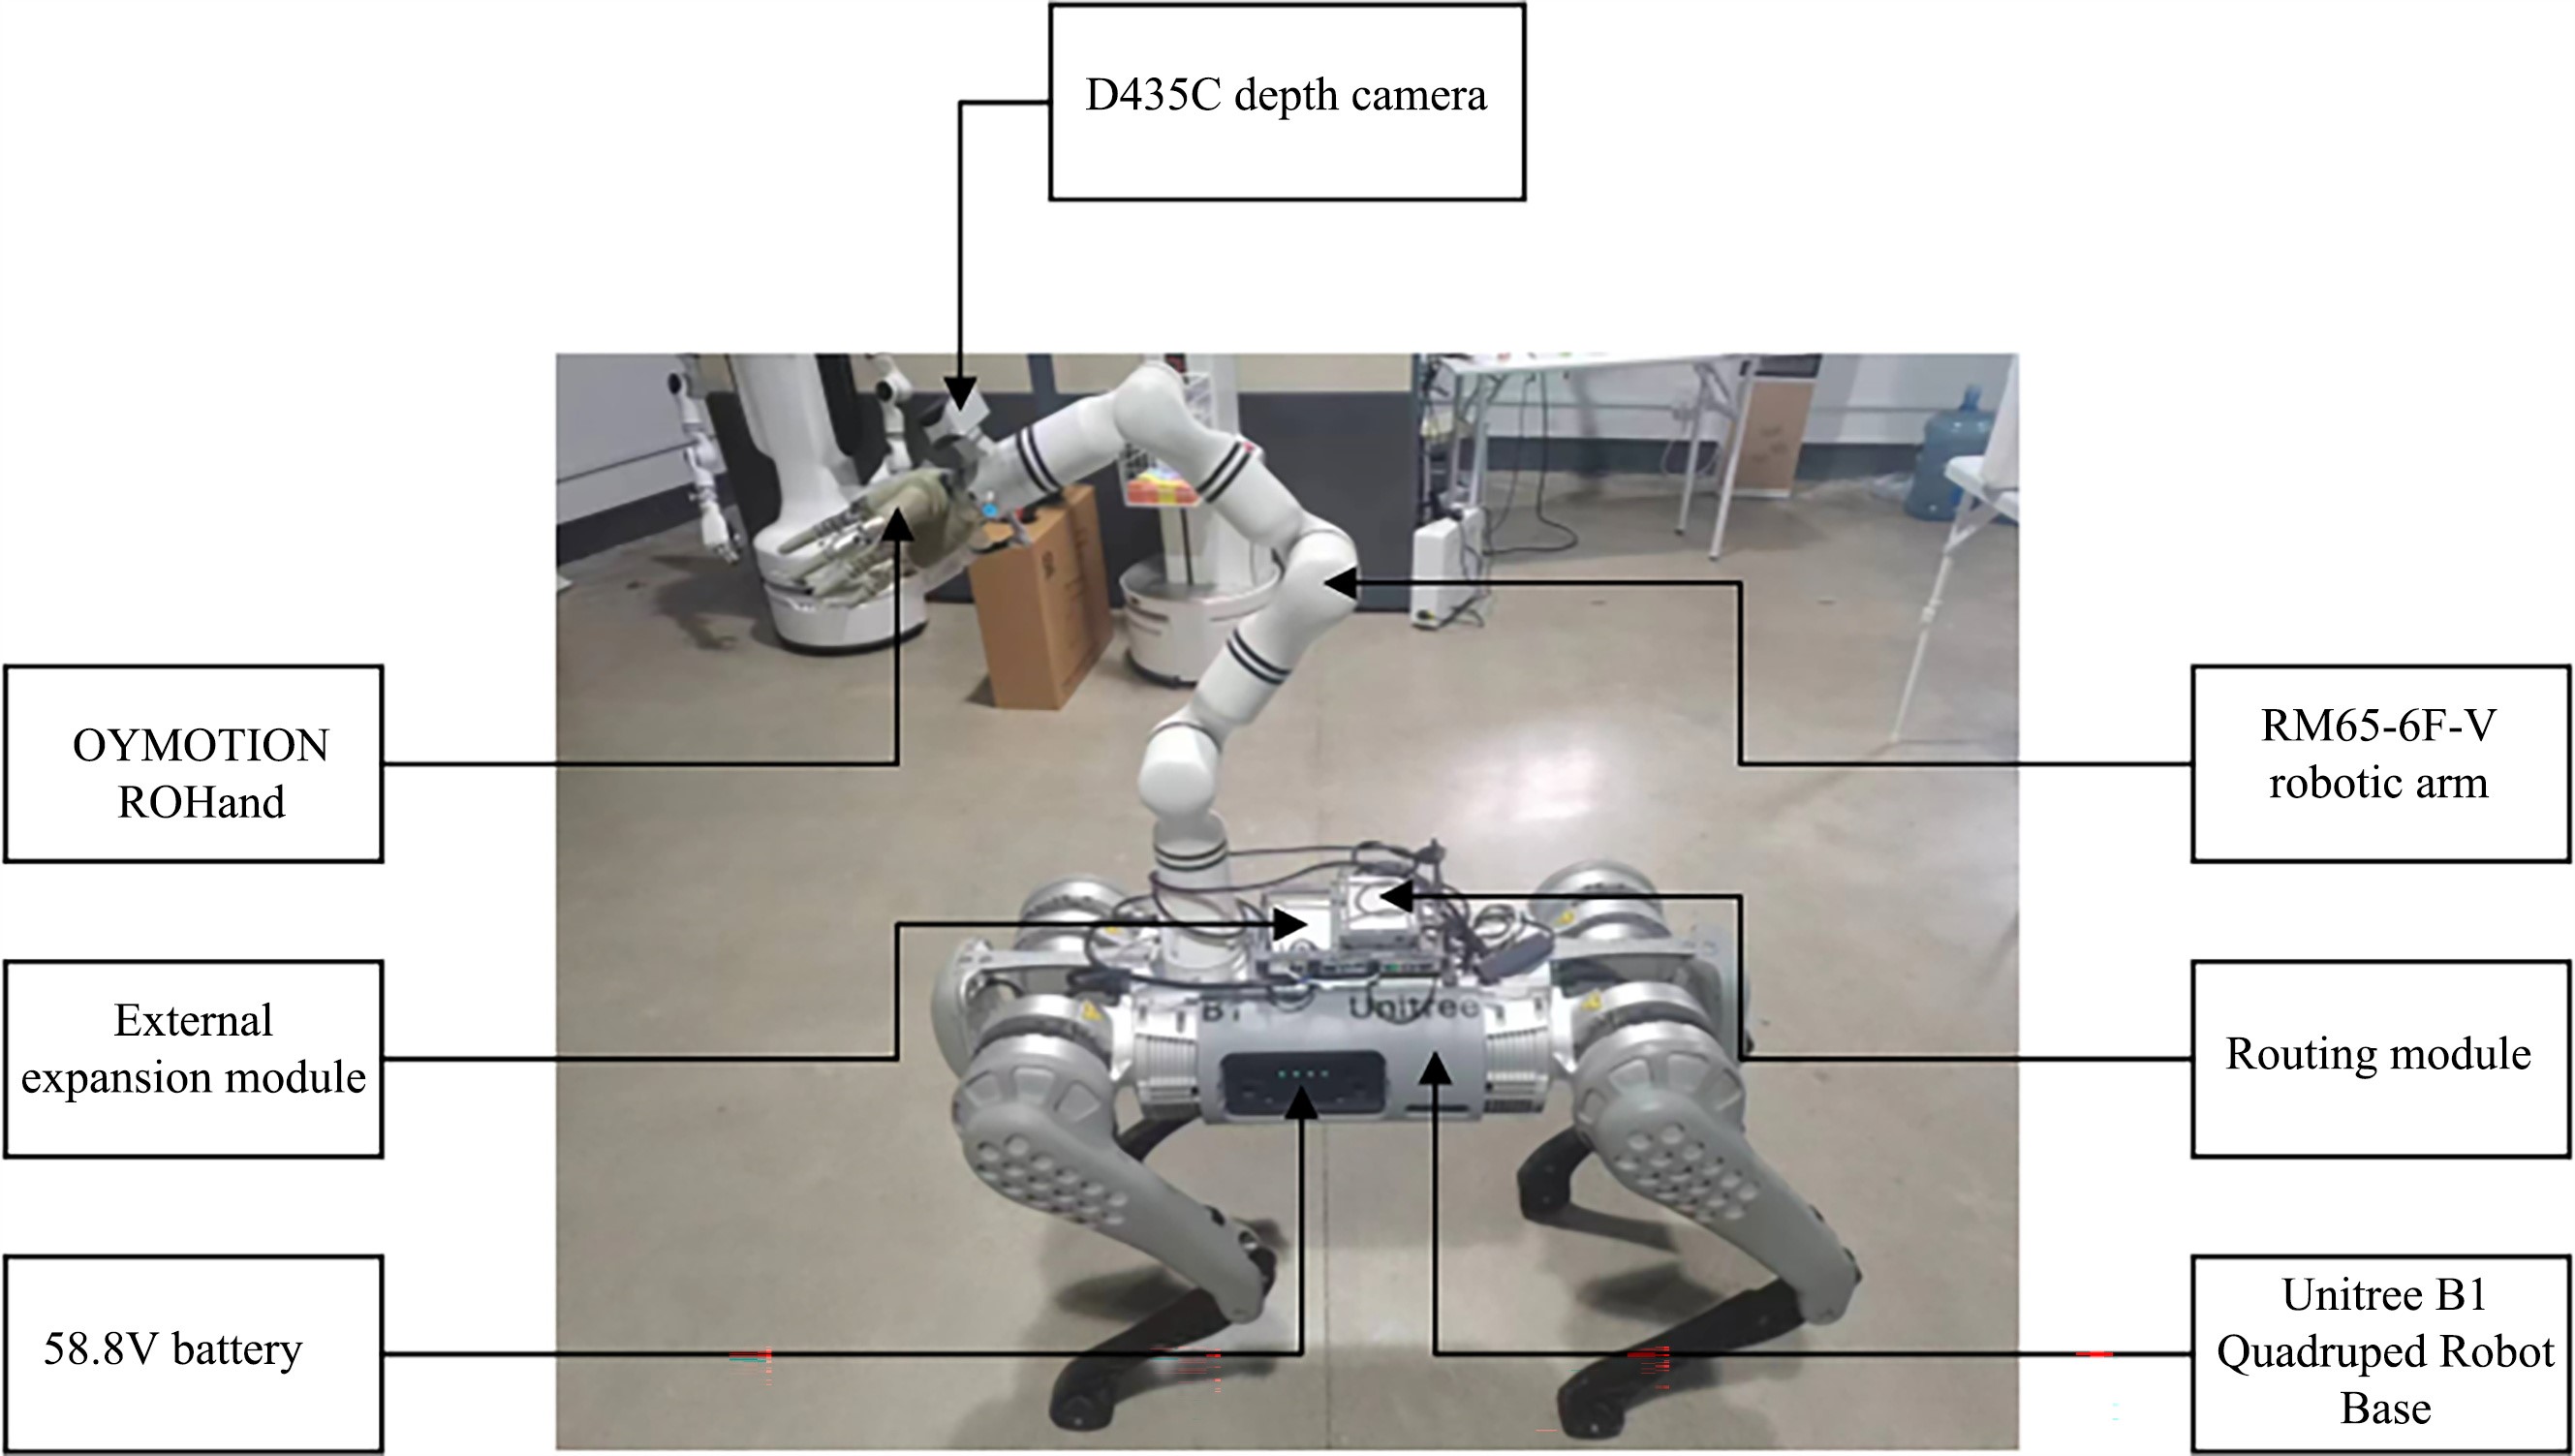
This project is an innovative robot case integration solution that combines the flexibility of the Unitree B1 robot dog, the operating accuracy of the RealMan RM65-6f-v robot arm and the fine grasping ability of the OYMOTION ROHand to create a multifunctional and efficient control case. Through this case, we can achieve agile movement and precise operation in complex environments to meet diverse operational needs. Make a corresponding case for the possibility of this composite robot, and pave the way for the development of subsequent autonomous operation systems.
Project Background
With the rapid development of industrial automation and intelligent manufacturing, there is an increasing demand for equipment that can adapt to changing working environments and perform complex tasks. This case came into being in this context, integrating multiple high-performance hardware and advanced control software to provide an integrated solution for achieving major breakthroughs in automation in the future.
Main Objectives
- Multifunctional integration: Organically combine the functions of mobile platforms, robotic arms and dexterous hands to form a system that can perform diverse tasks.
- Collaborative work: A high degree of coordinated control between the robot dogs, robotic arms and dexterous hands is achieved through the handle.
Core Functions
- Precise movement and manipulation: Robotic dogs provide a stable mobile platform, robotic arms and dexterous hands to perform precise grasping and placing tasks.
- Real-time remote control and autonomous control: Combined with real-time remote control, flexible handle operation mode is provided.
Technical Highlights
- High-performance robot arm: The RealMan RM65-6f-v robot arm provides a wide operating range and high-precision operation capabilities with its 6-dimensional freedom and 5 kg load capacity.
- Advanced dexterous hand design: The integration of OYMOTION ROHand simulates human hand movements to achieve the grasping and operation of complex objects.
- Multi-sensor data fusion: Combine IMU, depth camera and other sensors to achieve accurate perception of the robot's posture and surrounding environment.
- ROS-based software architecture: The ROS melodic version is adopted to build a modular and extensible software system, which supports secondary development and function expansion.
Application Prospects and Outlook
It is expected that the system will play an important role in automated manufacturing, intelligent logistics, service robots, disaster relief and other fields, providing flexible and efficient automation solutions. With the continuous advancement and innovation of technology, we believe that this system will drive the automation level of related industries to new heights.
Update Log
| Updated data | Updated content | Version No. |
|---|---|---|
| 2024/11/1 | Initial version of the composite robot dog project is released | v1.0.0 |
II. Hardware Environment
Introduction to Hardware Foundation
- External expansion module: Unitree provides 8 2×8 PIN Gigabit Ethernet, 12 V power supply, 485/CAN (transparent transmission) interface, 6 Type-C USB2.0 interfaces, etc.
- Battery power supply (58.8 V): The robot's only power source, both the robotic arms and the dexterous hands are powered by an external expansion module (24.0 V).
- Main controller: obtain IMU data, connect the interface to the Ethernet switch, and form a physically connected LAN. The corresponding IP can be accessed through a network cable connection.
- IMU: Obtain data such as robot posture.
- Ethernet switch: Build a local area network and access multiple network ports.
- Intel (body) controller: A WIFI router 5G module has been built (open to the public).
- NX (body) controller * 2: 1 of which integrates 2 binocular cameras, and the other 1 integrates 1 binocular camera for use (open to the public).
- NX (head) controller: Integrated with 2 binocular cameras (not open to the public).
- Robot dog leg motor * 4 * 3: Directly controlled by the main controller via 485 protocol.
- D435C depth camera: obtain RGB pixel data and point cloud data.
- Routing module: Provide WIFI routing 5G module.
- OYMOTION ROHand: Five-finger dexterous hand, mainly used to facilitate grasping.
- RealMan robotic arm controller: Integrates the robotic arm and dexterous hand, which is convenient for the teach pendant to call and directly control through the code interface.
- RealMan RM65-6f-v robotic arm: It is a RealMan RM65 series robotic arm. This series of products is a 6-dimensional freedom and 5 kg load robotic arm. At the same time, the end of the robotic arm contains a 6-dimensional force sensor that can be used in conjunction with hybrid force/position control to compensate for the end posture and optimize the pointing control performance of the robotic arm.
- Unitree robot dog handle: The signal is triggered by the remote lever and key, and finally published through the UDP protocol, waiting for the controllers of other IPs in the same LAN to subscribe.
Hardware Communication Framework
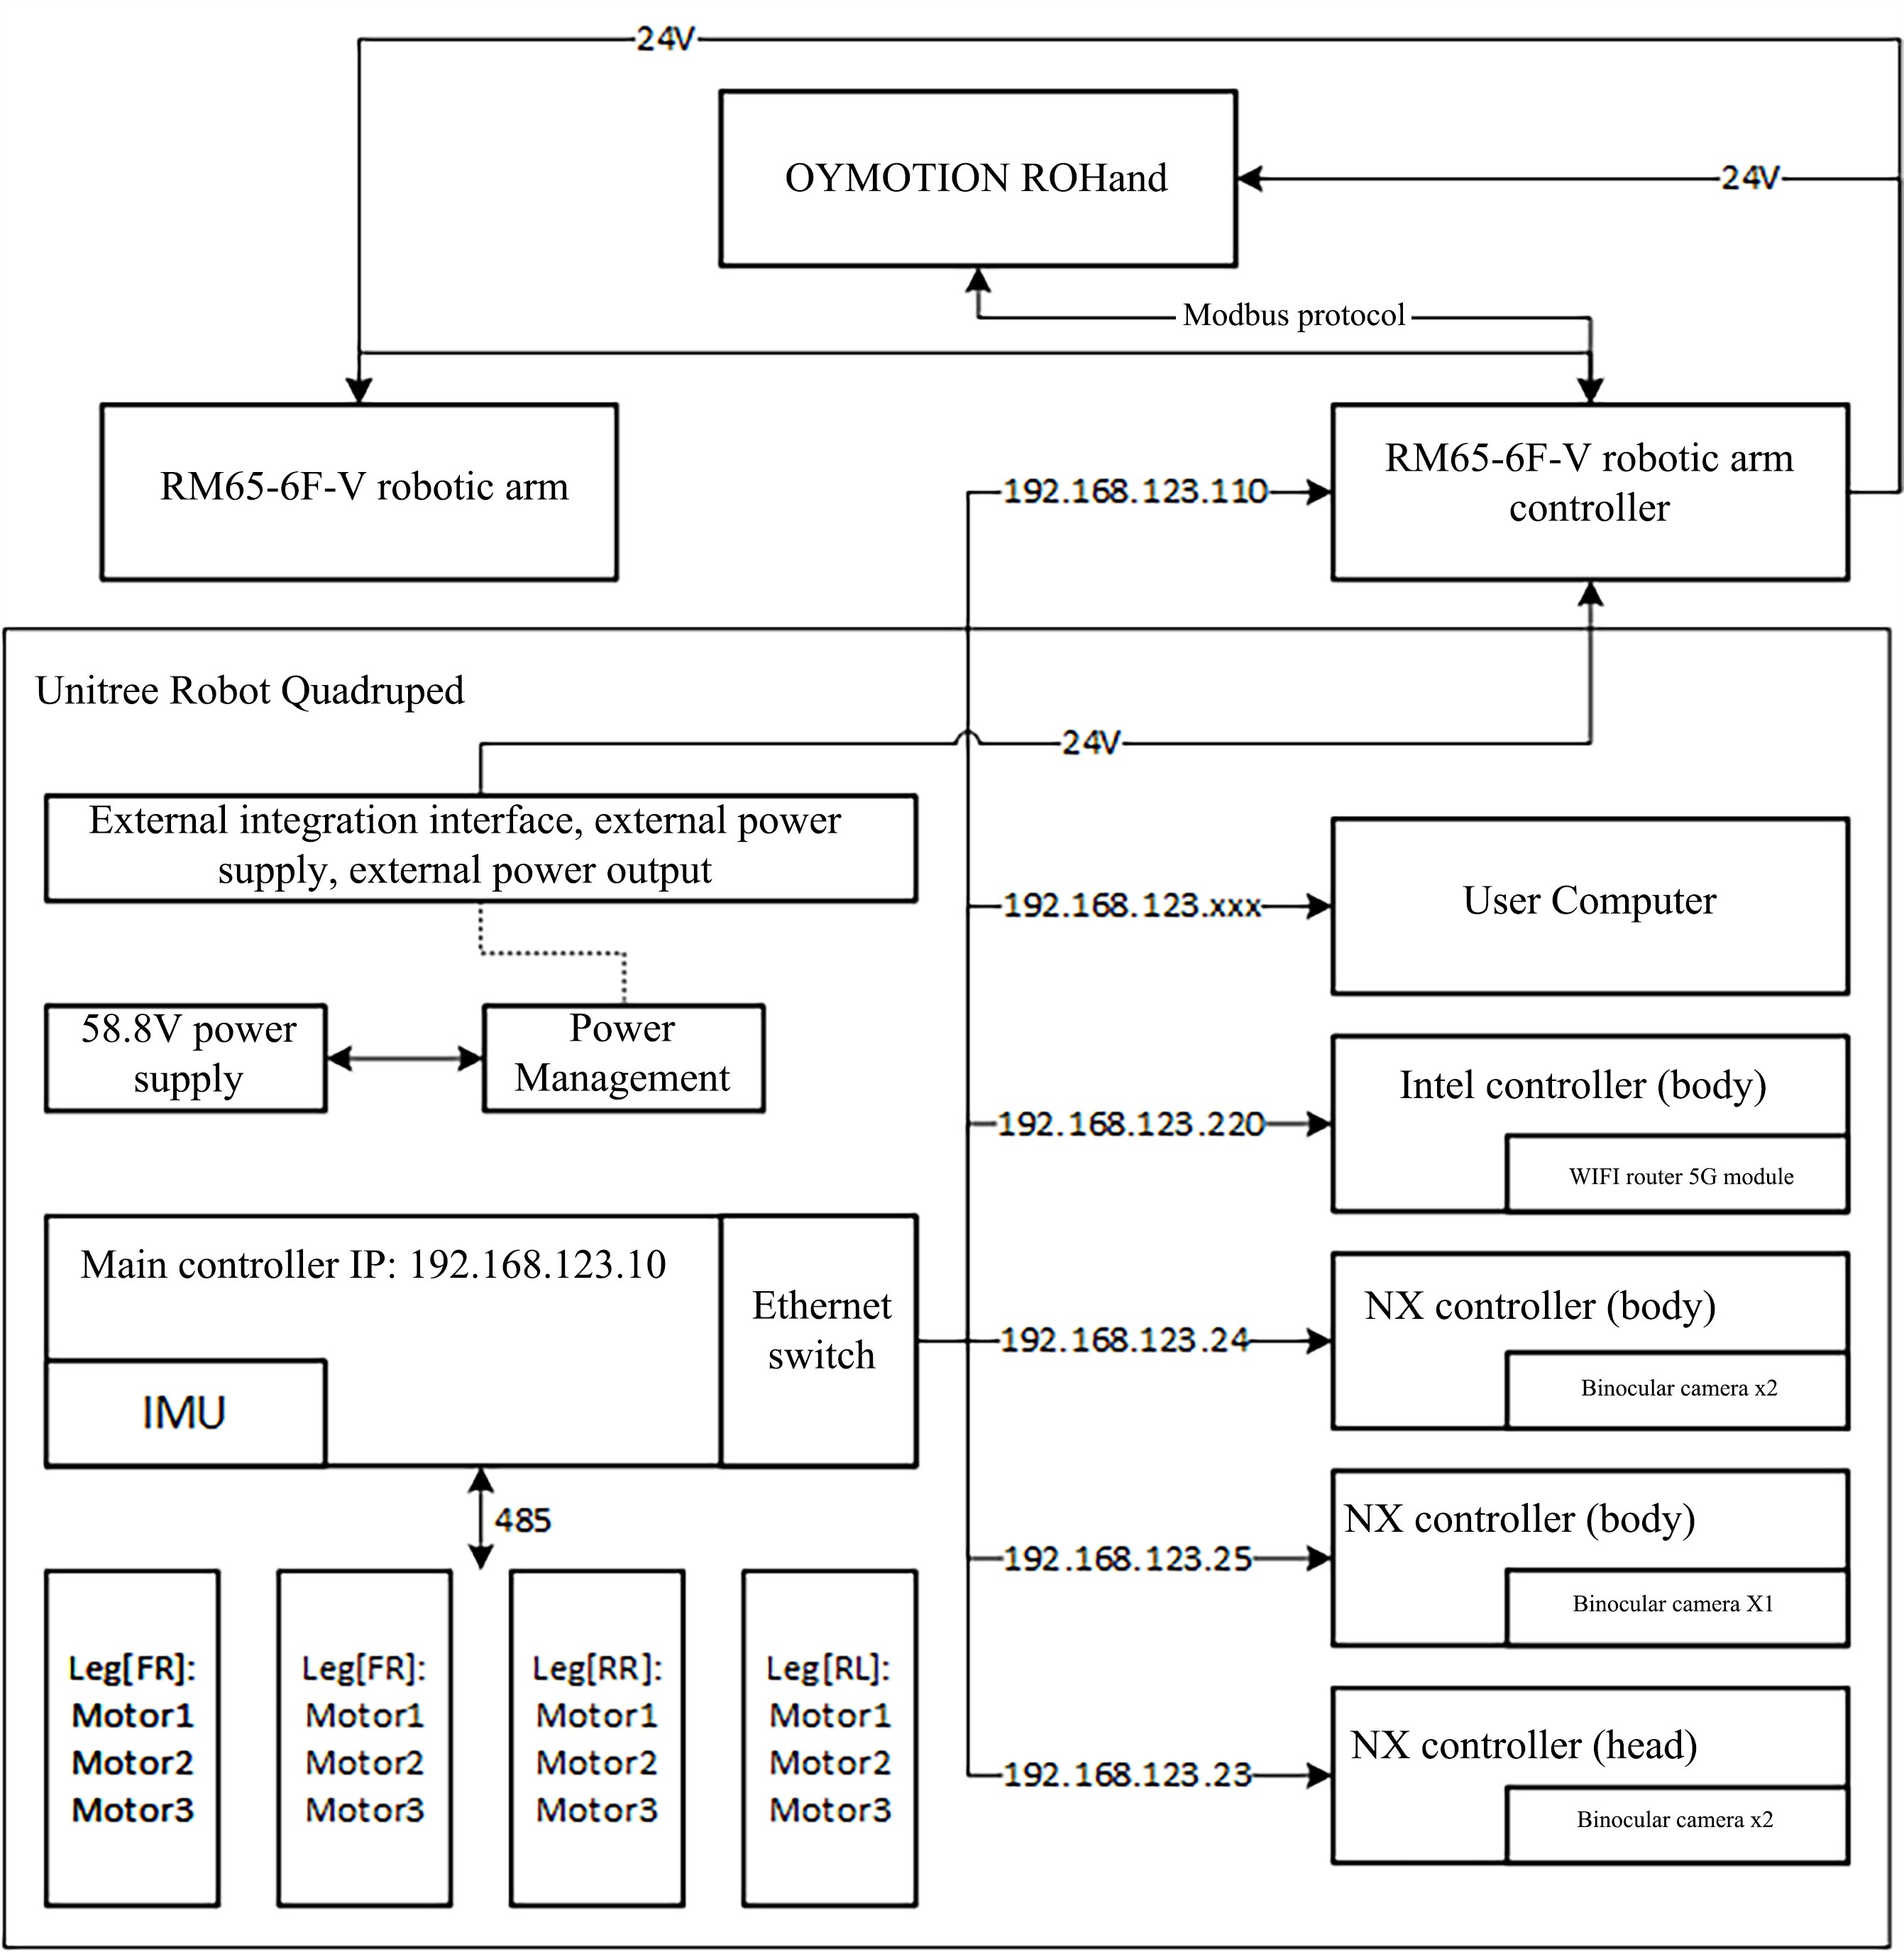
The figure above shows a highly integrated automation system with multiple key components and their interactions. The system uses the Unitree robot dog as a mobile platform, equipped with an RM65-6F-V robotic arm and OYMOTION ROHand to achieve precise operation and mobile operations. Main controller (IP: 192.168.123.10) As the core of the system, it is connected to each NX controller (where the head controller is not open to the public), IMU unit, and Intel controller through an Ethernet switch. The latter also integrates a WIFI router 5G module to provide wireless communication. The system is also equipped with a power management module that converts 58.8 V power to 24 V to power components such as robotic arms and dexterous hands. In addition, the system is also designed with an external integration interface for external power supply and equipment expansion, enhancing the flexibility and scalability of the system.
The design of the entire system embodies a modular and hierarchical architecture concept, with each component having clear responsibilities and communication interfaces. OYMOTION ROHand is controlled via the Modbus protocol, while the RM65-6F-V robotic arm operates through its own controller. The leg motor of the robot dog is directly controlled by the main controller through the 485 communication protocol to achieve walking and movement. The IMU and binocular camera on the NX controller provide the robot with perception capabilities, enabling it to navigate autonomously and avoid obstacles in the environment. The user’s computer is connected to the main controller via a local area network for system configuration and monitoring. Overall, the system is a powerful and flexible automation solution suitable for a variety of complex operations and environments.
III. Preparation Stage
Robotic Arm Configuration
After the user's computer is connected to the robotic arm through a network port, the computer IP needs to be configured as 192.168.123.xxx, the robotic arm IP needs to be configured as 192.168.123.110, and the coordinate system of the OYMOTION ROHand end calibration tool needs to be added and named ROH. Enter the teach pendant and set the end gripper voltage in the expansion bar to 24 V to provide power for the dexterous hand.
Dexterous Hand Firmware Upgrade
OYMOTION ROHand needs to use USB to convert 485 data and 24 V power supply to upgrade the firmware inside the dexterous hand through the upd extension file OYMOTION ROHand firmware file, so as to obtain the terminal Modbus control protocol communication function. The upgrade process is as follows:
- Power off the dexterous hand.
- Connect the USB to 485 module and the dexterous hand, and connect the USB to 485 module to the computer.
- Find the serial port name of the USB to 485 module in the device manager.
- Run commands in command line mode under Windows.
- Turn on the power supply within 10 seconds.
- Upgrade completed.
update <update_file> -COMx -115200WARNING
Among them, <update_file> is an upgrade file with an extension, for example: \modbus\oHandSerialRobotic_SpeedControlModBus_1B01_V3.0-68-bcf55cb.upd, COMx is the serial port name of the USB to 485 module.
Operating Conditions
First of all, it is necessary to ensure that the robot's limbs are placed in the correct position before starting to prevent personal life and property safety from being endangered due to the rollover of the robot during the initialization adjustment process. Ensure that the robot starts in an open scene. Ensure that the robot starts when there is sufficient power to avoid the robot losing control due to power problems.
Opening phase
The robot and the joystick are started by clicking and pressing and holding. Among them, click to check the power level, followed by pressing and holding to turn on the machine. The initialization of the startup process takes about 40s. When you see the robotic arm and the thumb of your dexterous hand move to a specific position, it means that the robot has been successfully initialized and can be controlled by the handle.
Closing stage
The robot and the handle are also turned off by clicking and pressing and holding. But it is worth noting that when the robot is turned off, it must be ensured that the robot is in a correct prone posture. Directly de-energizing the joints is an undesirable control method.
IV. Software Environment
- ROS version: melodic
- Ubuntu version: 18.04
- System Architecture: ARM64
File structure
new_retail3_ros1/src
  │ README.md    <- File Description
  │
  ├─rm_robot    <- Realman Robotic Arm Official Interface
  ├─rm_unitree_description    <- Unitree & Realman Model Description Function Package (Empty)
  ├─rm_unitree_joy    <- Unitree Handle ROS Driver Function Package
  ├─unitree_robot    <- Unitree Robot Dog Official Interface
  ├─rm_unitree_auto.sh    <- Startup Script
  └─rm_unitree_run.sh    <- Program Running Script
Dependency Packages and Necessary Configuration
- geometry_msgs:It provides basic geometry message types, such as Point, Vector3, Quaternion and Transform, etc., for transmitting geometric information between ROS nodes.
- roscpp:It is the C++ client library of ROS which contains an API for implementing ROS nodes, allowing C++ programs to create nodes, publish topics, subscribe to topics, provide services and use parameter servers.
- rospy:It is a Python client library of ROS that provides functions similar to roscpp, but for Python programs. Allow Python nodes to communicate and interact with ROS.
- sensor_msgs:It contains a variety of sensor data message types, such as Image, LaserScan, JointState, etc., which are used to standardize the transmission of sensor data.
- std_msgs:It provides the transmission of standard message types in ROS, such as String, integer (Int32/Int64), floating point number (Float32/Float64) and other basic data types.
- Unitree_legged_msgs:It is a customized message package of Unitree's quadruped robot dog containing the robot-specific message types for control and communication.
- rm_msgs:Data types for topics and services in the official ros1 package of RealMan robotic arm.
- rm_deftHand:It is a ROS message packet of OYMOTION ROHand, used to control and receive status information of the robot hand.
- message_generation:This is a toolkit for generating ROS messages. It is usually not used directly for communication, but is used when building ROS message definitions to help automate the generation of messages and the creation of interfaces.
Download of ROS Software Package
# Download All MoveIt Packages
sudo apt-get install ros-noetic-moveit

# Update Online Package List
sudo apt update

# Install the Required JSON Library for Parsing JSON Format Data
sudo apt install libjsoncpp-dev

# Alternatively, you can directly install JsonCpp via the following command without updating the package list separately, if you have already updated it before:
sudo apt-get install libjsoncpp-dev libjsoncpp0
V. Description of Topic and Service Parameters
Topic Description
| Topic Name | Data type | Function description |
|---|---|---|
| /rm_driver/Arm_PosTeach | rm_msgs::Pos_Teach | Position teaching topic |
| /rm_driver/Arm_OrtTeach | rm_msgs::Ort_Teach | Position and posture teaching topic |
| /rm_driver/Arm_StopTeach | rm_msgs::Stop_Teach | Stop teaching topic |
| /rm_driver/MoveJ_Cmd | rm_msgs::MoveJ | Joint space planning topic |
| /rm_driver/Plan_State | rm_msgs::Plan_State | Robotic arm execution status topic |
| /rm_driver/ChangeToolName_Cmd | rm_msgs::ChangeTool_Name | Tool coordinate system setting topic |
| /high_cmd | unitree_legged_msgs::HighCmd | Robot dog control topic |
| /high_state | unitree_legged_msgs::HighState | Robot dog status topic |
| /joy | sensor_msgs::joy | Handle status topic |
TIP
Once a teaching topic is published, it will be executed according to the published data. If you want to stop it, you must publish stop teaching topic.
Service Description
| Service name | Data type | Function description |
|---|---|---|
| /rm_deftHand_Server | rm_deftHand::deftHand | Dexterous hand control topic |
VI. Operation Demonstration
Establishment of Function Package
Create a feature package and compile it with the following command:
mkdir -p rm_unitree_ws1    # Create the package
cd rm_unitree_ws1    # Enter the workspace directory

# Put the src folder into the ~/rm_unitree_ws1 folder
catkin build    # Compile this workspace

# If prompted "catkin: command not found", execute the commands:
sudo apt-get update    # Update the online package list
sudo apt-get install python-catkin-tools    # Install catkin
Power-on Self-start Setting
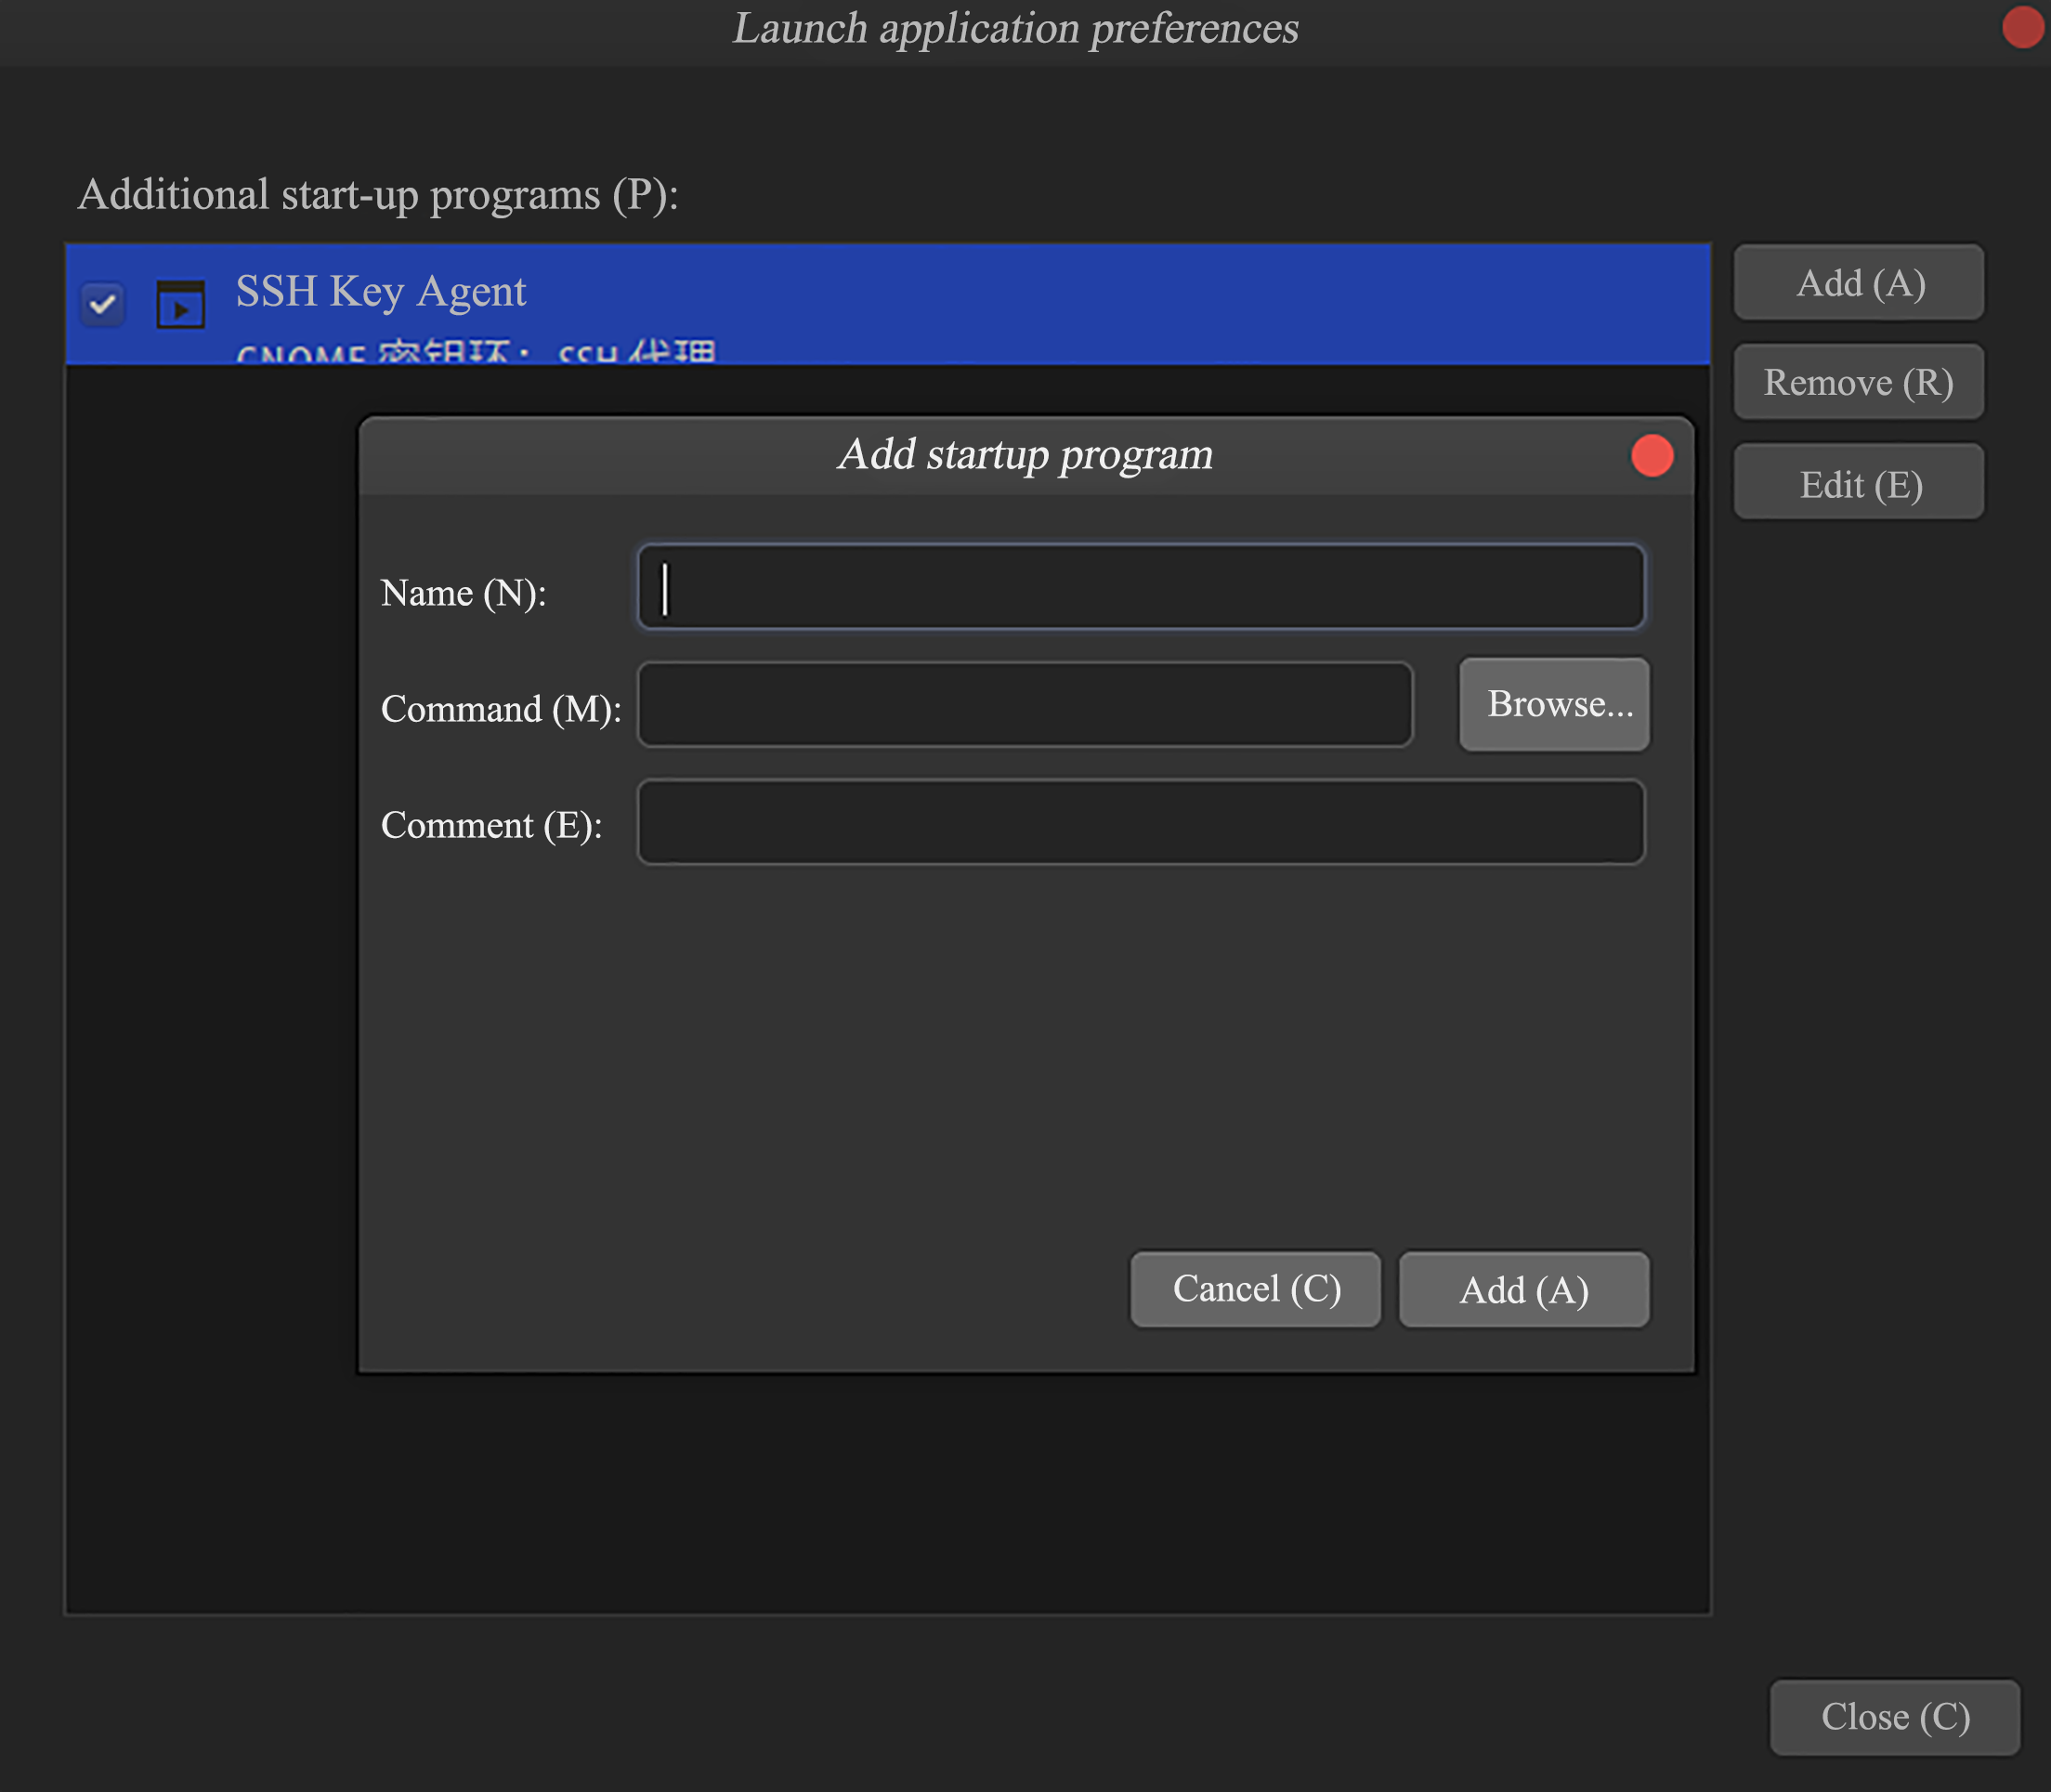
Enter the command of gnome-session-properties in the terminal to start the software, and then click add on the right to join. Fill in the name and import the run_unitree_auto file.
The contents of the rm_unitree_auto.sh file are as follows:
#!/bin/bash
gnome-terminal -- bash -c "cd rm_unitree_ws; source /opt/ros/melodic/setup.bash; source ~/rm_unitree_ws/devel/setup.bash; sleep 10; roslaunch rm_driver rm_65_driver.launch & sleep 4; roslaunch rm_unitree_joy Joystick_To_Cmd.launch & sleep 4; roslaunch rm_deftHand rm_deftHand.launch; exec bash"
Total Executive Function
Start the rm_unitree_run.sh command through the terminal
# Contents of rm_unitree_run.sh are as follows:
#!/bin/bash
roslaunch rm_driver rm_65_driver.launch & sleep 4;
roslaunch rm_unitree_joy Joystick_To_Cmd.launch & sleep 4;
roslaunch rm_deftHand rm_deftHand.launch;

---
sh src/rm_unitree_run.sh    #  Launch the sh script file
Launch File Launch Function
Start the following commands in sequence:
# Launch the ROS driver for the 65 arm
roslaunch rm_driver rm_65_driver.launch
# Launch the joystick data processing and corresponding control file for the data
roslaunch rm_unitree_joy Joystick_To_Cmd.launch
# Launch the ROS driver for the OYMOTIONROHand
roslaunch rm_deftHand rm_deftHand.launch
VII. Handle Control Instructions
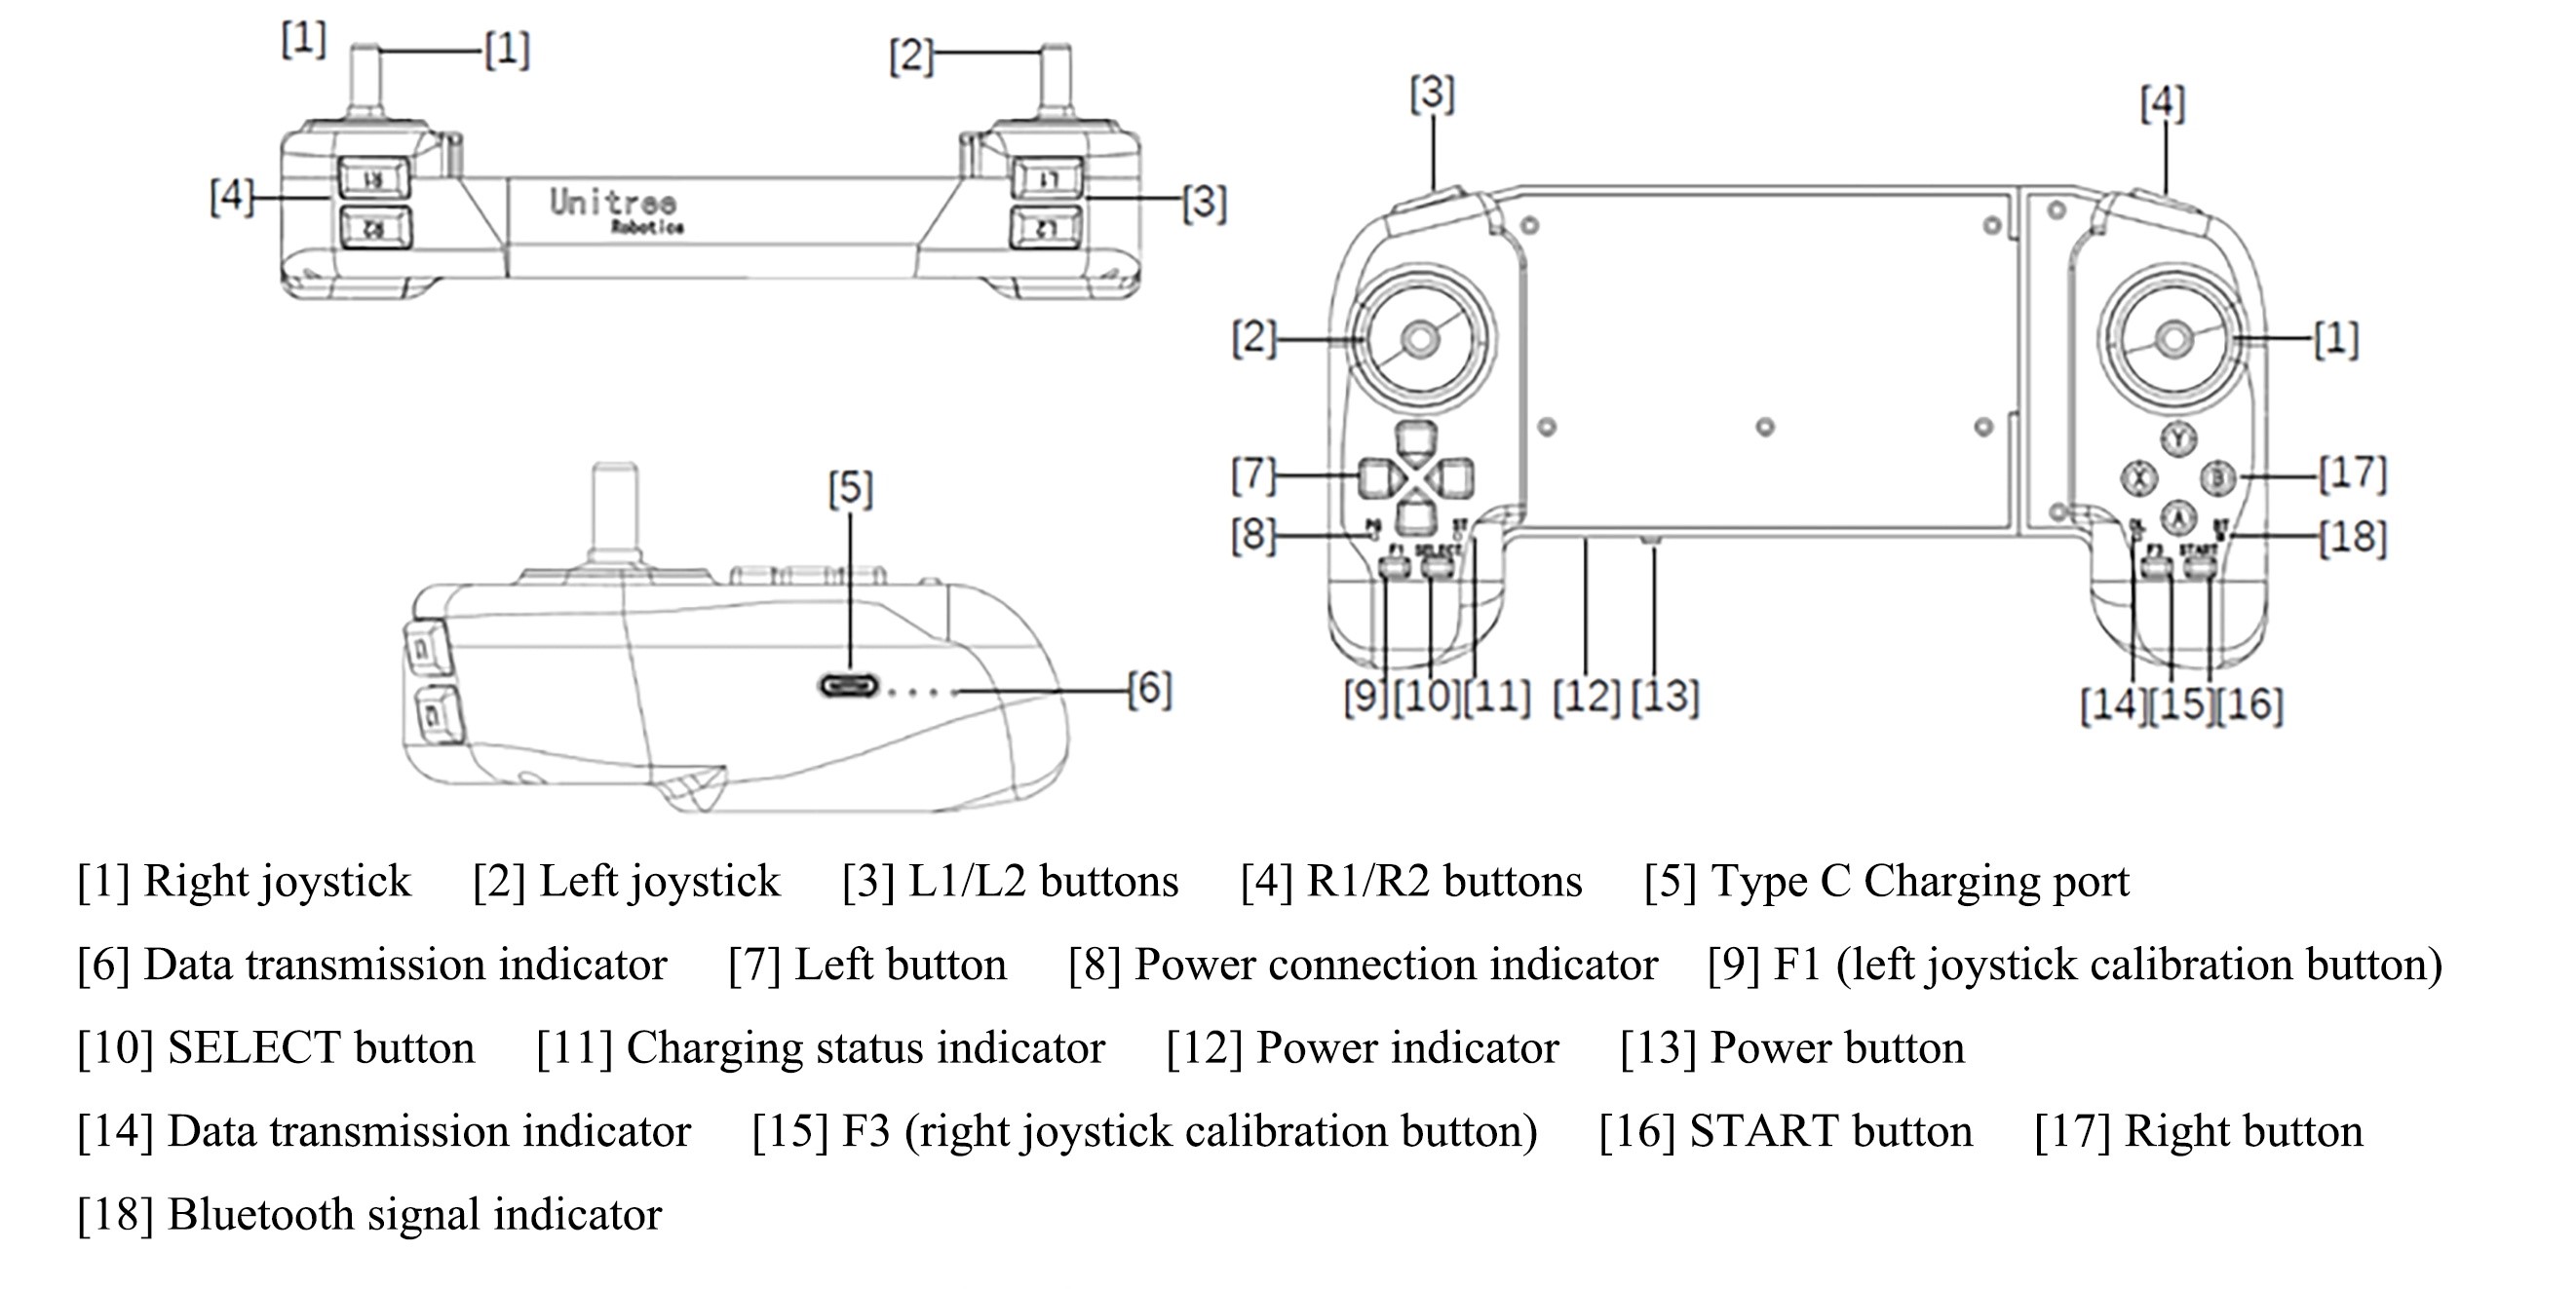
This project mainly uses the RealMan robotic arm with the handle of the Unitree robot dog. The controller is used to control the robot dog's standing, lying down, walking (forward and backward, left and right and yaw), posture (pitch, tilt and twist) and lying down; at the same time, the teaching mode can also be used to control the end posture, prefabricated position and opening and closing of the dexterous hand of the robotic arm. The handle control instructions are as follows:
The Left Controller Controls the Robot Dog
This mode means that the left half of the controller is used to control the robot dog.
Walking mode control
The robot dog standing control is controlled by the up key in the left button
7. When the up key is triggered, the robot dog stands up, and at the same time, the robot arm adjusts to a standing posture. At this time, the robot dog is in standing mode (if you need to control its displacement, press16the start button to enter walking mode). Press16the start button to directly switch the robot dog to walking mode.The robot dog lying down control is controlled by the down key in
7the left button. After the robot dog lies down, it cannot control any operation of the robot dog and can only control the robot arm.The forward and translation of the robot dog are controlled by the left joystick
2, and the yaw is controlled by the left and right buttons in the left button7.Posture mode control
The robot dog posture control must always trigger the L1 button in the key
3, and at the same time press other corresponding buttons to realize the robot dog posture control.Under the premise that L1 is continuously triggered, the left joystick
2controls the pitch and tilt of the robot dog, and the left button7controls the rise and twist of the robot dog's body.10The select button returns the robot dog posture to its neutral position.
The Right Controller Controls the Robotic Arm
This mode means that the right half of the controller is used to control the robot arm. The robotic arm controls the position and posture of the end of the robotic arm based on the dog itself as the base coordinate system (the front of the dog is the positive direction X axis). In addition, it is recommended that the controller's direction be consistent with the robot dog for observation.
Position mode control
The Z-axis position of the robotic arm is controlled by
17the upper and lower buttons in the right button.1The right joystick controls the X-axis and Y-axis of the robot arm position.Posture mode control
The robot dog posture control must always trigger the R1 button in the key [4], and at the same time press other corresponding buttons to achieve the robot dog posture control.
Under the premise that R1 is continuously triggered, the right joystick
1controls the pitch and roll of the end of the robotic arm.17The left and right buttons of the right button control the yaw posture at the end of the robotic arm, the up button controls the step-by-step gripping function of the dexterous hand at the end of the robotic arm (the so-called step-by-step gripping means that the degree of gripping by the dexterous hand is determined by the duration triggered by the up button), and the down button controls the opening function of the dexterous hand, as shown in the figure below.
Full Controller Control
This mode refers to the full controller controlling the robotic arm or robot dog, increasing the flexibility of control and making it efficient and convenient.
Full controller robot dog control
Under the premise that L2 is continuously triggered,
2the left joystick controls the translation, forward and backward movement of the robot dog, and1the right joystick controls the yaw of the robot dog. Other actions are to be developed.Full controller robotic arm control
Under the premise that R2 is continuously triggered,
2the left joystick controls the X-axis and Y-axis displacements of the robotic arm, and1the right joystick controls the X-axis displacement of the robotic arm.7The left button controls the four prefabricated positions of the robotic arm, and the lower button of17the left button controls the robot dog to lie down. Other actions are to be developed.
WARNING
For other controller-related functions and related operations, please refer to the Unitree b1 robot dog instruction document.
VIII. Software Use Case Model Diagram
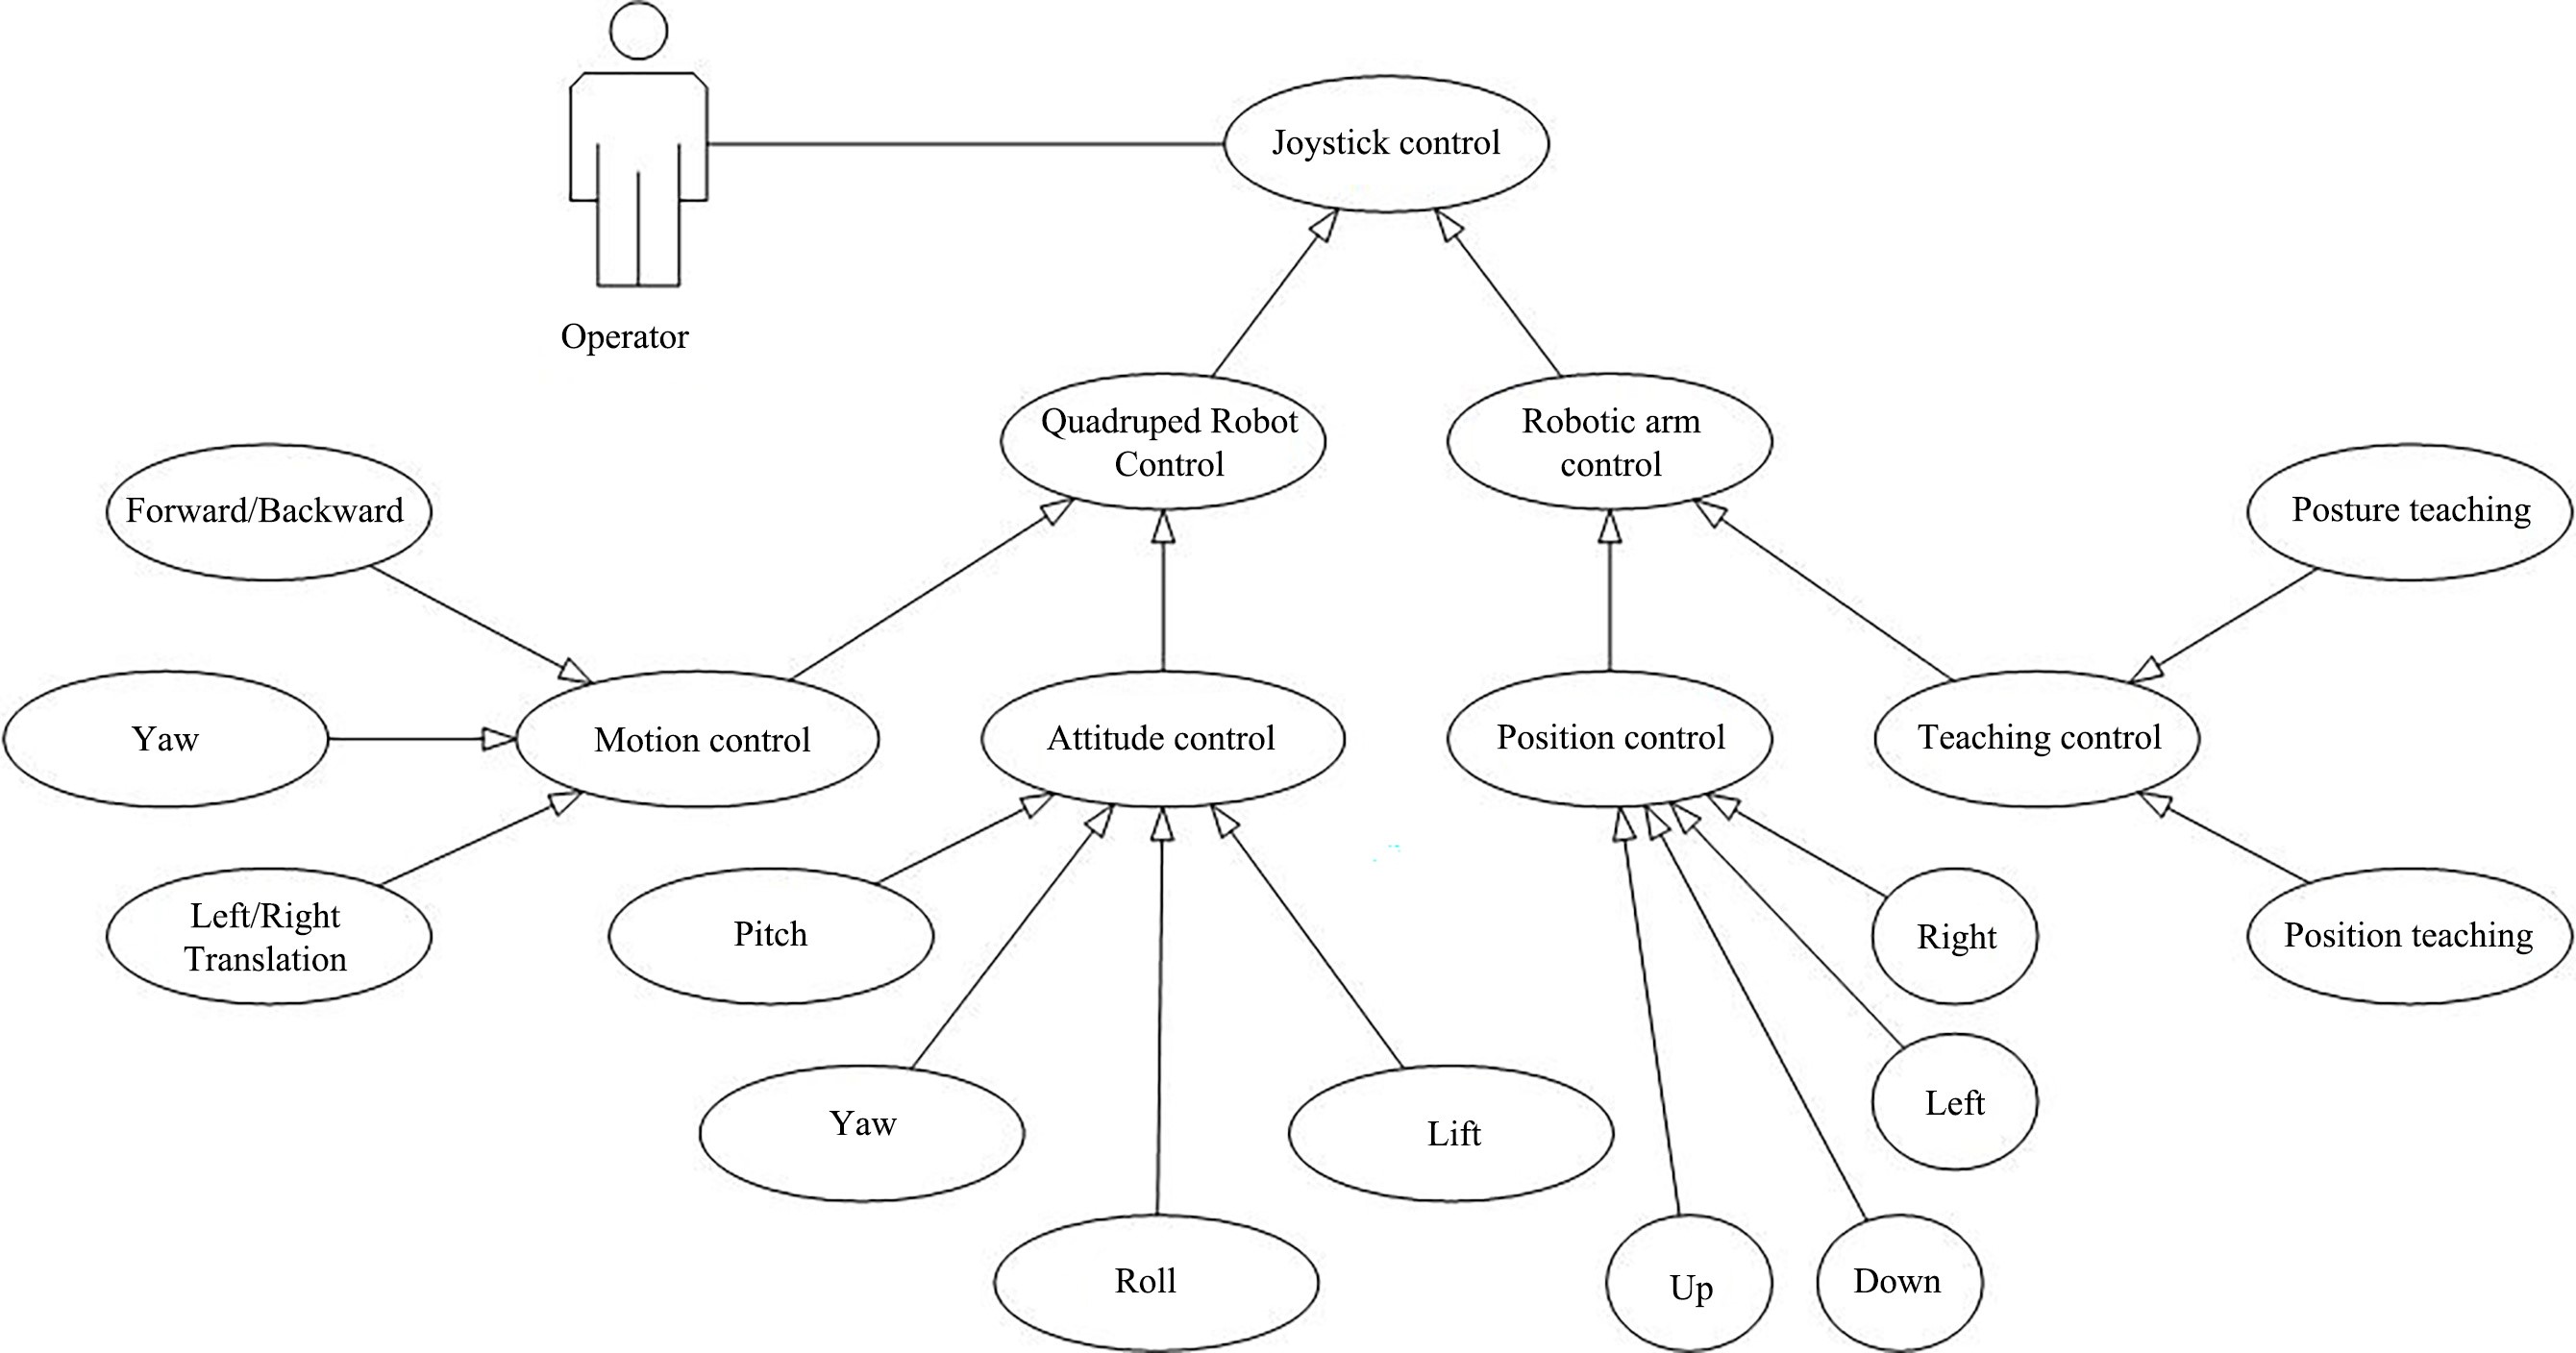
As can be seen from the above, the operator can control the linear movement and posture of the B1 dog body through the handle, and can control the specific position and posture angle of the robot arm, as well as the spatial position based on the robot arm base.
IX. Key Code Analysis
By monitoring the handle control data, the corresponding control operations on the robotic arm and robot dog are shown in the following code:
void Rm_Unitree_Getcmd::Joy_Listener(const sensor_msgs::Joy::ConstPtr &joy) {
    // Initialize with the assumption that the data published by the joystick has changed
    RM_ARM arm_flag = RM_ARM::NONE;
    dog_data.pub_stop = true;   // Assume that the robot dog's actions can be published at this time
    int mode = static_cast<int>(dog_data.unitree_state.mode);

    int col_flag = joy->buttons[13] + joy->buttons[15];
    if (col_flag == 0 || col_flag == 2) {
        // Simple mode is available
        if (mode != 7)
            if (joy->buttons[12] == 1) {
                // Robot dog posture simple teaching
                dog_data.unitree_cmd.mode = 1;  // Control the overall height and attitude angle of the robot dog
                dog_data.unitree_cmd.euler[0] = -joy->axes[1] * dog_pub.e_limit[0]; // r
                dog_data.unitree_cmd.euler[1] = joy->axes[0] * dog_pub.e_limit[1]; //p
                Button_Step_Pose(joy->buttons[2], joy->buttons[3], "left", "right", dog_pub.e_limit[2] / 6, dog_data.unitree_cmd.euler[2]); // y
                Button_Velocity(joy->buttons[0], joy->buttons[1], dog_pub.bh_limit / 2, dog_data.unitree_cmd.bodyHeight);  //bodyheight
            }
            else {
                // Robot dog position simple teaching
                dog_data.unitree_cmd.mode = 2;  //Control the position and velocity of the robot dog
                dog_data.unitree_cmd.velocity[0] = joy->axes[0] * dog_pub.v_limit[0];  // x
                dog_data.unitree_cmd.velocity[1] = joy->axes[1] * dog_pub.v_limit[1]; // y
                Button_Velocity(joy->buttons[2], joy->buttons[3], dog_pub.yaw_limit / 2, dog_data.unitree_cmd.yawSpeed); // yaw

                // Set robotic arm publishing mode
                arm_flag = RM_ARM::MOVEJ;
                // Control the robot dog to stand up and sit dow
                if (joy->buttons[0]) {
                    dog_data.unitree_cmd.mode = 6;  //Stand-up mode
                    // ROS_INFO("Plan stand over!");
                    rm_data.movej["pub"] = rm_data.movej["stand"];
                    rm_data.movej["pub"].speed = rm_pub.movej_limit;
                    dog_pub.ROS_Publish(dog_data);
                    rm_pub.ROS_Publish(arm_flag, rm_data);
                    return;
                }
                else if (joy->buttons[1]) {
                    dog_data.unitree_cmd.mode = 5;  //Sit-down mode
                    // ROS_INFO("Plan frap over!");
                    rm_data.movej["pub"] = rm_data.movej["fall"];
                    rm_data.movej["pub"].speed = rm_pub.movej_limit;
                    dog_pub.ROS_Publish(dog_data);
                    rm_pub.ROS_Publish(arm_flag, rm_data);
                    return;
                }
                else    {}
            }
        else {
            // Set robotic arm publishing mode
            arm_flag = RM_ARM::MOVEJ;
            // Control the robot dog to sit down
            if (joy->buttons[0]) {
                dog_data.unitree_cmd.mode = 6;  //Stand-up mode
                // ROS_INFO("Plan stand over!");
                rm_data.movej["pub"] = rm_data.movej["stand"];
                rm_data.movej["pub"].speed = rm_pub.movej_limit;
                dog_pub.ROS_Publish(dog_data);
                rm_pub.ROS_Publish(arm_flag, rm_data);
                return;
            }
            else    {}
        }

        float vel_of_dog = int(abs(dog_data.unitree_state.velocity[0] * 100) + abs(dog_data.unitree_state.velocity[1] * 100));
        // std::cout<< vel_of_dog <<std::endl;
        if(vel_of_dog == 0)
            if (joy->buttons[14] == 1) {
                rm_data.pos_cmd.v = 0;
                // Robotic arm posture simple teaching
                arm_flag = RM_ARM::ORT;
                // Determine whether to stop control
                if (joy->axes[2] != 0 || joy->axes[3] != 0 || joy->buttons[6] || joy->buttons[7]) {
                    rm_data.pub_stop = false;
                }
                else if(rm_data.pub_stop) {
                    arm_flag = RM_ARM::NONE;
                }
                else {
                    arm_flag = RM_ARM::STOP;
                    rm_data.pub_stop = true;
                }
                // Assign robotic arm posture
                if (joy->axes[2] != 0) {
                    rm_data.ort_cmd.teach_type = "ry";
                    rm_data.ort_cmd.v = abs(joy->axes[2]) * rm_pub.ort_limit;
                    if (joy->axes[2] > 0)
                        rm_data.ort_cmd.direction = "pos";
                    else
                        rm_data.ort_cmd.direction = "neg";
                }
                else if (joy->axes[3] != 0) {
                    rm_data.ort_cmd.v = 0.0;
                    rm_data.ort_cmd.teach_type = "rx";
                    rm_data.ort_cmd.v = abs(joy->axes[3]) * rm_pub.ort_limit;
                    if (joy->axes[3] < 0) {
                        rm_data.ort_cmd.direction = "pos";
                    }
                    else {
                        rm_data.ort_cmd.direction = "neg";
                    }
                }
                else if (joy->buttons[6] || joy->buttons[7]) {
                    rm_data.ort_cmd.teach_type = "rz";
                    rm_data.ort_cmd.v = rm_pub.ort_limit / 1.5;
                    if (joy->buttons[6]) {
                        rm_data.ort_cmd.direction = "pos";
                    }
                    else {
                        rm_data.ort_cmd.direction = "neg";
                    }
                }
                else    {}

                // Joystick controls dexterous hand
                if (joy->buttons[4] && rm_pub.Hand_Planner(RM_HAND::CLOSE_OF_FINGERS, rm_data, 0)) {
                    ROS_INFO("Close the fingers succeed..");
                }
                else if (rm_data.finger_finish && rm_pub.Hand_Planner(RM_HAND::CLOSE_OF_THUMB, rm_data, 0)) {
                    ROS_INFO("Close the thumb succeed..");
                }
                else    {}

                if (joy->buttons[5] && rm_pub.Hand_Planner(RM_HAND::OPEN_OF_HAND, rm_data, 0.7)) {
                    ROS_INFO("Open the hand succeed..");
                }
                else    {}
            }
            else {
                rm_data.ort_cmd.v = 0;
                // Robotic arm position simple teaching
                arm_flag = RM_ARM::POS;
                // Determine whether to stop control
                if (joy->axes[2] != 0 || joy->axes[3] != 0 || joy->buttons[4] || joy->buttons[5]) {
                    rm_data.pub_stop = false;
                }
                else if(rm_data.pub_stop) {
                    arm_flag = RM_ARM::NONE;
                }
                else {
                    arm_flag = RM_ARM::STOP;
                    rm_data.pub_stop = true;
                }
                // Assign robotic arm position message
                if (joy->axes[2] != 0) {
                    rm_data.pos_cmd.teach_type = "x";
                    rm_data.pos_cmd.v = abs(joy->axes[2]) * rm_pub.pos_limit;
                    if (joy->axes[2] > 0) {
                        rm_data.pos_cmd.direction = "pos";
                    }
                    else {
                        rm_data.pos_cmd.direction = "neg";
                    }
                }
                else if (joy->axes[3] != 0)
                {
                    rm_data.pos_cmd.teach_type = "y";
                    rm_data.pos_cmd.v = abs(joy->axes[3]) * rm_pub.pos_limit;
                    if (joy->axes[3] > 0) {
                        rm_data.pos_cmd.direction = "pos";
                    }
                    else {
                        rm_data.pos_cmd.direction = "neg";
                    }
                }
                else if (joy->buttons[4] || joy->buttons[5])
                {
                    rm_data.pos_cmd.teach_type = "z";
                    rm_data.pos_cmd.v = rm_pub.pos_limit / 1.5;
                    if (joy->buttons[4])
                        rm_data.pos_cmd.direction = "pos";
                    else
                        rm_data.pos_cmd.direction = "neg";
                }
                else    {}
            }
        else
            arm_flag = RM_ARM::NONE;
    }
    else if (joy->buttons[13] == 1)
    {
        // Robot dog complex teaching
        if (mode != 7)
        {
            dog_data.unitree_cmd.mode = 2;  // Control the displacement and velocity of the robot dog
            dog_data.unitree_cmd.velocity[0] = joy->axes[0] * dog_pub.v_limit[0];  // x
            dog_data.unitree_cmd.velocity[1] = joy->axes[1] * dog_pub.v_limit[1]; // y
            dog_data.unitree_cmd.yawSpeed = joy->axes[3] * dog_pub.yaw_limit; // yaw
        }
        else    {}

        // Set four gait modes for the robot dog
        if (joy->buttons[0]) {
            dog_data.unitree_cmd.gaitType = 1;
        }
        else if (joy->buttons[1]) {
            dog_data.unitree_cmd.gaitType = 2;
        }
        else if (joy->buttons[2]) {
            dog_data.unitree_cmd.gaitType = 3;
        }
        else if (joy->buttons[3]) {
            dog_data.unitree_cmd.gaitType = 4;
        }
        else    {}
    }
    else if(joy->buttons[15] == 1) {
        rm_data.ort_cmd.v = 0;
        // Set robotic arm teaching mode
        arm_flag = RM_ARM::ORT_POS;

        // Determine whether to stop control
        if (joy->axes[0] != 0 || joy->axes[1] != 0 || joy->axes[2] != 0) {
            rm_data.pub_stop = false;
        }
        else if(rm_data.pub_stop) {
            arm_flag = RM_ARM::NONE;
        }
        else {
            arm_flag = RM_ARM::STOP;
            rm_data.pub_stop = true;
        }

        //
        rm_data.ort_cmd.v = 0;
        // Robotic arm complex teaching
        if (joy->axes[0] != 0) {
            rm_data.pos_cmd.teach_type = "x";
            rm_data.pos_cmd.v = abs(joy->axes[0]) * rm_pub.pos_limit;
            if (joy->axes[0] > 0) {
                rm_data.pos_cmd.direction = "pos";
            }
            else {
                rm_data.pos_cmd.direction = "neg";
            }
        }
        else if (joy->axes[1] != 0) {
            rm_data.pos_cmd.teach_type = "y";
            rm_data.pos_cmd.v = abs(joy->axes[1]) * rm_pub.pos_limit;
            if (joy->axes[1] > 0){
                rm_data.pos_cmd.direction = "pos";
            }
            else {
                rm_data.pos_cmd.direction = "neg";
            }
        }
        else if (joy->axes[2] != 0) {
            rm_data.pos_cmd.teach_type = "z";
            rm_data.pos_cmd.v = abs(joy->axes[2]) * rm_pub.pos_limit;
            if (joy->axes[2] > 0) {
                rm_data.pos_cmd.direction = "pos";
            }
            else {
                rm_data.pos_cmd.direction = "neg";
            }
        }
        else    {}

        // Set four actions for the robotic arm
        if (joy->buttons[0]) {
            arm_flag = RM_ARM::MOVEJ;
            rm_data.movej["pub"] = rm_data.movej["pre"];
            rm_data.movej["pub"].speed = rm_pub.movej_limit;
        }
        else if (joy->buttons[1]) {
            arm_flag = RM_ARM::MOVEJ;
            rm_data.movej["pub"] = rm_data.movej["back"];
            rm_data.movej["pub"].speed = rm_pub.movej_limit;
        }
        else if (joy->buttons[2]) {
            arm_flag = RM_ARM::MOVEJ;
            rm_data.movej["pub"] = rm_data.movej["left"];
            rm_data.movej["pub"].speed = rm_pub.movej_limit;
        }
        else if (joy->buttons[3]) {
            arm_flag = RM_ARM::MOVEJ;
            rm_data.movej["pub"] = rm_data.movej["right"];
            rm_data.movej["pub"].speed = rm_pub.movej_limit;
        }
        else if (joy->buttons[11]) {
            arm_flag = RM_ARM::MOVEJ;
            rm_data.movej["pub"] = rm_data.movej["run"];
            rm_data.movej["pub"].speed = rm_pub.movej_limit;
        }
        else    {}
    }

    // Control the robot dog to reset posture
    if (joy->buttons[10] == 1) {
        dog_data.unitree_cmd.mode = 1;
        dog_data.unitree_cmd.euler[0] = 0.0;
        dog_data.unitree_cmd.euler[1] = 0.0;
        dog_data.unitree_cmd.euler[2] = 0.0;
        dog_data.unitree_cmd.bodyHeight = 0;
        dog_data.unitree_cmd.gaitType = 0;
    }
    else    {}
    // Start controlling the robot with joystick data
    rm_pub.ROS_Publish(arm_flag, rm_data);
    dog_pub.ROS_Publish(dog_data);
}
This C++ code is part of a ROS (Robot Operating System) node that processes inputs from the game controller and converts these inputs into control commands for the robot (a combination of Unitree B1 robot dog and robotic arm). Here is an analysis of the code:
- Function declaration:
Rm_Unitree_Getcmd::Joy_Listeneris a member function that receives a pointer to asensor_msgs::Joymessage as an argument. - Initialize variables: At the beginning of the function, some variables are initialized, including
arm_flagto identify the state of the robot arm.dog_datais used to store the status and commands related to the robot dog andmoderepresents the current control mode. - Button and axis status reading: The code reads the status of the buttons and axes of a gamepad by checking the
buttonsandaxessum array ofjoyobjects. - Easy mode and complex mode control: The code distinguishes between easy mode and complex mode according to the status of buttons
13and15. In simple mode, it is allowed to control the posture, speed and movement of the robot dog's robot arm through buttons and axes. In complex mode, more detailed control is provided, allowing for finer adjustments to the robot dog's gait and the position of its arms. - Robot dog control: In simple mode, if the button
12is pressed, the code will enter the robot dog attitude control mode, controlling the pitch angle and roll angle of the robot dog through the axis0and1, and controlling the yaw angle through the button2and3. In complex mode, it is allowed to control the linear speed and yaw speed of the robot dog through axes0,1and3. - Robotic arm control: There are several sections in the code that control the robotic arm. For example, if a button
0or1is pressed and it is not currently in mode7, the raising or lowering action of the robot arm will be triggered. In addition, there are axes2and3to control the robotic arm. - Control command issuance: Use
rm_pub.ROS_Publishanddog_pub.ROS_Publishfunctions to issue control commands to the ROS system, which will be received and executed by the corresponding robot nodes. - Stop and zero control: The code also provides logic to stop all actions (by setting
arm_flagtoRM_ARM::STOPorRM_ARM::NONE), as well as the function of zeroing the robot dog's posture (via button10). - Dexterous hand control: There is also a part of the code used to control the opening and closing of the dexterous hand, which is achieved through buttons
4and5. - Status flag:
dog_data.pub_stopflag is used to determine whether an action command should be issued. - Mode and speed setting: Multiple modes and speed limits are set in the code, such as
dog_pub.e_limit,dog_pub.v_limit, anddog_pub.yaw_limit, to limit the value of control commands and ensure the safety of robot actions.
This case connects the robotic arm, dexterous hand and robot dog through ROS, making full use of the distributed communication method of ROS to integrate and develop the composite robot dog. Overall, this code implements an interface for controlling the robot through a gamepad, including the posture and speed control of the robot dog and the position and posture control of the robot arm. Developers can perform secondary development based on the above interface to empower applications for composite robot dogs, thereby contributing to the development of technology and productivity.
X. Video Presentation
Video won't load? Click to view
Resource Download
Review of relevant documents
Download relevant documents
Download function packages