C、C++:
End Effector 6-DoF Force Configurationforce The 6-DoF force version of the RealMan robotic arm is equipped with an integrated 6-DoF force sensor at the end effector, eliminating the need for external wiring and allowing the user to manipulate the 6-DoF force and obtain 6-DoF force data directly through the protocol. As shown in the image below, the Z-axis of the 6-DoF force is directly above, and the Y-axis of the 6-DoF force is in the opposite direction of the aviation connector, with the frame following the right-hand rule. When the robotic arm is in the zero position, the tool frame is aligned with the 6-DoF force frame. 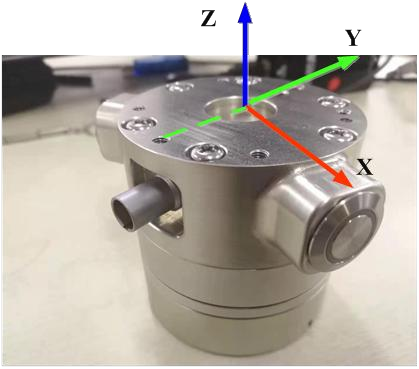 Additionally, the 6-DoF force sensor has a rated force of 200 N, a rated torque of 8 Nm, an overload capacity of 300FS, an operating temperature range of 5 to 80°C, and an accuracy of 0.5 FS. During use, it is important to pay attention to the operational requirements to prevent damage to the 6-DoF force sensor. This interface is used to query and configure the state information of the 6-DoF force, including the 6-DoF force orientation, zero calibration, and sensor calibration.
Query 6-DoF force informationrm_get_force_data()
Query the current force and torque information obtained from the 6-DoF force sensor: Fx, Fy, Fz, Mx, My, and Mz.
- Method prototype:
int rm_get_force_data(rm_robot_handle * handle,rm_force_data_t * data)Jump to rm_robot_handle and rm_force_data_t for details of the structure.
- Parameter description:
| Parameter | Type | Description |
|---|---|---|
handle | Input | Robotic arm handle. |
data | Output | Force sensor data structure. |
- Return value:
0 represents success. For other error codes, please refer to the API2 Error Codes.
- Usage demo
//Get 6-DoF force data
rm_force_data_t force_data;
ret = rm_get_force_data(robot_handle, &force_data);
printf("get force data result : %d\n", ret);
for(int i = 0; i < 6; i++) {
    printf("force data[%d] : %f \n", i, force_data.force_data[i]);
    printf("work_zero_force_data[%d] : %f \n", i, force_data.work_zero_force_data[i]);
    printf("tool_zero_force_data[%d] : %f \n", i, force_data.tool_zero_force_data[i]);
    printf("zero_force_data[%d] : %f \n", i, force_data.zero_force_data[i]);
}
6-DoF force zero calibrationrm_clear_force_data()
Zero the 6-DoF force data, calibrating the zero position under the current state.
- Method prototype:
int rm_clear_force_data(rm_robot_handle * handle)Jump to rm_robot_handle for details of the structure.
- Parameter description:
| Parameter | Type | Description |
|---|---|---|
handle | Input | Robotic arm handle. |
- Return value:
0 represents success. For other error codes, please refer to the API2 Error Codes.
- Usage demo
ret = rm_clear_force_data(robot_handle);
printf("clear force data result : %d\n", ret);
Set the 6-DoF force center of gravity parameters rm_set_force_sensor()
Set the 6-DoF force center of gravity parameters. After reinstalling the 6-DoF force sensor, the initial force and center of gravity acting on the 6-DoF force must be recalculated. Get 6-DoF force data at different orientations to calculate the center of gravity position. After this command is issued, the robotic arm moves to each calibration point at a fixed speed.
Take the RM65 robotic arm, the joint angles for the four calibration points are as follows:
Position 1 joint angles: 0,0,-60,0,60,0
Position 2 joint angles: 0,0,-60,0,-30,0
Position 3 joint angles: 0,0,-60,0,-30,180
Position 4 joint angles: 0,0,-60,0,-120,0
Method prototype:
int rm_set_force_sensor(rm_robot_handle * handle,bool block)Jump to rm_robot_handle for details of the structure.
WARNING
- Calibration must be performed while the robotic arm is stationary;
- This process must not be interrupted. Otherwise, the calibration must be restarted.
- Parameter description:
| Parameter | Type | Description |
|---|---|---|
handle | Input | Robotic arm handle. |
block | Input | true indicates blocking mode, where the system waits for the calibration to complete before returning; false indicates non-blocking mode, where the system returns immediately after sending the command. |
- Return value:
0 represents success. For other error codes, please refer to the API2 Error Codes.
- Usage demo
// Block until the 6-DoF force center of gravity calibration is complete
ret = rm_set_force_sensor(robot_handle, true);
printf("set force sensor result : %d\n", ret);
Calibrate the 6-DoF force datarm_manual_set_force()
After reinstalling the 6-DoF force sensor, the initial force and center of gravity acting on the 6-DoF force must be recalculated.
This manual calibration process is suitable for narrow working spaces to prevent the robotic arm from colliding during the automatic calibration process. Users can manually select four positions to issue commands. Once all four points are set, the robotic arm will automatically move toward the user-defined target, and the 6-DoF force center of gravity will be calculated during this movement.
- Method prototype:
int rm_manual_set_force(rm_robot_handle * handle,int count,float * joint,bool block)Jump to rm_robot_handle for details of the structure.
WARNING
The four positions must be issued in sequence. Once position 4 is set, the robotic arm will automatically begin its movement to calculate the center of gravity.
- Parameter description:
| Parameter | Type | Description |
|---|---|---|
handle | Input | Robotic arm handle. |
count | Input | Point: 1-4. |
joint | Input | Joint angle, in °. |
block | Input | true indicates blocking mode, where the system waits for the calibration to complete before returning; false indicates non-blocking mode, where the system returns immediately after sending the command. |
- Return value:
0 represents success. For other error codes, please refer to the API2 Error Codes.
- Usage demo
// Define four joint angle arrays, each corresponding to a calibration position
float joint_pos1[6] = {0, 0, -60, 0, 60, 0}; // Position 1
float joint_pos2[6] = {0, 0, -60, 0, -30, 0}; // Position 2
float joint_pos3[6] = {0, 0, -60, 0, -30, 180}; // Position 3
float joint_pos4[6] = {0, 0, -60, 0, -120, 0}; // Position 4

// Blocking mode, wait for calibration to complete
bool block = true;

// Sequentially set the four positions
for (int i = 1; i <= 4; i++) {
    float *current_joint;
    switch (i) {
        case 1: current_joint = joint_pos1; break;
        case 2: current_joint = joint_pos2; break;
        case 3: current_joint = joint_pos3; break;
        case 4: current_joint = joint_pos4; break;
        default: continue; // Should not reach here
    }

    // Call function to send the calibration position
    int status = rm_manual_set_force(robot_handle, i, current_joint, block);

    // Check the function return value
    switch (status) {
        case 0:
            printf("Calibration position %d successful\n", i);
            break;
        case 1:
            printf("Calibration position %d failed: controller returned an error or parameter error\n", i);
            return 1; // Exit the program early
        case -1:
            printf("Calibration position %d data transmission failed\n", i);
            return -1;
        case -2:
            printf("Calibration position %d data reception failed or timed out\n", i);
            return -2;
        case -3:
            printf("Calibration position %d return value parsing failed\n", i);
            return -3;
        default:
            printf("Unknown error\n");
            return status;
    }
}
Stop calibrating the force sensor center of gravityrm_stop_set_force_sensor()
During the calibration of the force sensor, if an unexpected event occurs, send this command to stop the robotic arm's movement and exit the calibration process.
- Method prototype:
int rm_stop_set_force_sensor(rm_robot_handle * handle)Jump to rm_robot_handle for details of the structure.
- Parameter description:
| Parameter | Type | Description |
|---|---|---|
handle | Input | Robotic arm handle. |
- Return value:
0 represents success. For other error codes, please refer to the API2 Error Codes.
- Usage demo
//Exit the 6-DoF force calibration process
ret = rm_stop_set_force_sensor(robot_handle);