Start Guide:
Realman Robot Hardware Preparations This manual is a quick user manual for robots, which is intended to help users complete the assembly and simple action edition in a short time. With this manual, operators, technicians, technical service personnel, and robot program developers can learn how to use Realman's robotic arms quickly. The robots developed by Realman include the RM65 series, RM75 series, RML63 series, ECO series, GEN72 series, etc. This manual is applicable for all series of robots.
1. Product components
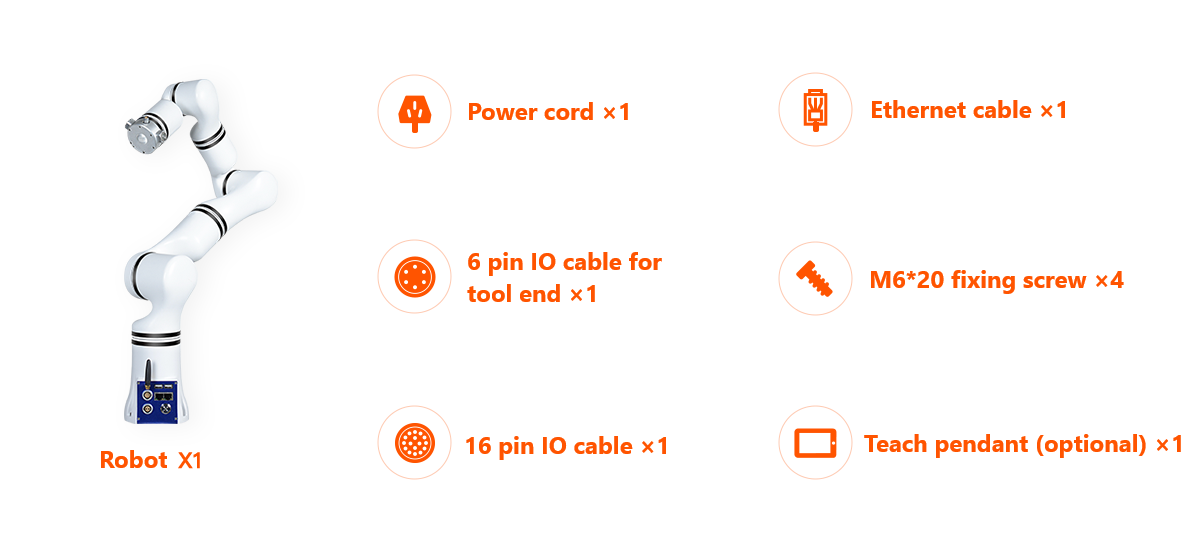
A complete set of Realman collaborative robot comprises the following components:
Explanation of the Electrical Indications
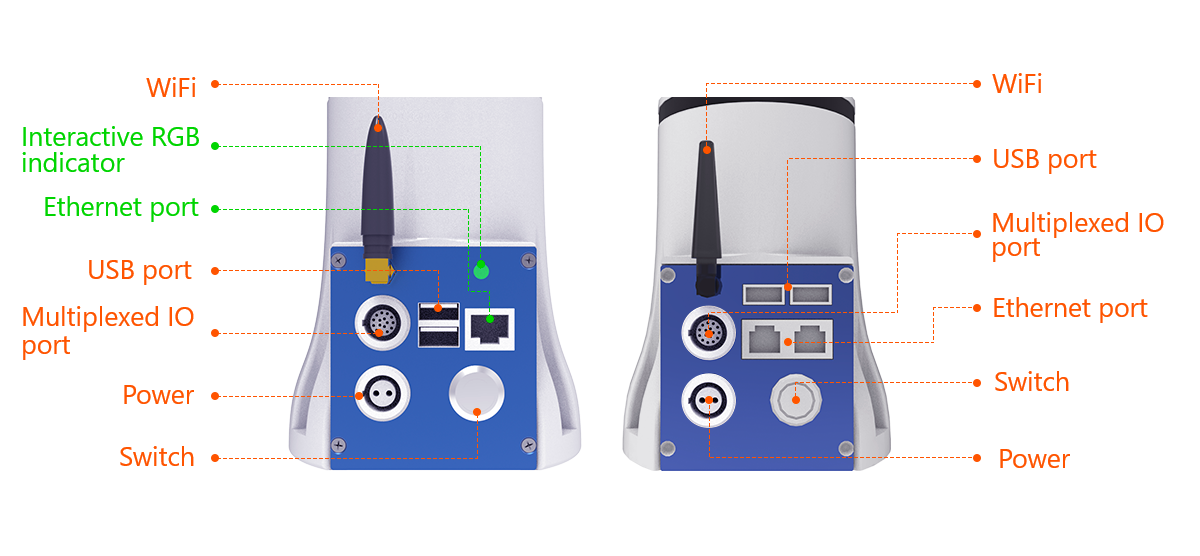
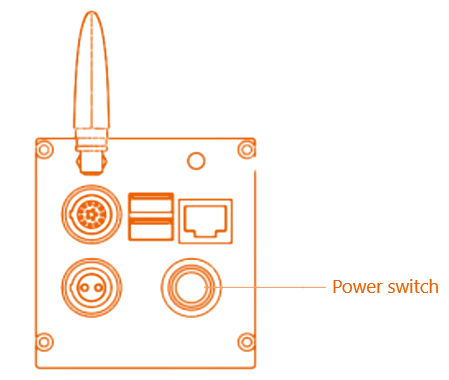
The left one in the figure above is Gen 3 controller. Compared with Gen 2 controller on the right, the status indicator light is added and a rarely used network port is removed.
| No. | Interface | Function |
|---|---|---|
| 1 | Switch | Control the power supply to the robot, and the blue indicator light is on after being turned on |
| 2 | Power | Insert the power cable |
| 3 | Multiplexing I/O interface | Lead out the RS485 and I/O interfaces, etc. For example, the external emergency stop button box. For detailed information, please refer to the External Emergency Stop Button Box. |
| 4 | WiFi | For wireless communication, 100 Mbps Wi-Fi. |
| 5 | USB port | An extension interface, for connecting the bluetooth handle receiver |
| 6 | Ethernet port | Gigabit wired network interface, Communication network interface. |
| 7 | Interactive RGB indicator | Change among blue, white, green, yellow, and red with the status of robotic arm ① indicates controller start and initialization; ②White indicates joint start and initialization; ③ indicates normal operation of robotic arm; ④ indicates the warning of a common fault, which must be handled immediately; ⑤ indicates a major fault, which must be handled immediately. |
2. Quick installation of robot
Realman's robotic arms are of ultra-lightweight type, which can be quickly installed by only one person. The RM65 series, for example, weighs only 7.2 kg, with a base of only 110 mm. The following will take the RM65-B robotic arm as an example to introduce how to install the base and end extension tools, which are similar for other series of robotic arms.
Base installation
- Take the RM65 robot out of the packing box and install the base at a fixed position. The dimensions of the base are as follows.

- Prepare four M6 hexagon socket bolts and an M6 hex wrench.
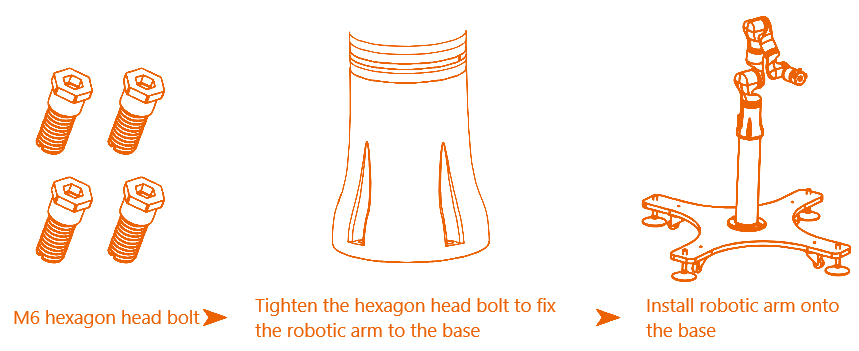
- Take the RM65 robot out of the packing box and install the base at a fixed position. The dimensions of the base are as follows.
End installation
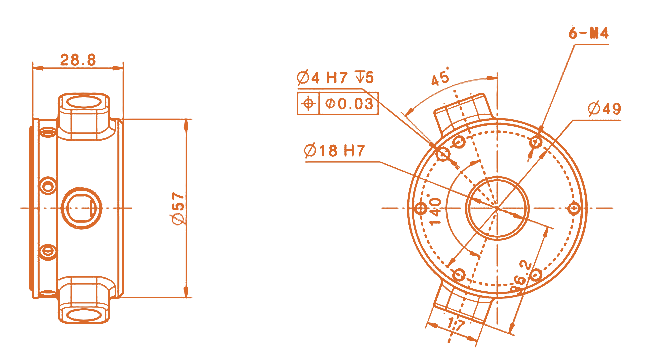
The robotic arm provides standard flange interfaces. Six M4 threaded holes evenly distributed on the ⌀49 mm reference circle are reserved on the flange of the robotic arm. Users only need to fit the holes according to the installation dimensions, as shown in the figure below.
3. Wiring and startup of robot
Take out the 24 V DC cable of RM65 robot from the packing box.
Prepare a 24 V DC power supply and connect it to the power supply interface of the robotic arm. The power supply interface of the robotic arm is a 2-core aerial plug, which is located in the lower left corner of the controller panel. In the 2-core power cable, the brown wire is the power supply positive pole and the blue wire is the power supply negative pole.
TIP
The power voltage ranges from 20 V to 27 V, or even up to 30 V. It is recommended to use a switching power supply rated above 600 W with hiccup mode and constant current output of 1S.
Do not expose the robot to dust or a humid environment beyond the protection level of IP54. Pay close attention to the environment with conductive dust, for which special protection is required.
Connect the cables of the robot. If there are no external devices, just connect the power cable and network cable, as shown in the figure below:

WARNING
Check the following items before turning on the power supply:
- Check whether the power cable and power plug are properly connected.
- Check whether the power switch of the controller is off when it is not connected.
- Ensure that the robot will not touch any person or equipment around. Make sure that the power cable is connected to the 24 V DC power supply.
Press the power switch to start the robotic arm.
TIP
① The background indicator light of the power switch turns blue, indicating that the robotic arm has been energized.
② Meanwhile, the indicator light in the upper right corner of the robot controller turns blue, indicating that the controller is starting.
③ The indicator light of the controller turns white, indicating that the robot joints are being initialized.
④ The indicator light of the controller turns green and flashes, indicating that the robot has started and are ready for normal operation. This process takes approximately 50s.
4. Teach pendant connection
The teach pendant software is web-end software. Users can log in to the software simply by entering the specified IP address in the browser (Google Browser is recommended). Through this human-machine interface, users can operate the robot body and controller, run and create robot programs, and read robot information.
The teach pendant supports platform-wide use, and different carriers can be selected according to the application scenarios, such as an Android pad, a Windows pad or computer, an Apple pad or computer, and a Linux computer.
The teach pendant carrier and the robotic arm can be connected by wired or wireless means.
Wired connection:
The Windows system is connected with the robotic arm by wired means through network interface. 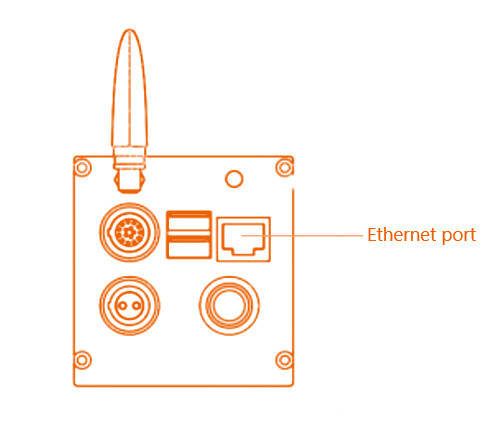
Before wired connection with the teach pendant, it is necessary to change the IP address of the computer to the
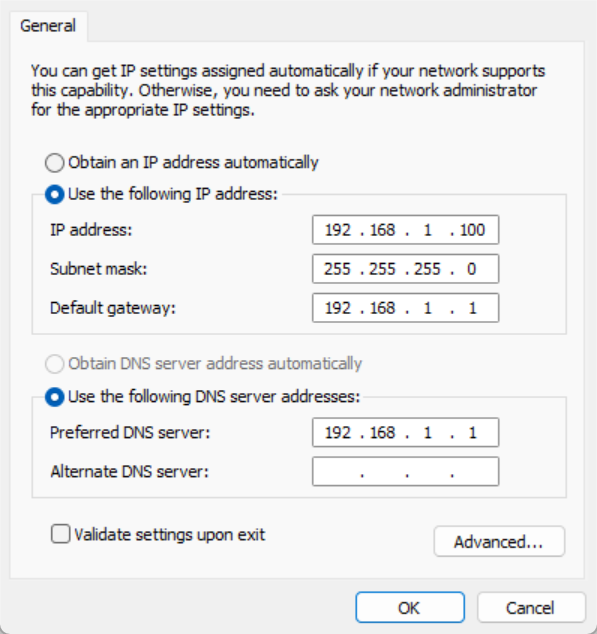
192.168.1.xxnetwork segment, in whichxxcan be any IP address other than "18" in "192.168.1.18". It is recommended to configure the IP address to 192.168.1.100. The configuration method is as follows:
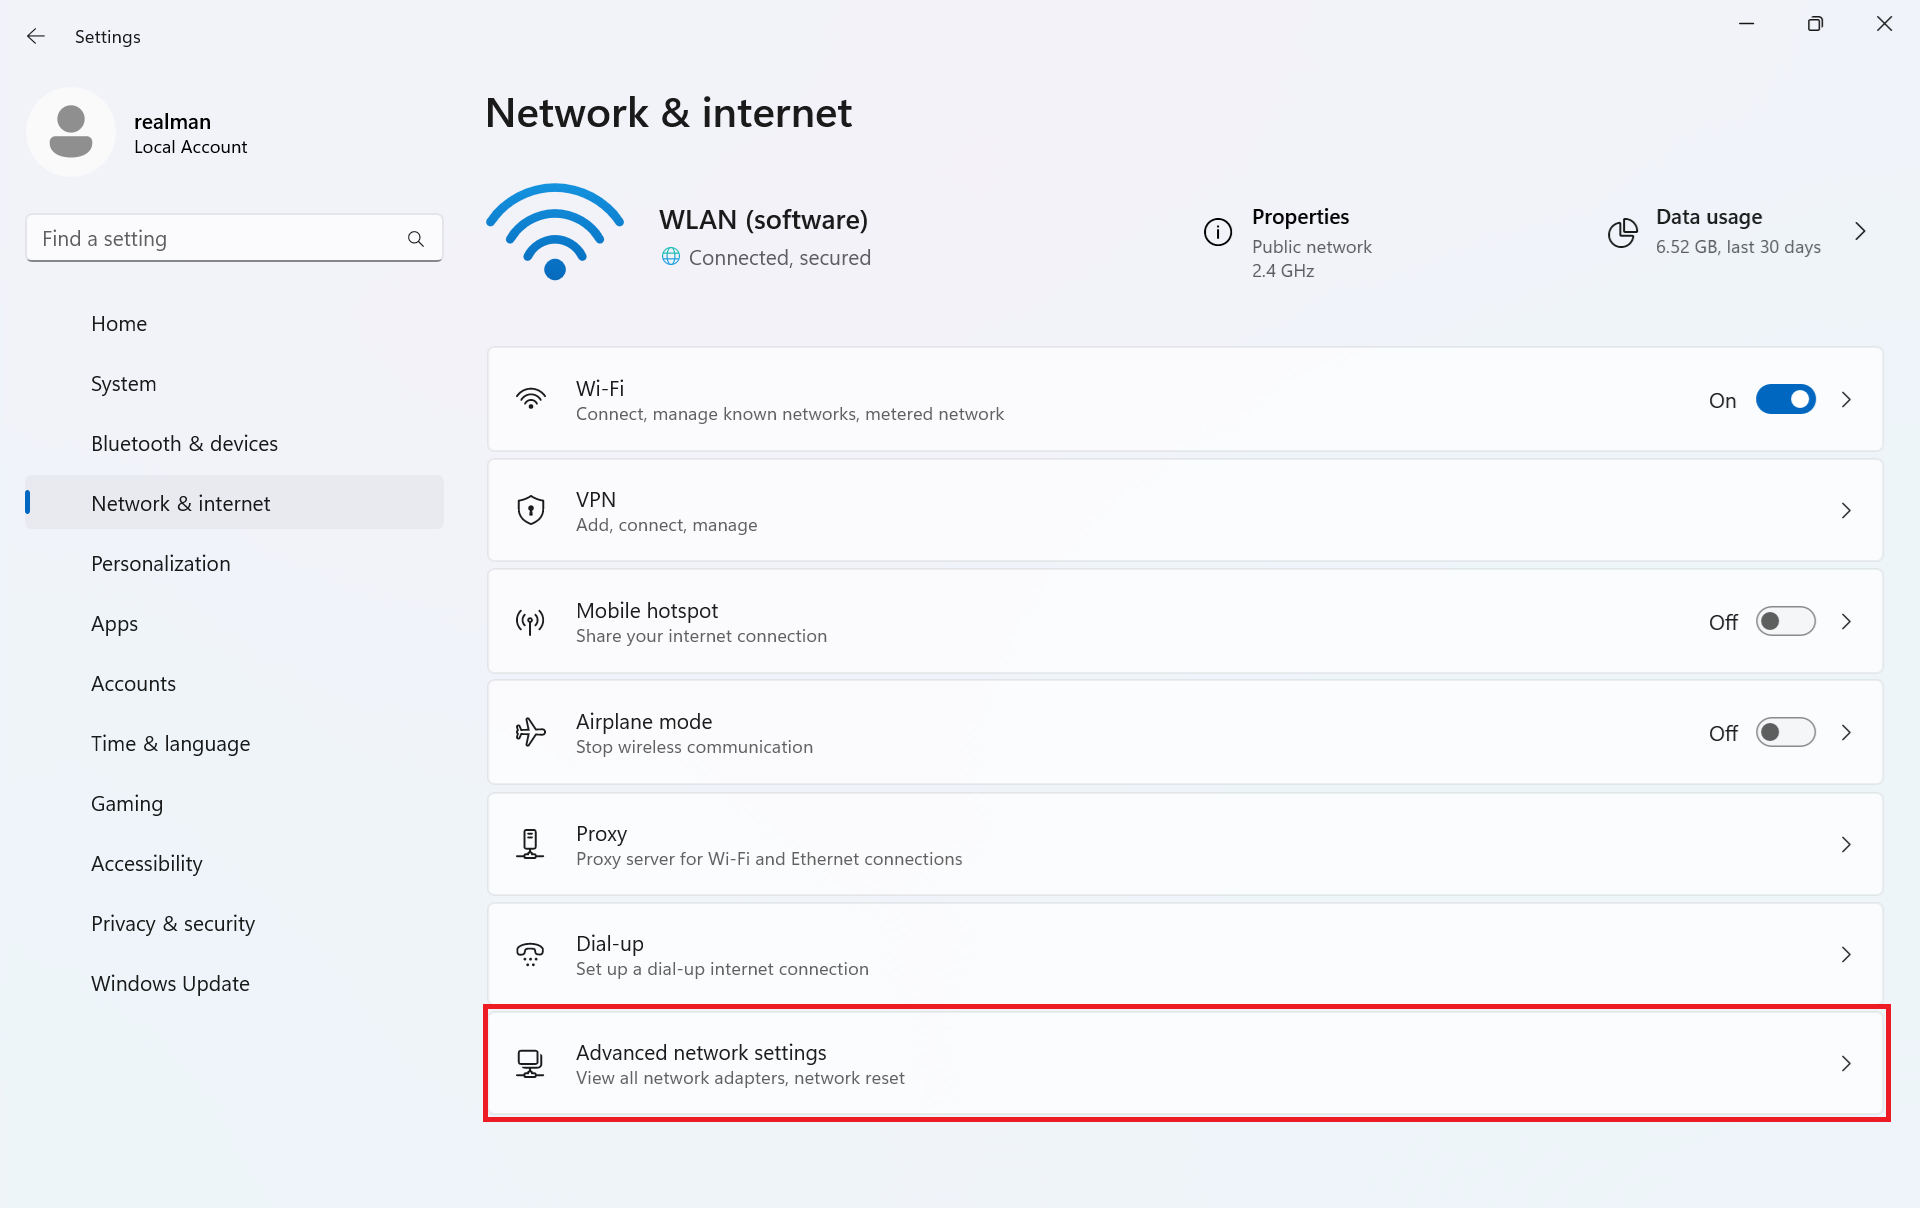
(1) Right-click the WiFi icon in the bottom right corner of the computer to open "Network & Internet":TIP
For Windows 11 system, click "Advanced network settings" to open "Ethernet".
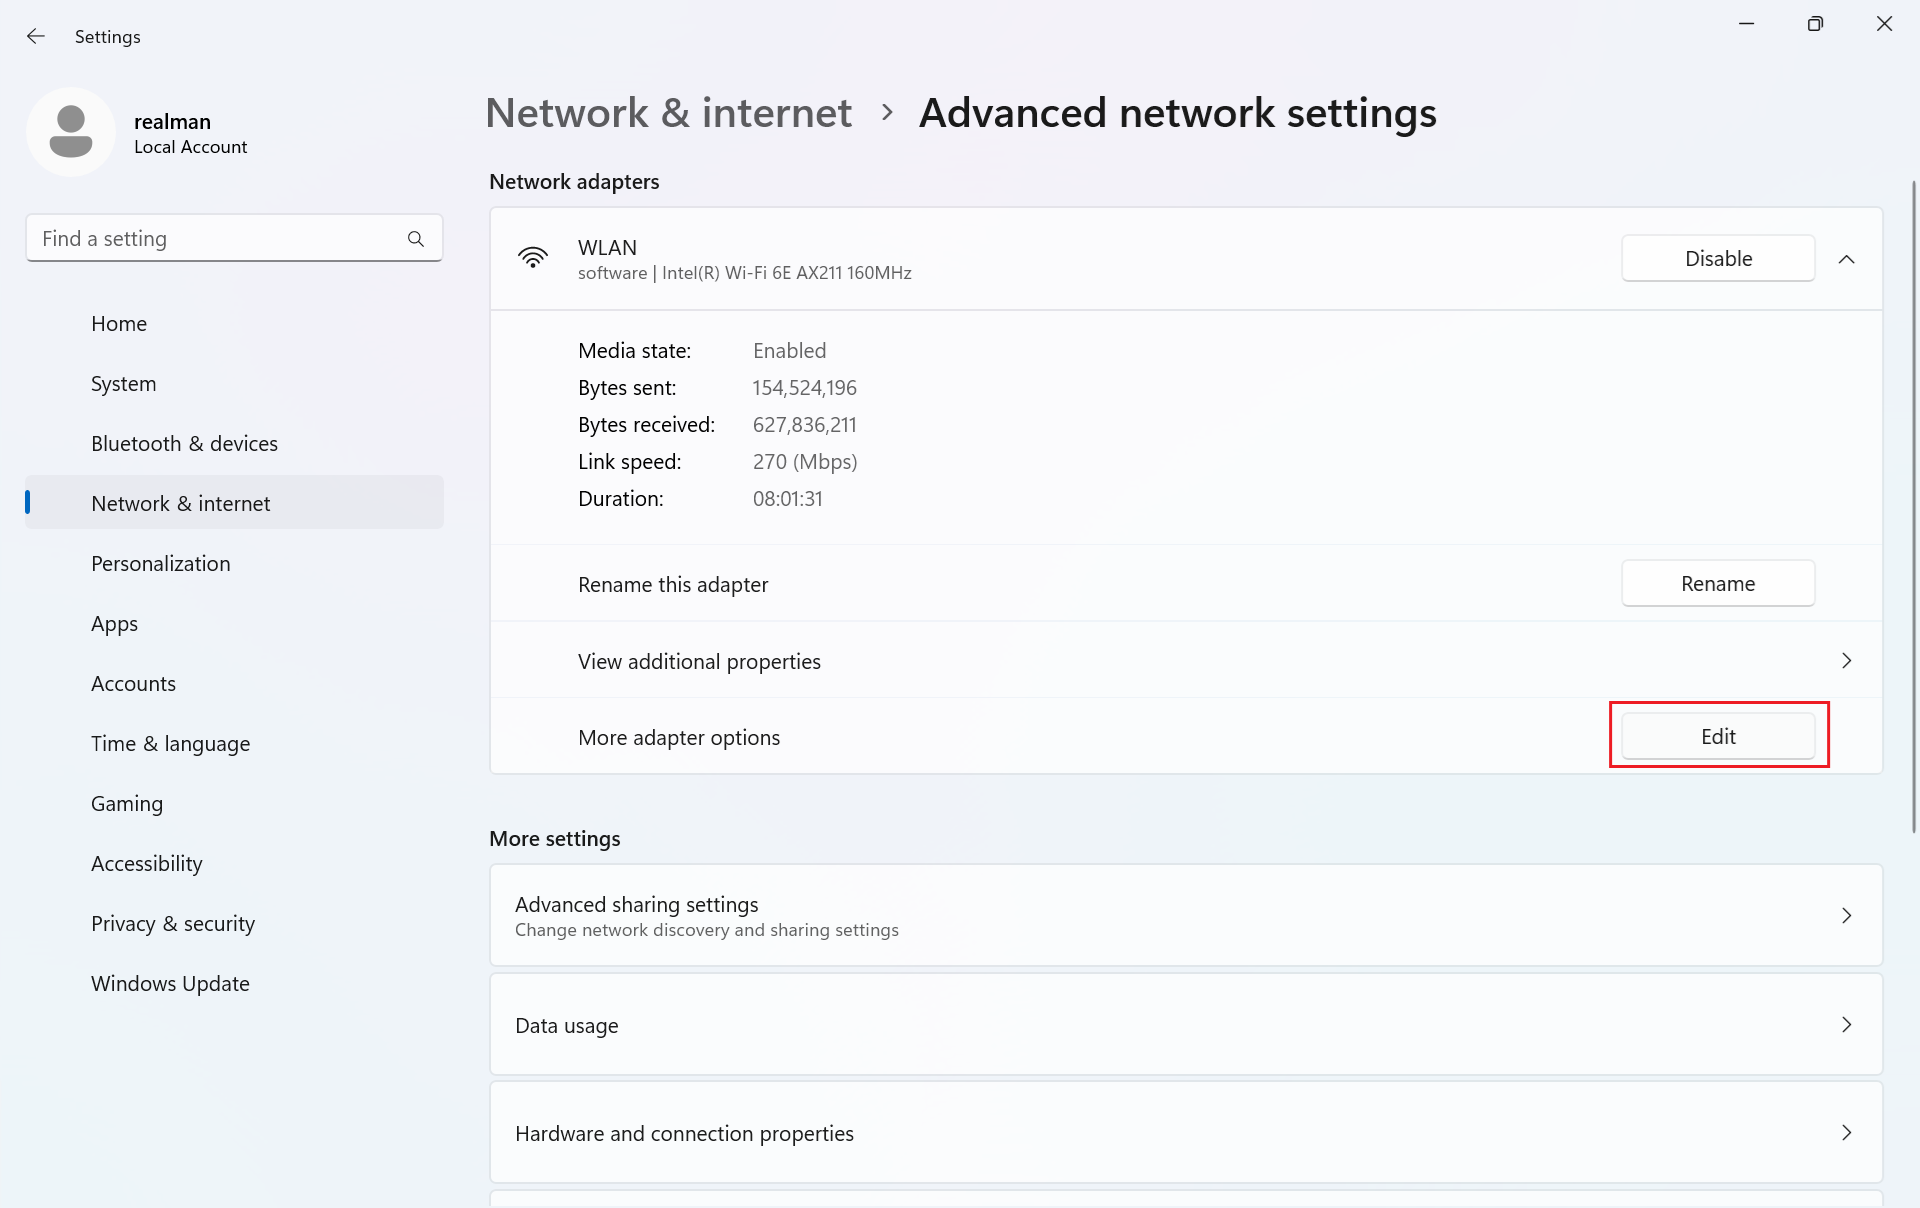
 (2) In the dropdown menu of "Ethernet," click on "Edit" after selecting "More adapter options."
  (3) In the pop-up dialog box, select "Internet Protocol Version 4" first and then click the "Properties" button.
 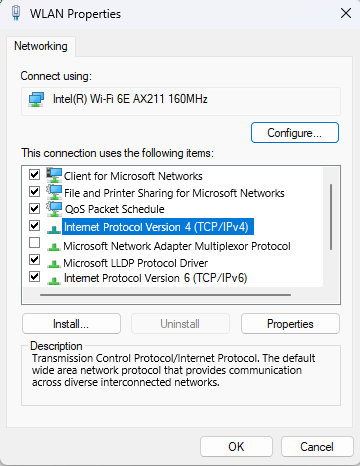 (4) Configure the network IP address as shown in the figure below, and click "OK". Then the local network setting is completed.
Open the teach pendant as follows:
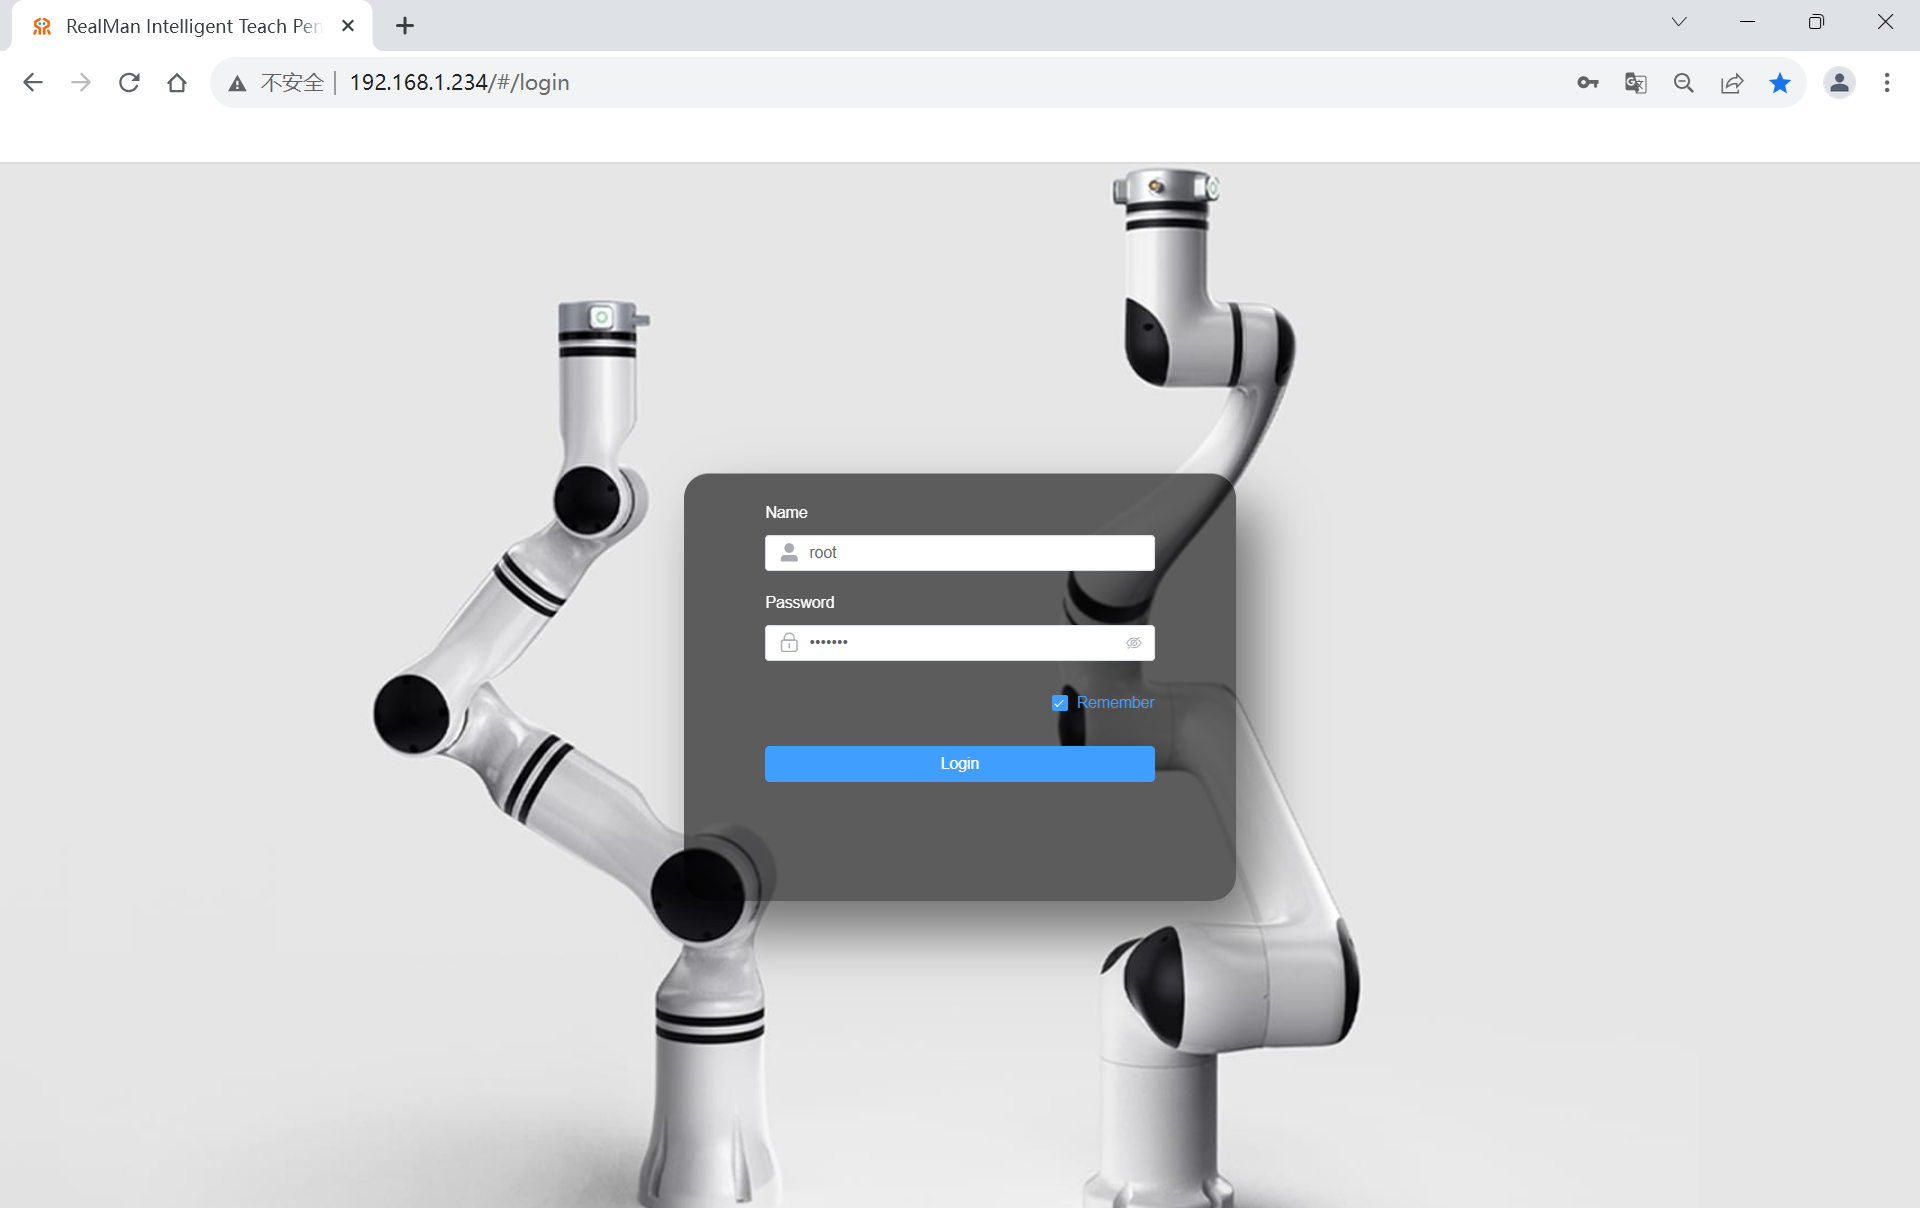
(1) Open a browser and enter the website "192.168.1.18".(2) Enter the account number "user" and password "123", and click "Login".
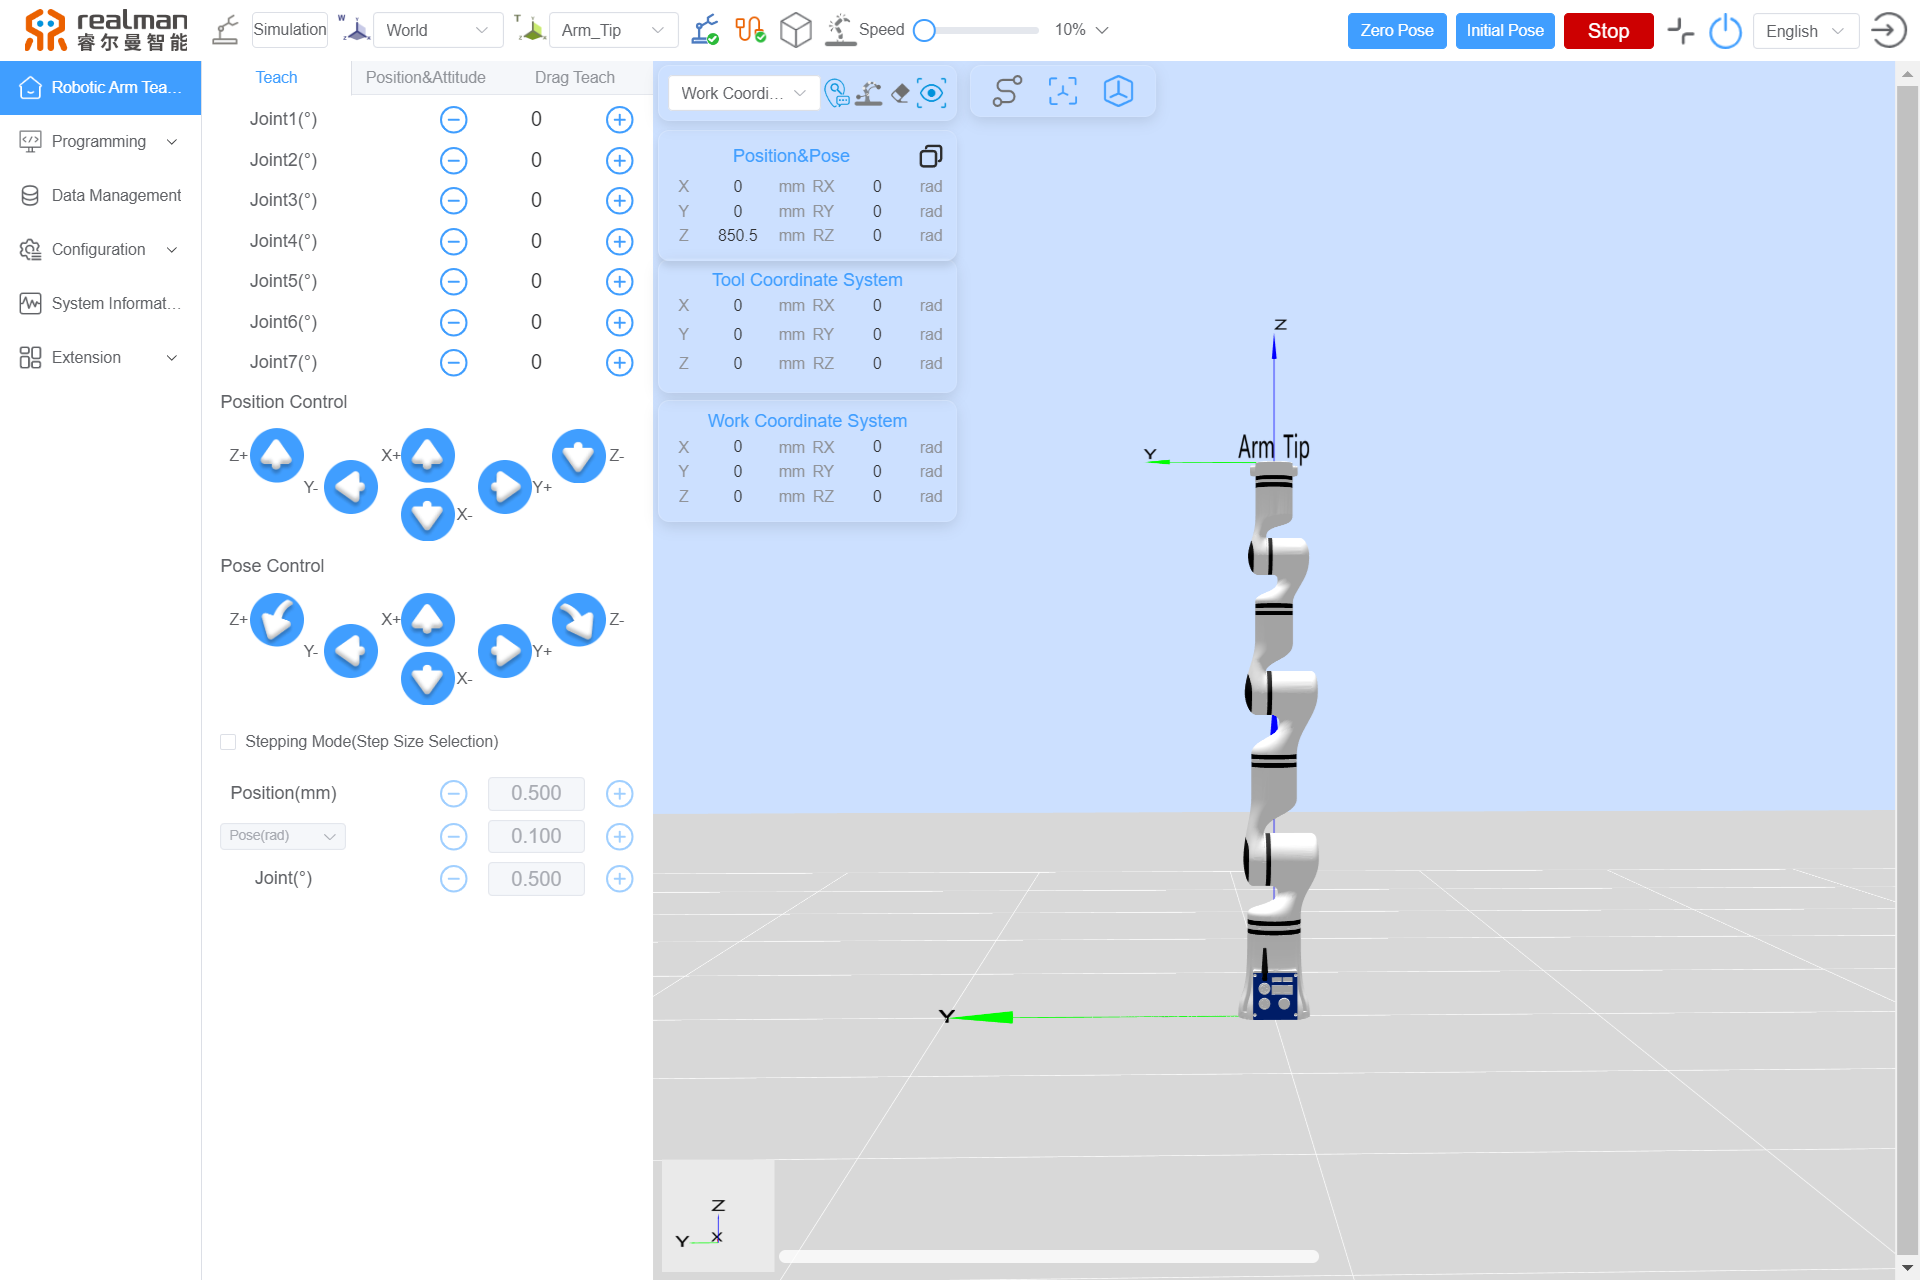
 (3) Open the robotic arm teaching interface.
Wireless connection:
Users connect their host computers to the WiFi access point of robotic arm.
WiFi connection The default name format of WiFi access point is as shown in the figure below. The password is "12345678" by default:

Open the teach pendant as follows:
(1) Open a browser, and if the connection is made through the wireless access point, enter the website "192.168.33.80".
(2) Enter the account number "user" and password "123", and click "Login". (3) Open the robotic arm teaching interface.
5. Description of teach pendant interface
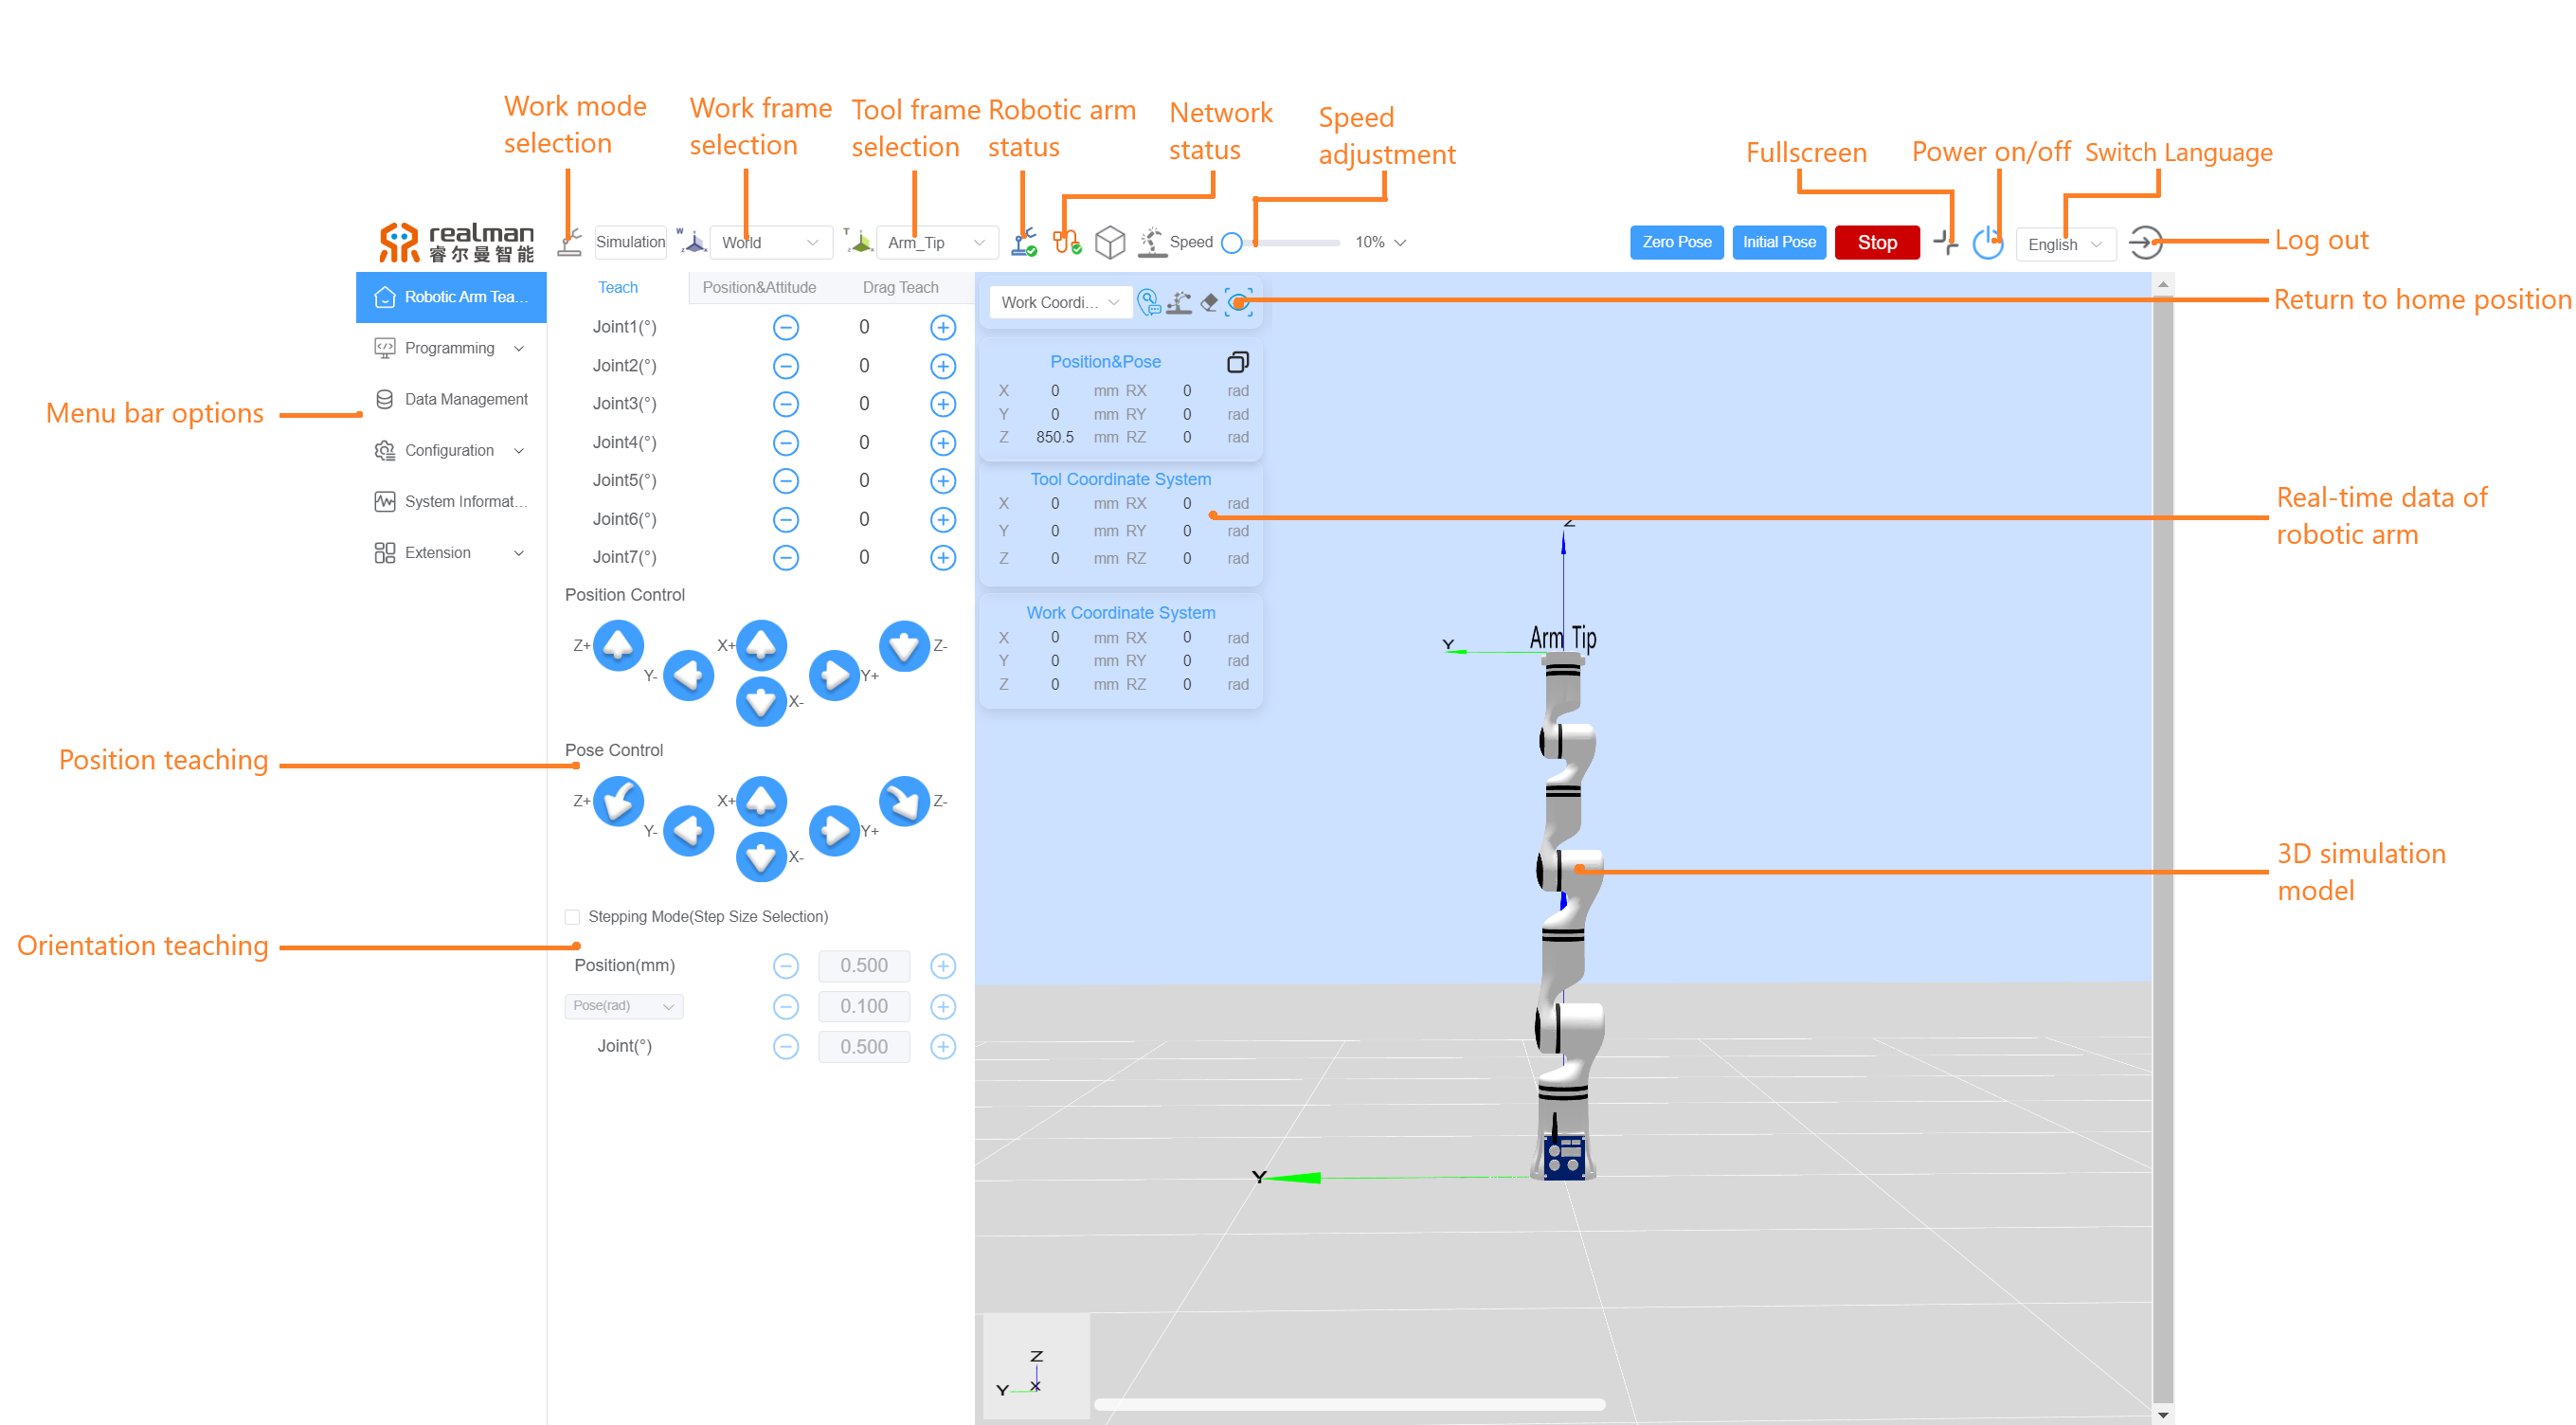
TIP
If the page is stuck when connecting the teach pendant for the first time or after program upgrade, you can refresh the page by pressing "Ctrl+F5".
6. Drag teaching
There are two buttons on the end flange housing of robotic arm, which are intended to control the drag teaching and trajectory reproduction respectively. 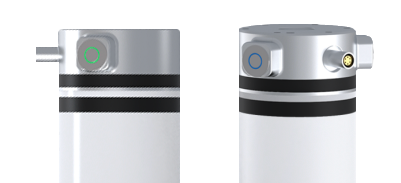
- By long pressing the green button at the end of robotic arm, the robotic arm will become draggable, and the trajectory will be recorded in real time automatically during the dragging process. Trajectory recording will be completed as long as the green button is released.
- By short pressing the blue button at the end of the robotic arm, the robotic arm will automatically return to the starting position of the trajectory and reproduce the trajectory once (the robotic arm reproduces only the finally recorded drag trajectory).
- By long pressing the blue button at the end of robotic arm, the robotic arm to start the arm moving to the initial position. Release to stop.
Here is just simple description of teaching motion control. For more details, refer to the Guide to Use of Web Teach Pendant of Realman Robotic Arm. For further secondary development, refer to the interface instructions open to users at the website.
7. Power-off of robot
- Press the power switch to make it pop up and close.
- Turn off the 24 V DC power supply to the robot.

