ROS2:
Introduction to the Rm_driver Package The rm_driver package, as an important part of the ROS2 package of the robotic arm, is intended to communicate and control the robotic arm through the ROS2.
The package will be introduced in detail from the following three aspects with different purposes:
- Package application: Learn how to use the package.
- Package structure description: Understand the composition and function of files in the package.
- Package topic description: Know the topics of the package for easy development and use.
Code link: https://github.com/RealManRobot/ros2_rm_robot/tree/humble/rm_driver
1. Application of the rm_driver package
1.1 Basic use of the package
The node can be started directly by the following command to control the robotic arm.
TIP
The current control is based on the fact that the IP address of the robotic arm is still 192.168.1.18 without change.
ros2 launch rm_driver rm_<arm_type>_driver.launch.pyGenerally, the above <arm_type> is required for the actual type of the robotic arm and optional for 65, 63, 63_III, ECO65, ECO63, 75, and GEN72.
After the underlying driver is started successfully, the following screen will pop up. 
1.2 Advanced use of the package
If the IP address of the robotic arm is changed, the start command will be invalid, so it will fail to connect to the robotic arm by directly executing the above command. However, you can re-establish the connection by modifying the following configuration file.
The configuration file is located in the config folder of the rm_driver package. 
The configuration file is as follows:
rm_driver:
  ros__parameters:
    #robot param
    arm_ip: "192.168.1.18"        # Set the IP address for the TCP connection
    tcp_port: 8080#               # Set the port for the TCP connection

    arm_type: "RM_65"             # set the robotic arm model
    arm_dof: 6                    # Set the degree of freedom of the robotic arm

    udp_ip: "192.168.1.10"        # set the udp active reporting IP address
    udp_cycle: 5                  # the active reporting cycle of UDP, which needs to be a multiple of 5.
    udp_port: 8089                # Set the udp active reporting port
    udp_force_coordinate: 0       # Set the base coordinate of the six-axis force when the system is forced, where 0 is the sensor coordinate system, 1 is the current work coordinate system, and 2 is the current tool coordinate system
    udp_hand: false               # Set the udp hand reporting enable
    udp_plus_base: false          # Set the udp plus base reporting enable
    udp_plus_state: false         # Set the udp plus state reporting enable
    udp_joint_speed_state: true   # Enable active reporting of joint speed
    udp_lift_state: false         # Enable active reporting of the lifting joint
    udp_expand_state: false       # Enable active reporting of the expansion joint
    udp_arm_current_status: false # Enable active reporting of the robotic arm status
    udp_aloha_state: false        # Enable active reporting of the aloha status

    trajectory_mode: 0            #When the high following mode is set, multiple modes are supported, including 0- complete transparent transmission mode, 1- curve fitting mode and 2- filtering mode.
    radio: 0                     #Set the smoothing coefficient in curve fitting mode (range 0-100) or the filter parameter in filtering mode (range 0-1000). The higher the value, the better the smoothing effect.
    arm_joints: ["joint1", "joint2", "joint3", "joint4", "joint5", "joint6"]
The main parameters are as follows.
- arm_ip: This parameter represents the current IP of the robotic arm
- tcp_port: set the port when TCP is connected.
- arm_type: This parameter represents the current model of the robotic arm. The parameters that can be selected are RM_65 (65 series), RM_eco65 (ECO65 series), RM_eco63 (ECO63 series), RM_63 (63 series),GEN_72 (GEN72 series) and RM_75 (75 series).
- arm_dof: set the degree of freedom of the robotic arm. 6 is 6 degrees of freedom, and 7 is 7 degrees of freedom.
- udp_ip: set the udp active reporting IP address.
- udp_cycle: the active reporting cycle of UDP, which needs to be a multiple of 5.
- udp_port: set the udp active reporting port.
- udp_force_coordinate: set the base coordinate of the six-axis force when the system is forced, where 0 is the sensor coordinate system (original data), 1 is the current work coordinate system, and 2 is the current tool coordinate system.
- udp_hand: Enable UDP active reporting for dexterous hand.
- udp_plus_base: Enable UDP active reporting for end-effector basic information.
- udp_plus_state: Enable UDP active reporting for end-effector real-time information.
- udp_joint_speed_state: Enable active reporting of joint speed.
- udp_lift_state: Enable active reporting of lift joint status.
- udp_expand_state: Enable active reporting of expansion joint status.
- udp_arm_current_status: Enable active reporting of robotic arm status.
- udp_aloha_state: Enable active reporting of aloha status.
- trajectory_mode:When the high following mode is set, multiple modes are supported, including 0- complete transparent transmission mode, 1- curve fitting mode and 2- filtering mode.
- radio:Set the smoothing coefficient in curve fitting mode (range 0-100) or the filter parameter in filtering mode (range 0-1000). The higher the value, the better the smoothing effect.
- In practice, we choose the corresponding launch file to start, which will automatically select the correct model. If there are special requirements, you can modify the corresponding parameters here. After modification, recompile the configuration in the workspace directory, and then the modified configuration will take effect.
- Run the colcon build command in the workspace directory.
colcon build- After the build succeeds, the package can be started by the above commands.
2. Structure description of the rm_driver package
├── CMakeLists.txt             #Build rule file
├── config                         #Configuration folder
│   ├── rm_63_config.yaml          #RML63 configuration file
│   ├── rm_65_config.yaml          #RM65 configuration file
│   ├── rm_75_config.yaml          #RM75 configuration file
│   ├── rm_eco65_config.yaml       #ECO65 configuration file
│   ├── rm_eco63_config.yaml      # ECO63 configuration file
│   └── rm_gen72_config.yaml       #GEN72 configuration file
├── doc
│   ├── RealMan Robotic Arm rm_driver Topic Detailed Description (ROS2).md
│   ├── rm_driver1.png
│   ├── rm_driver2.png
│   ├── rm_driver3.png
│   ├── rm_driver4.png
│   └── RealMan robotic arm ROS2 rm_driver description.md
├── include                         #Dependency header file folder
│   └── rm_driver
│       ├── cJSON.h                #API header file
│       ├── constant_define.h      #API header file
│       ├── rman_int.h             #API header file
│       ├── rm_base_global.h       #API header file
│       ├── rm_base.h              #API header file
│       ├── rm_define.h            #API header file
│       ├── rm_driver.h            #rm_driver.cpp header file
│       ├── rm_praser_data.h       #API header file
│       ├── rm_queue.h             #API header file
│       ├── rm_service_global.h    #API header file
│       ├── rm_service.h           #API header file
│       └── robot_define.h         #API header file
├── launch
│   ├── rm_63_driver.launch.py     #RML63 launch file
│   ├── rm_65_driver.launch.py     #RM65 launch file
│   ├── rm_75_driver.launch.py     #RM75 launch file
│   ├── rm_eco65_driver.launch.py  #ECO65 launch file
│   ├── rm_eco63_driver.launch.py  #ECO63 launch file
│   └── rm_gen72_driver.launch.py  #GEN72 launch file
├── lib
│   ├── libRM_Service.so -> libRM_Service.so.1.0.0        #API library file
│   ├── libRM_Service.so.1 -> libRM_Service.so.1.0.0      #API library file
│   ├── libRM_Service.so.1.0 -> libRM_Service.so.1.0.0    #API library file
│   ├── libRM_Service.so.1.0.0                            #API library file
│   ├── linux_arm_service_release_v4.3.7.t7.tar.bz2       # API library file
│   └── linux_x86_service_release_v4.3.7.t7.tar.bz2       # API library file
├── package.xml                         #Dependency declaration file
├── README_CN.md
├── README.md
└── src
    └── rm_driver.cpp                                     #Driver source code file
3. Topic description of the rm_driver package
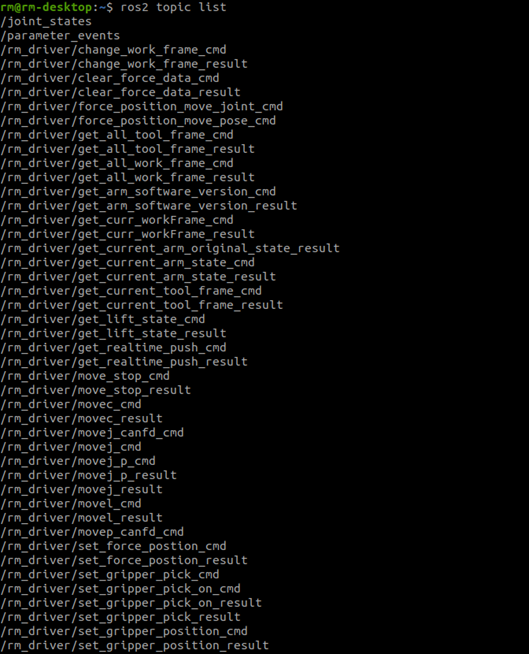
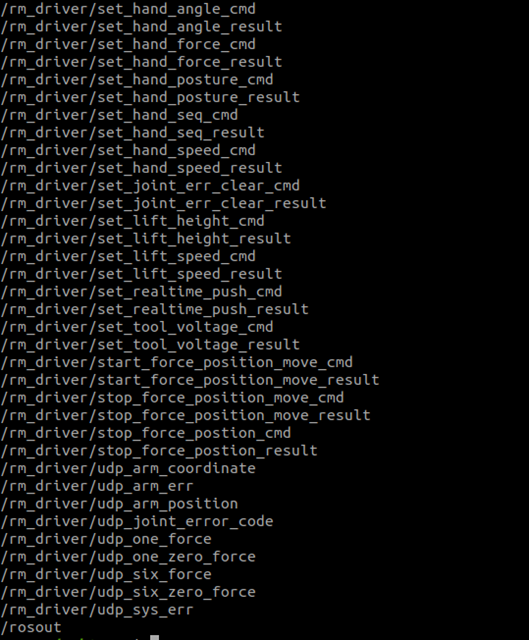
The rm_driver package has many topics to enable functions of the robotic arm based on the API. After the package runs, the topics are available by the following commands.
ros2 topic list


