

ROS2:
Introduction to the Rm_example Package The rm_example package is intended to enable the basic functions of the robotic arm and control the robotic arm, such as the joint motion, Cartesian space motion, and spline curve trajectory motion.
The package will be introduced in detail from the following three aspects with different purposes:
- Package application: Learn how to use the package.
- Package structure description: Understand the composition and function of files in the package.
- Package topic description: Know the topics of the package for easy development and use.
Code link: https://github.com/RealManRobot/ros2_rm_robot/tree/humble/rm_example
1. Application of the rm_example package
1.1 Changing the work frame
TIP
In actual use, replace <arm_type> in the command with the actual robotic arm model. Available robotic arm models include 65, 63, eco65, eco63, 75, and rx75.
First, run the underlying driver node
rm_driverfor the robotic arm.ros2 launch rm_driver rm_<arm_type>_driver.launch.pyFor example, the launch command for the 65 robotic arm is:
ros2 launch rm_driver rm_65_driver.launch.pyAfter the node starts successfully, execute the following command to run the node for switching the work frame.
ros2 run rm_example rm_change_work_frameThe following output indicates that the switch was successful:

You can enter the following commands in the terminal for verification.
a. First, subscribe to the current work frame topic:
ros2 topic echo /rm_driver/get_curr_workFrame_resultb. Then publish a request for the current work frame.
ros2 topic pub --once /rm_driver/get_curr_workFrame_cmd std_msgs/msg/Empty "{}"You can then see the following output in the terminal.

1.2 Getting the current state of the robotic arm
TIP
In actual use, replace <arm_type> in the command with the actual robotic arm model. Available robotic arm models include 65, 63, eco65, eco63, 75, and rx75.
First, run the underlying driver node
rm_driverfor the robotic arm.ros2 launch rm_driver rm_<arm_type>_driver.launch.pyFor example, the launch command for the 65 robotic arm is:
ros2 launch rm_driver rm_65_driver.launch.pyAfter the node starts successfully, execute the following command to run the node for obtaining the current state of the robotic arm.
ros2 run rm_example rm_get_stateThe following output indicates that the command was executed successfully.

The interface displays the current joint angle information of the robotic arm, as well as the current end-effector Cartesian position and Euler angle orientation information.
1.3 MoveJ
You can control the robotic arm to perform MoveJ joint motion using the following commands.
TIP
In actual use, replace <arm_type> in the command with the actual robotic arm model. Available robotic arm models include 65, 63, eco65, eco63, 75, and rx75.
First, run the underlying driver node
rm_driverfor the robotic arm.ros2 launch rm_driver rm_<arm_type>_driver.launch.pyFor example, the launch command for the 65 robotic arm is:
ros2 launch rm_driver rm_65_driver.launch.pyAfter the node starts successfully, execute the following command to control the robotic arm motion.
ros2 launch rm_example rm_<dof>_movej.launch.pyTIP
The
dofin the command represents the current DOF (Degrees of Freedom) of the robotic arm. Available options are6dof,7dof, and7dof_dual.For example, to launch a 7-DOF robotic arm, use the following command:
ros2 launch rm_example rm_7dof_movej.launch.pyFor a dual-arm robotic arm, use the following command:
ros2 launch rm_example rm_7dof_dual_movej.launch.py
After successful execution, the joints of the robotic arm will rotate, and the interface will display the following information.

1.4 MoveJ_P
You can control the robotic arm to perform MoveJ_P joint motion using the following commands.
TIP
In actual use, replace <arm_type> in the command with the actual robotic arm model. Available robotic arm models include 65, 63, eco65, eco63, 75, and rx75.
First, run the underlying driver node
rm_driverfor the robotic arm.ros2 launch rm_driver rm_<arm_type>_driver.launch.pyFor example, the launch command for the 65 robotic arm is:
ros2 launch rm_driver rm_65_driver.launch.pyAfter the node starts successfully, execute the following command to control the robotic arm motion.
ros2 run rm_example movejp_demoTIP
If the robotic arm model is GEN72, use the following command instead.
ros2 run rm_example movejp_gen72_demoAfter successful execution, the following prompt will appear on the interface, and the robotic arm will move to the specified pose.

1.5 MoveL
You can control the robotic arm to perform MoveL motion using the following commands.
TIP
In actual use, replace <arm_type> in the command with the actual robotic arm model. Available robotic arm models include 65, 63, eco65, eco63, 75, and rx75.
First, run the underlying driver node
rm_driverfor the robotic arm.ros2 launch rm_driver rm_<arm_type>_driver.launch.pyFor example, the launch command for the 65 robotic arm is:
ros2 launch rm_driver rm_65_driver.launch.pyAfter the node starts successfully, execute the following command to control the robotic arm motion.
ros2 run rm_example movel_demoTIP
If the robotic arm model is GEN72, use the following command instead.
ros2 run rm_example movel_gen72_demoAfter successful execution, the following prompt will appear on the interface, and the robotic arm will perform two motions. First, it will move to the specified pose through MoveJP motion, and then perform MoveL motion.

2. Structure description of the rm_example package
The current rm_example package consists of the following files.
├── CMakeLists.txt                               #Build rule file
├── doc
│   ├── rm_example10.png
│   ├── rm_example11.png
│   ├── rm_example1.png
│   ├── rm_example2.png
│   ├── rm_example3.png
│   ├── rm_example4.png
│   ├── rm_example5.png
│   ├── rm_example6.png
│   ├── rm_example7.png
│   ├── rm_example8.png
│   └── rm_example9.png
├── launch
│   ├── rm_6dof_movej.launch.py                 #6 DoF MoveJ launch file
│   ├── rm_7dof_dual_movej.launch.py            #7 DoF dual-arm MoveJ launch file
│   └── rm_7dof_movej.launch.py                 #7 DoF MoveJ launch file
├── package.xml
└── src
    ├── api_ChangeWorkFrame_demo.cpp        #Source file of changing the work frame
    ├── api_Get_Arm_State_demo.cpp          #Source file of getting the state of the robotic arm
    ├── api_MoveJ_demo.cpp                  #MoveJ source file
    ├── api_MoveJP_demo.cpp                 #MoveJ_P source file
    ├── api_MoveJP_Gen72_demo.cpp           #MoveJ_P source file for GEN72
    └── api_MoveL_demo.cpp                  #MoveL source file
    └── api_MoveL_Gen72_demo.cpp            #MoveL source file for GEN72
3. Topic description of the rm_example package
3.1 Description of rm_change_work_frame
The data communication diagram of this node is as follows:  From the diagram, the main communication topics between the /changeframe node and /rm_driver are /rm_driver/change_work_frame_result and /rm_driver/change_work_frame_cmd. The /rm_driver/change_work_frame_cmd indicates the change request and publishes the target frame, and the /rm_driver/change_work_frame_result indicates the change result.
3.2 Description of rm_get_state
The data communication diagram of this node is as follows:  From the diagram, the main communication topics between the /get_state node and /rm_driver are /rm_driver/get_current_arm_state_cmd and /rm_driver/get_current_arm_original_state_result. The rm_driver/get_current_arm_state_cmd indicates the request for getting the current state of the robotic arm, and the /rm_driver/get_current_arm_original_state_result indicates the change result.
3.3 Description of moveJ_demo
The data communication diagram of this node is as follows:  From the diagram, the main communication topics between the /Movej_demo node and /rm_driver are /rm_driver/movej_cmd and /rm_driver/movej_result. The /rm_driver/movej_cmd indicates the request to control the motion of the robotic arm and publishes the radians of each joint to be moved, and the /rm_driver/ movej_result indicates the motion result.
3.4 Description of moveJ_P_demo
The data communication diagram of this node is as follows:  From the diagram, the main communication topics between the /Movejp_demo_node and /rm_driver are /rm_driver/movej_p_cmd and /rm_driver/movej_p_result. The /rm_driver/movej_p_cmd indicates the request to control the motion of the robotic arm and publishes the coordinates of the target point, and the /rm_driver/ movej_p_result indicates the motion result.
3.5 Description of moveL_demo
The data communication diagram of this node is as follows: 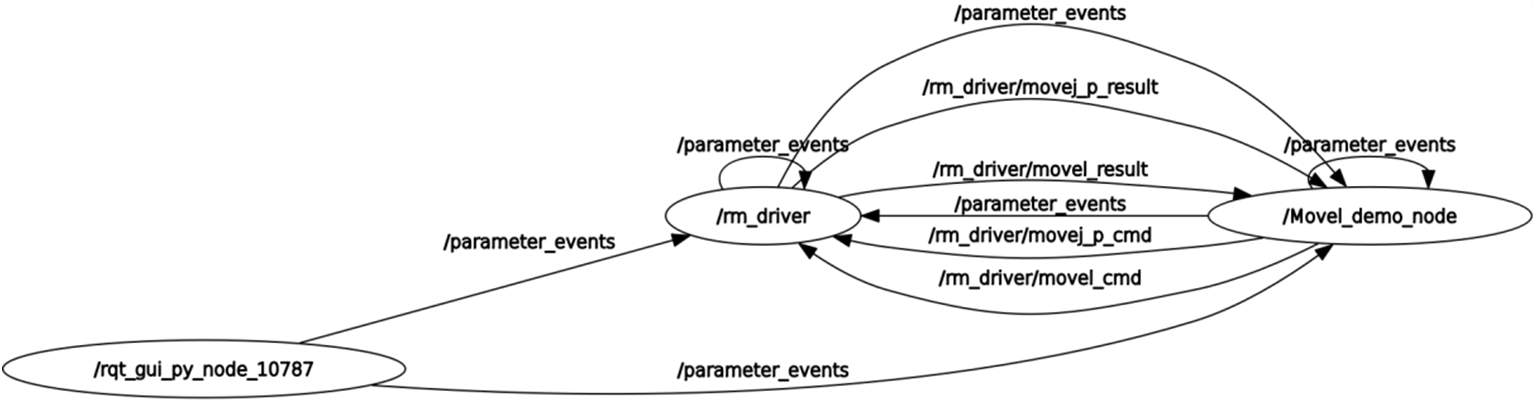 From the diagram, the main communication topics between the /Movel_demo_node and /rm_driver are /rm_driver/movej_p_cmd and /rm_driver/movej_p_result, as well as /rm_driver/movel_cmd and /rm_driver/movel_result. The /rm_driver/movej_p_cmd indicates the request to control the motion of the robotic arm and publishes the coordinates of the first target point, and the /rm_driver/ movej_p_result indicates the motion result. After reaching the first point, the /rm_driver/movel_cmd is executed to publish the pose of the second point for the robotic arm to reach it through linear motion, and the /rm_driver/movel_result indicates the motion result.